Passing Arguments
Building on the Previous Lesson
In Introduction to Navigation, we used fixed routes: "home" and "profile". Every time you went to Profile, that screen looked the same. In many apps you need to send data to the next screen—for example, which user's profile to show, or which product was tapped. This lesson adds navigation arguments: data you pass when you navigate so the destination screen can use it.
What’s different:
- Before: Route was a fixed string like
"profile". No data was sent. - Now: The route includes a placeholder (e.g.
"profile/{userName}"). When you navigate, you supply the value (e.g. the user’s name), and the Profile screen receives it and can display “Hello, Alex” instead of a generic message.
What Are Navigation Arguments?
Navigation arguments are values you attach to a navigation action. When the user goes from one screen to another, those values are available on the new screen. Typical uses: passing a user ID to a profile screen, a product ID to a detail screen, or a search query to a results screen. The data is passed once when you navigate; it doesn’t automatically update if something changes elsewhere (for that you’ll use state, which we cover later).
Types of Arguments
Arguments have types, just like variables. You declare the type so the navigation system knows how to parse and pass the value.
| Type | What It's For | Example Use |
|---|---|---|
| String | Text data | User names, messages |
| Int | Whole numbers | IDs, counts |
| Float | Decimal numbers | Prices, measurements |
| Boolean | True/False values | Settings, flags |
Expanding the first example to pass an argument
@Composable
fun AppNav(){
    val navController = rememberNavController()
    NavHost(navController = navController, startDestination = "home"){
        composable("home") {
            HomeScreen(onNavigateToProfile = {
                navController.navigate("profile/$it") {
                    launchSingleTop = true
                }
            })
        }
        composable(
            route = "profile/{userName}",
            arguments = listOf(
                navArgument("userName") { type = NavType.StringType }
            )
        ) { backStackEntry ->
            val username = backStackEntry.arguments?.getString("userName")
            ProfileScreen(
                userName = username,
                onBack = { navController.popBackStack() }
            )
        }
    }
}

@Composable
fun HomeScreen(onNavigateToProfile: (String) -> Unit) {
    var name by remember { mutableStateOf("") }
    Column(
        modifier = Modifier
            .fillMaxSize()
            .systemBarsPadding(),
        horizontalAlignment = Alignment.Start
    ) {
        OutlinedTextField(
            value = name,
            onValueChange = { name = it },
            label = { Text("Your Name") }
        )
        Button(onClick = { onNavigateToProfile(name) }, enabled = name.isNotBlank()) {
            Text("Go to Profile")
        }
        Spacer(modifier = Modifier.height(16.dp))
        Text(
            "This is the home page",
            modifier = Modifier.padding(16.dp)
        )
    }
}

@Composable
fun ProfileScreen(userName: String?, onBack: () -> Unit) {
    Column(
        modifier = Modifier
            .fillMaxSize()
            .systemBarsPadding(),
        horizontalAlignment = Alignment.Start
    ){
        Spacer(modifier = Modifier.height(16.dp))
        Button(onClick = onBack) {
            Text("Back to Home")
        }
        Spacer(modifier = Modifier.height(16.dp))
        Text(
            "Hello, $userName, This is the profile page",
            modifier = Modifier.padding(16.dp)
        )
    }
}
Here’s how it works compared to the intro lesson. You still use NavHost, composable(), and navController.navigate(). The new pieces are: a route with a placeholder, declaring the argument type, passing the value when navigating, and reading it in the destination.
1. Route with a placeholder
Instead of composable("profile"), you use something like composable("profile/{userName}"). The part in curly braces is the argument name. When you navigate to "profile/Alex", the system will match this route and treat "Alex" as the value for userName.
2. Declare the argument type
Inside composable(...) you add an arguments list and tell the navigation system the type of each placeholder, e.g. navArgument("userName") { type = NavType.StringType }. That way it knows how to parse and pass the value safely.
3. Pass the value when navigating
From the Home screen, instead of navigate("profile"), you call something like navigate("profile/$name") where name is the actual string (e.g. from a text field). So the full route might be "profile/Alex". The destination that matches "profile/{userName}" will receive "Alex" as userName.
4. Read the argument in the destination
The composable block receives a parameter (often named backStackEntry). That object represents the current screen in the navigation stack—it’s not about “going back,” it’s the current destination’s information. From it you get the arguments: backStackEntry.arguments?.getString("userName"). You then pass that value into your screen composable (e.g. ProfileScreen(userName = username, ...)). Always handle the case where the value might be null (e.g. use String? and null checks or a default).
Full runnable code: chapter9 passingArgs.kt on the GitHub examples repo.
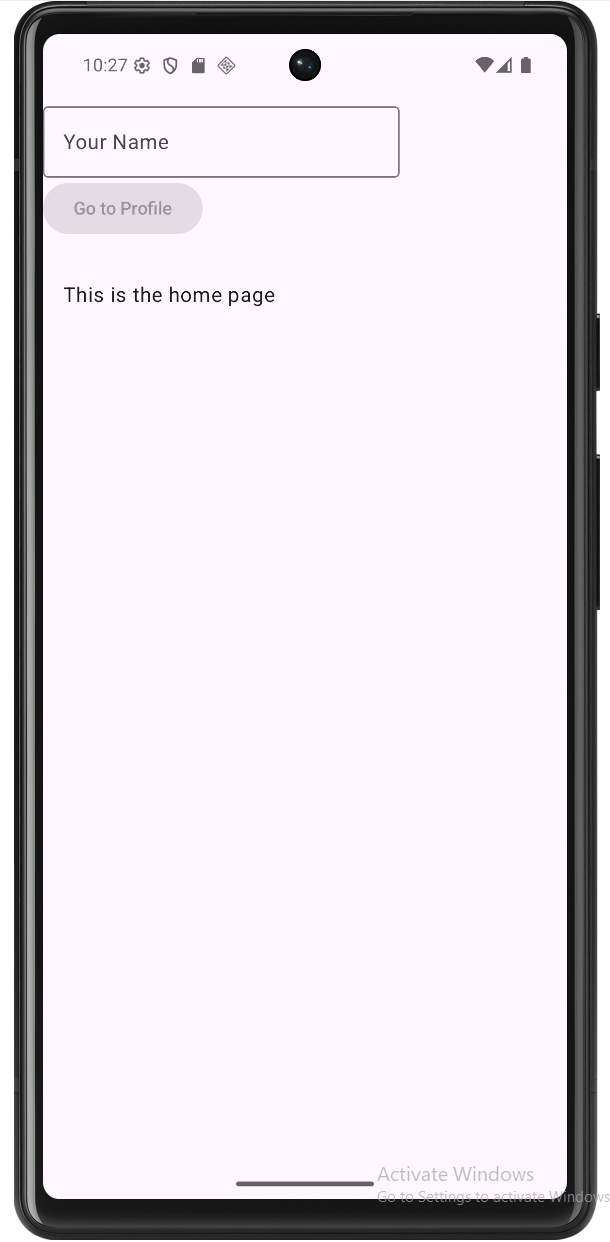
How This Example Renders
Below: home screen where the user enters a name, then the profile screen showing that name. Full code is in chapter9 passingArgs.kt on GitHub.


Multiple Arguments
You can pass more than one value. The route lists multiple placeholders, e.g. "product/{id}/{name}". You define each in the arguments list with its own type (NavType.IntType, NavType.StringType, etc.). When navigating, you build the route with all values in order, e.g. navigate("product/$id/$name"). In the destination you read each from backStackEntry.arguments (e.g. getInt("id"), getString("name")).
Example: Multiple arguments
@Composable
fun NavigationWithMultipleArgs() {
    val navController = rememberNavController()

    NavHost(
        navController = navController,
        startDestination = "home"
    ) {
        composable("home") {
            HomeScreen(
                onNavigateToProduct = { id, name ->
                    navController.navigate("product/$id/$name")
                }
            )
        }
        composable(
            "product/{id}/{name}",
            arguments = listOf(
                navArgument("id") { type = NavType.IntType },
                navArgument("name") { type = NavType.StringType }
            )
        ) { backStackEntry ->
            val id = backStackEntry.arguments?.getInt("id")
            val name = backStackEntry.arguments?.getString("name")
            ProductScreen(
                id = id,
                name = name,
                onNavigateBack = {
                    navController.popBackStack()
                }
            )
        }
    }
}

@Composable
fun HomeScreen(onNavigateToProduct: (Int, String) -> Unit) {
    Column(
        modifier = Modifier
            .fillMaxSize()
            .padding(16.dp)
            .padding(top = 50.dp),
        horizontalAlignment = Alignment.CenterHorizontally,
        verticalArrangement = Arrangement.spacedBy(8.dp)
    ) {
        Text(
            text = "Available Products",
            modifier = Modifier.padding(bottom = 16.dp)
        )

        val products = listOf(
            Product(1, "Smartphone"),
            Product(2, "Laptop"),
            Product(3, "Headphones"),
            Product(4, "Tablet")
        )

        products.forEach { product ->
            Button(
                onClick = { onNavigateToProduct(product.id, product.name) },
                modifier = Modifier.fillMaxWidth()
            ) {
                Text("View ${product.name}")
            }
        }
    }
}

@Composable
fun ProductScreen(
    id: Int?,
    name: String?,
    onNavigateBack: () -> Unit
) {
    Column(
        modifier = Modifier
            .fillMaxSize()
            .padding(16.dp)
            .padding(top = 50.dp),
        horizontalAlignment = Alignment.CenterHorizontally,
        verticalArrangement = Arrangement.spacedBy(16.dp)
    ) {
        Text(
            text = "Product Details",
            modifier = Modifier.padding(bottom = 8.dp)
        )

        if (id != null && name != null) {
            Text("Product ID: $id")
            Text("Product Name: $name")
        } else {
            Text("Error: Product information not available")
        }

        Button(
            onClick = onNavigateBack,
            modifier = Modifier.padding(top = 16.dp)
        ) {
            Text("Back to Products")
        }
    }
}

data class Product(
    val id: Int,
    val name: String
)
What this example is doing
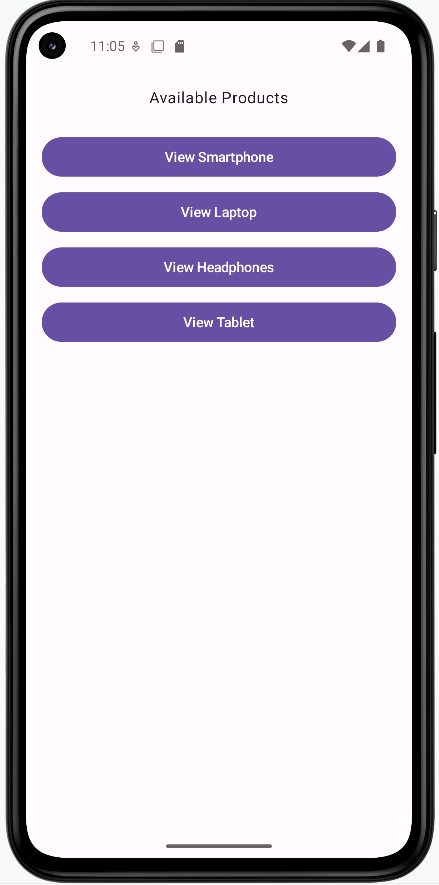
The app has two screens: a Home screen that shows a list of products, and a Product screen that shows details for the one the user tapped. We need to pass two pieces of data—both the product’s ID (a number) and its name (text)—so the detail screen knows what to show.
On the Home screen, we build a simple list of products (Smartphone, Laptop, Headphones, Tablet), each with an id and a name. Each item is a button. When the user taps “View Smartphone,” we call onNavigateToProduct(1, "Smartphone"), which triggers navigate("product/1/Smartphone"). So the route string includes both values in order: id first, then name.
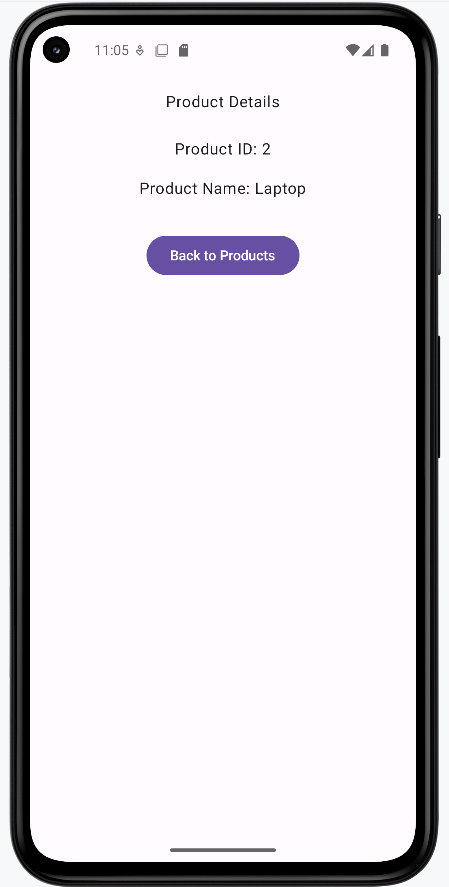
The route "product/{id}/{name}" has two placeholders, and we declare both in the arguments list—id as IntType and name as StringType. In the composable, we read them with getInt("id") and getString("name"), then pass them into ProductScreen. The detail screen checks that both are not null; if they are, it shows an error message. Otherwise it displays the product ID and name and provides a “Back to Products” button that calls popBackStack().
Full example: chapter9 multiple.kt on GitHub.
How the Multiple-Argument Example Renders
See chapter9 multiple.kt on GitHub for the full code.
Optional Arguments
Sometimes a value isn’t always required. You make an argument optional by giving it a defaultValue in its navArgument block. In the route pattern, the part after the ? is the query; arguments in the query can be optional when you provide a default. For example, profile/{userId}?showDetails={showDetails} has a required path argument userId and an optional query argument showDetails. In the example below, a home screen has two buttons: one navigates to the profile with only the user ID (so showDetails is omitted and defaults to false), and the other navigates with the user ID plus showDetails=true. The same profile screen then shows either a basic view or a detailed view depending on that optional argument.
Example: Optional argument
@Composable
fun AppNavWithOptionalArgs() {
val navController = rememberNavController()
NavHost(
navController = navController,
startDestination = "home"
) {
composable("home") {
HomeScreen(
onNavigateToProfileBasic = { userId ->
navController.navigate("profile/$userId") {
launchSingleTop = true
}
},
onNavigateToProfileWithDetails = { userId ->
navController.navigate("profile/$userId?showDetails=true") {
launchSingleTop = true
}
}
)
}
composable(
route = "profile/{userId}?showDetails={showDetails}",
arguments = listOf(
navArgument("userId") { type = NavType.StringType },
navArgument("showDetails") {
type = NavType.BoolType
defaultValue = false
}
)
) { backStackEntry ->
val userId = backStackEntry.arguments?.getString("userId")
val showDetails = backStackEntry.arguments?.getBoolean("showDetails") ?: false
ProfileScreen(
userId = userId,
showDetails = showDetails,
onNavigateBack = {
navController.popBackStack()
}
)
}
}
}
@Composable
fun HomeScreen(
onNavigateToProfileBasic: (String) -> Unit,
onNavigateToProfileWithDetails: (String) -> Unit
) {
Column(
modifier = Modifier
.fillMaxSize()
.systemBarsPadding()
.padding(16.dp),
horizontalAlignment = Alignment.Start,
verticalArrangement = Arrangement.spacedBy(12.dp)
) {
Text(
text = "Optional argument example",
modifier = Modifier.padding(bottom = 8.dp),
style = MaterialTheme.typography.titleMedium
)
Text(
text = "Choose how to view the profile:",
modifier = Modifier.padding(bottom = 8.dp)
)
Button(onClick = { onNavigateToProfileBasic("alex") }) {
Text("View profile (basic)")
}
Button(onClick = { onNavigateToProfileWithDetails("alex") }) {
Text("View profile (with details)")
}
Spacer(modifier = Modifier.height(16.dp))
Text(
text = "This is the home page.",
modifier = Modifier.padding(8.dp),
style = MaterialTheme.typography.bodySmall
)
}
}
@Composable
fun ProfileScreen(
userId: String?,
showDetails: Boolean,
onNavigateBack: () -> Unit
) {
Column(
modifier = Modifier
.fillMaxSize()
.systemBarsPadding()
.padding(16.dp),
horizontalAlignment = Alignment.Start,
verticalArrangement = Arrangement.spacedBy(12.dp)
) {
Text(
text = "Profile for user: $userId",
style = MaterialTheme.typography.titleMedium
)
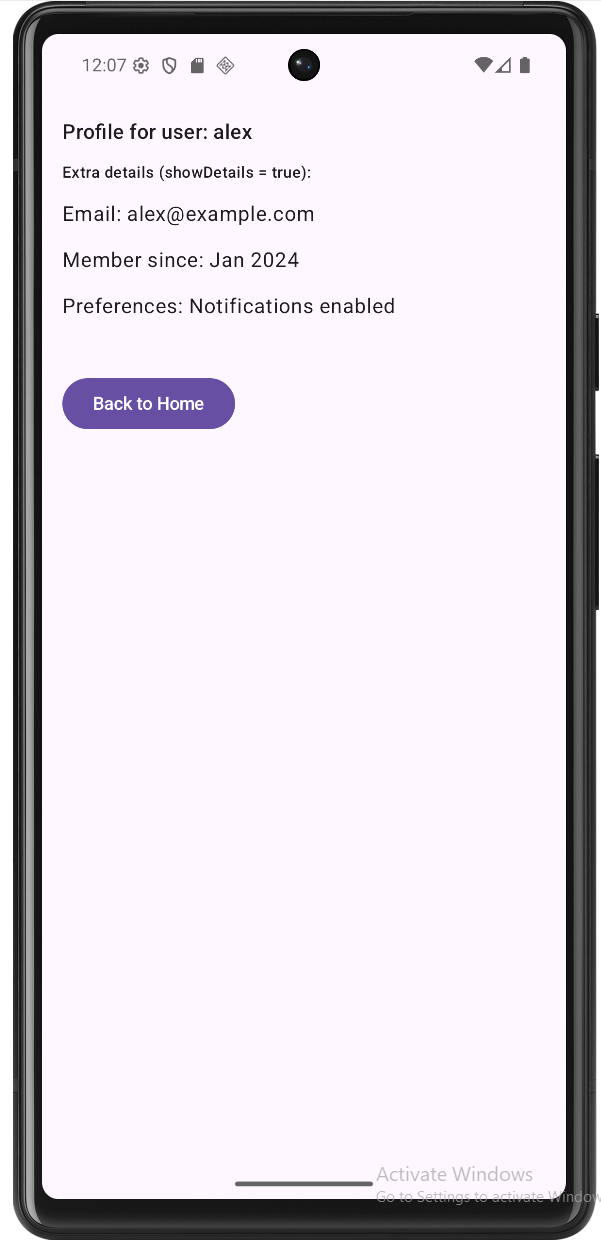
if (showDetails) {
Text(
text = "Extra details (showDetails = true):",
style = MaterialTheme.typography.labelMedium
)
Text(text = "Email: ${userId}@example.com")
Text(text = "Member since: Jan 2024")
Text(text = "Preferences: Notifications enabled")
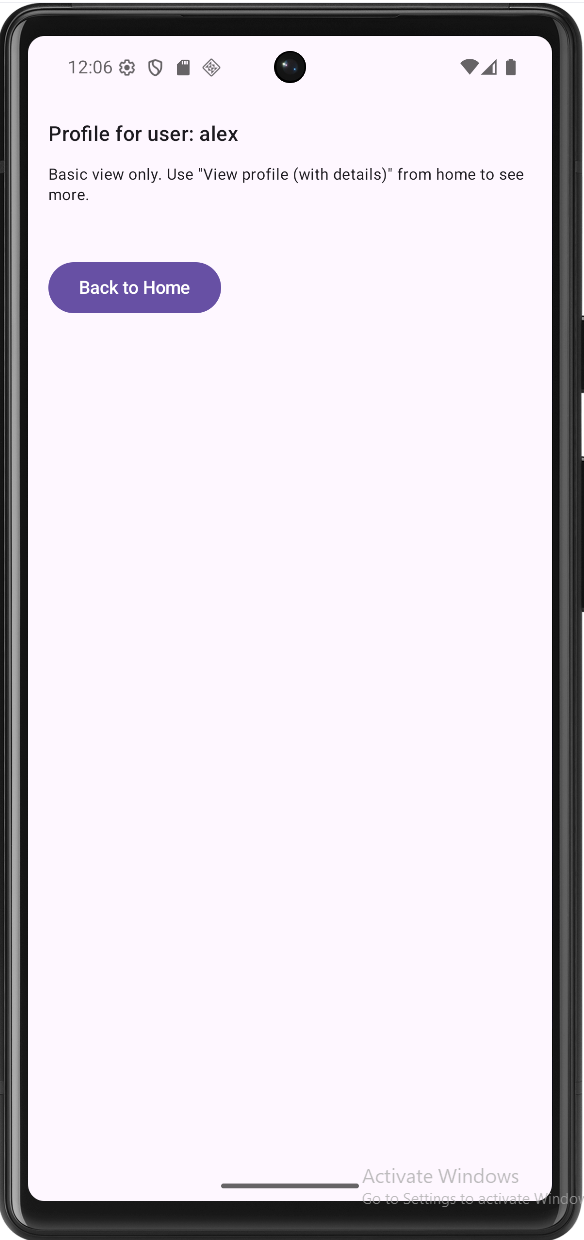
} else {
Text(
text = "Basic view only. Use \"View profile (with details)\" from home to see more.",
style = MaterialTheme.typography.bodySmall
)
}
Spacer(modifier = Modifier.height(16.dp))
Button(onClick = onNavigateBack) {
Text("Back to Home")
}
}
}What this example is doing
Overview. The app has a home screen and a profile screen. The profile screen is reached by a single route, profile/{userId}?showDetails={showDetails}. We can navigate to it in two different ways: with just the user ID (basic view) or with the user ID plus showDetails=true (detailed view). The profile screen then shows different content depending on whether showDetails was passed and what value it had.
The route pattern. The string "profile/{userId}?showDetails={showDetails}" has two parts. Everything before the ? is the path: profile/{userId}. So we must always pass a userId (e.g. "profile/alex"). The part after the ? is the optional query: showDetails={showDetails}. So we can call the route as "profile/alex" (no query) or "profile/alex?showDetails=true" (with the optional argument). When we don’t pass showDetails, we need a default—that’s why we set defaultValue = false in navArgument("showDetails"). The navigation system will then use false whenever the URL doesn’t include showDetails.
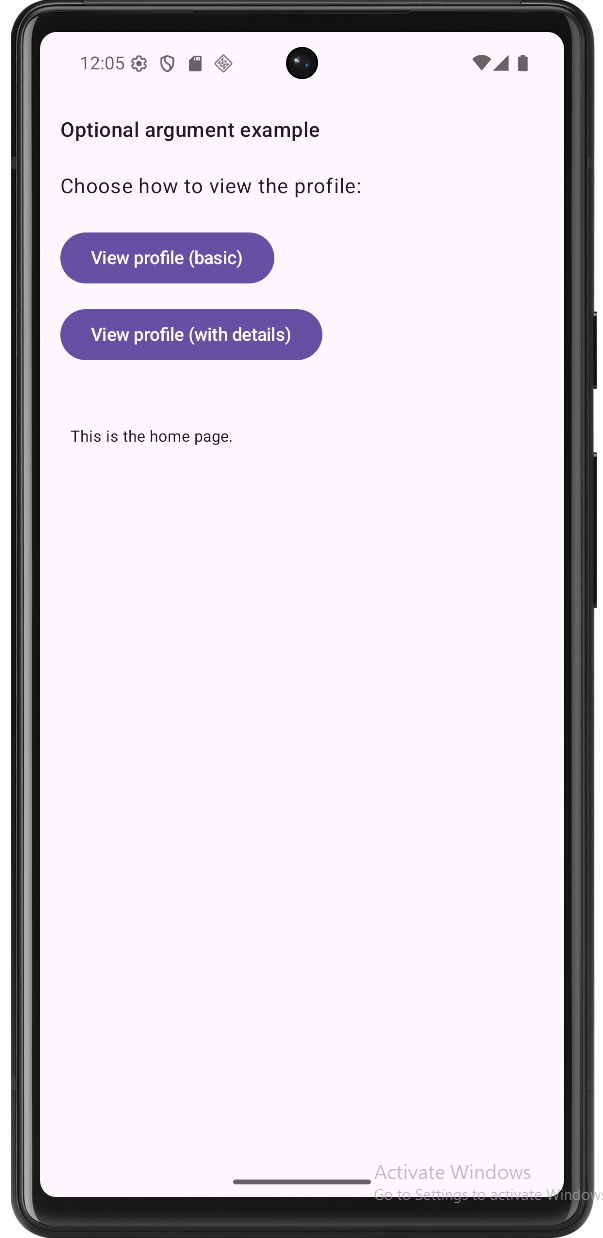
Home screen: two ways to navigate. HomeScreen has two buttons. “View profile (basic)” calls onNavigateToProfileBasic("alex"), which does navController.navigate("profile/alex"). So the route has no query, and showDetails will be false. “View profile (with details)” calls onNavigateToProfileWithDetails("alex"), which does navController.navigate("profile/alex?showDetails=true"). So the same profile route is used, but this time with the optional argument set to true. In both cases we’re going to the same composable (the profile destination); only the argument values differ.
Declaring and reading the arguments. In the composable(...) for the profile route we declare both arguments: userId as StringType (required), and showDetails as BoolType with defaultValue = false (optional). Inside the composable block we receive backStackEntry and read userId with getString("userId") and showDetails with getBoolean("showDetails") ?: false. The ?: false is a safety fallback so we always have a non-null Boolean to pass to ProfileScreen. We then call ProfileScreen(userId = userId, showDetails = showDetails, onNavigateBack = { ... }).
Profile screen: one screen, two layouts. ProfileScreen takes userId, showDetails, and onNavigateBack. It always shows “Profile for user: $userId”. Then it branches on showDetails: if showDetails is true, it shows the extra details (email, member since, preferences); if showDetails is false, it shows the short message “Basic view only…”. So one composable, one route, but two possible “modes” depending on the optional argument. The “Back to Home” button calls onNavigateBack, which runs popBackStack() to return to the home screen.
Full runnable example: chapter9 optional_argument.kt on GitHub.
Tips for Success
- Use clear, consistent argument names in the route and in
navArgument. - Always treat arguments as nullable when reading them and handle null safely.
- Keep routes and argument names in sync with your
navigate(...)calls.
Common Mistakes to Avoid
- Forgetting to declare the argument type in
arguments. - Passing arguments in the wrong order when you have multiple.
- Assuming the argument is never null instead of using safe calls or defaults.