Setting Up an Emulator
You will need to set up an emulator to run any of the applications built in this course. Running an emulator is taxing on your computer and your computer may not handle it well. The better method is to run it on a physical device. I realize many of you may not have a Android device and you are not required to get one. However, if you want one they are fairly inexpensive and can be found on Amazon or at any store that carries electronics.
Prerequisites
Ensure that you have Android Studio installed on your computer. You can download it from the official Android Developer website.
Step 1: Launch Android Studio
Open Android Studio on your computer and wait for it to load completely. If you have a project open, you can continue from there, or you can start a new project.
Step 2: Access the Device Manager
The Device Manager is where you manage your virtual devices.
- Navigate to Device Manager: You can access the Device Manager in one of the following ways:
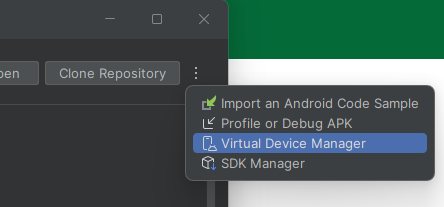
- In the intro screen of Android Studio click the three dots in the upper right corner and click Virtual Device Manager
- In the project view, click on the Device Manager icon in the toolbar on the top right of Android Studio

- In the project view, in the upper left corner there is a 4 line icon click on that to display the menu. Then go to Tools > Device Manager in the menu bar at the top.

- In the intro screen of Android Studio click the three dots in the upper right corner and click Virtual Device Manager
Step 3: Create a New Virtual Device
- Start the Creation Process: In the Device Manager window, click on the + button at the top left of the window. Then click "Create virtual device".
- Choose a Device: You will see a list of device definitions, from phones and tablets to Wear OS and TV devices. For example, select Pixel 6 under the Phone category and click Next.
- Select a System Image: You need to download a system image for the emulator.
- Choose a release name (e.g., Q) under the Recommended tab or other tabs like x86 Images or Other Images.
- Click on the Download link next to the system image (e.g., Q API 29) if it's not already downloaded. This process might take some time depending on your internet speed.
- After Downloading: Once the system image is downloaded, select it and click Next.
Step 4: Configure the Emulator
- Device Name: Give your device a name. For instance, you might name it "Pixel_6_API_29".
- Startup Orientation: Choose the orientation (Portrait or Landscape) in which to start the emulator. I used Portrait
- Advanced Settings (Optional I don't do this): Click on Show Advanced Settings to configure additional options like RAM, VM heap, Internal Storage, SD Card size, etc.
- Finish: Click on Finish to create your virtual device.
Step 5: Launch the Emulator
- Start Your emulator: Back in the Device Manager area, you will see your newly created device listed. Click on the green play button under the Actions column to start the emulator.
- Wait for Emulator to Boot: It may take a few minutes for the emulator to start up, especially the first time.
Step 6: Run Your Application
- Deploy an App: With the emulator running, you can now run your Android app. Go back to the main Android Studio window, select your project, and click on the Run button (a green triangle) in the toolbar.
- Select the Emulator: Choose your newly created device from the list of running devices and click OK. Android Studio will install and launch your app on the emulator.
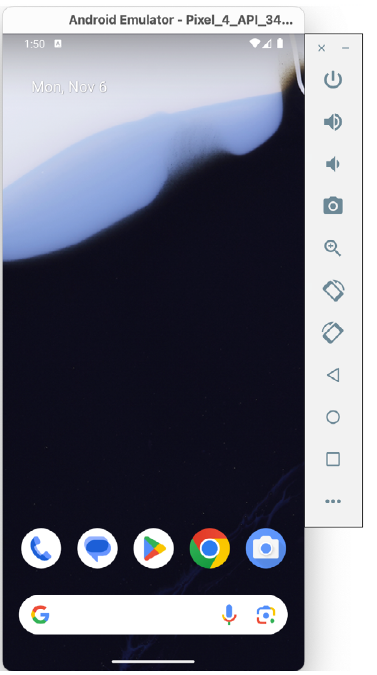
The Emulator Environment
When launched in standalone mode, the emulator displays an initial splash screen during loading. Once loaded, the main emulator window appears, showing the chosen device type (e.g., a Pixel 4 device). The toolbar on the right edge provides quick access to emulator controls and configuration options.
Emulator Toolbar Options
The emulator toolbar offers various options for the appearance and behavior of the emulator environment. Each button in the toolbar has a keyboard accelerator, identified by hovering the mouse pointer over the button for a tooltip or via the help option in the extended controls panel.
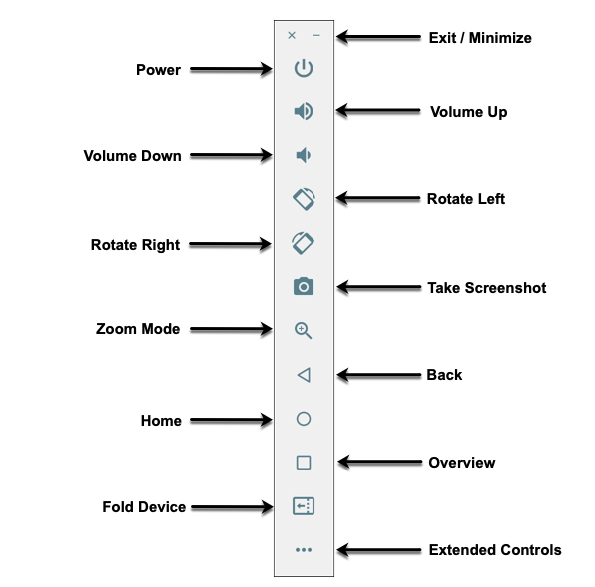
The toolbar options include:
- Exit / Minimize: The uppermost 'x' button exits the emulator session, while the '-' option minimizes the window.
- Power: Simulates the hardware power button on a physical device.
- Volume Up / Down: Controls the audio volume.
- Rotate Left/Right: Rotates the emulated device between portrait and landscape.
- Take Screenshot: Captures the screen content and saves it as specified in the settings.
- Zoom Mode: Toggles zoom mode on and off.
- Back: Performs the standard Android “Back” navigation.
- Home: Displays the home screen.
- Overview: Displays the currently running apps.
- Fold Device: Simulates the folding and unfolding of a foldable device.
- Extended Controls: Opens the extended controls panel for further configuration.
Working in Zoom Mode
The zoom button located in the emulator toolbar switches in and out of zoom mode. When zoom mode is active, the toolbar button is depressed, and the mouse pointer appears as a magnifying glass when hovering over the device screen. Clicking the left mouse button will cause the display to zoom in relative to the selected point on the screen, with repeated clicking increasing the zoom level. Conversely, clicking the right mouse button decreases the zoom level. Toggling the zoom button off reverts the display to the default size.
Clicking and dragging while in zoom mode will define a rectangular area into which the view will zoom when the mouse button is released.
While in zoom mode, the screen's visible area may be panned using the horizontal and vertical scrollbars located within the emulator window.
Resizing the Emulator Window
The emulator window size can be changed by enabling zoom mode and dragging the corners or sides of the window.
Extended Control Options
The extended controls toolbar button opens a panel with various settings:
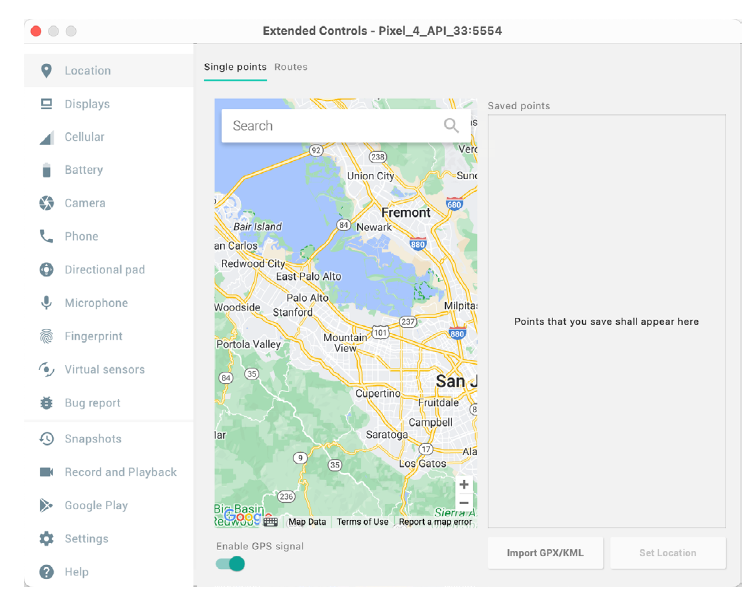
- Location: Sends simulated location information to the emulator.
- Displays: Adds additional displays within the same Android instance.
- Cellular: Changes the simulated cellular connection type.
- Battery: Simulates battery state and charging conditions.
- Camera: Simulates a 3D scene for the camera.
- Phone: Simulates incoming calls and text messages.
- Directional Pad: Simulates D-Pad interaction.
- Microphone: Enables the microphone and simulates virtual connections.
- Fingerprint: Configures fingerprint authentication.
- Virtual Sensors: Simulates accelerometer and magnetometer effects.
- Snapshots: Saves and restores the emulator state.
- Record and Playback: Records the emulator screen and audio.
- Google Play: Displays the current Google Play version and update options.
- Settings: Provides configuration options for the emulator appearance and behavior.
- Help: Contains keyboard shortcuts, links to documentation, bug reporting, and emulator version information.
Working with Snapshots
When an emulator starts for the first time, it performs a cold boot, much like a physical Android device when powered on. This cold boot process can take some time to complete as the operating system loads and all the background processes are started. To avoid the necessity of going through this process every time the emulator is started, the system is configured to automatically save a snapshot (referred to as a quick-boot snapshot) of the emulator’s current state each time it exits. The next time the emulator is launched, the quick-boot snapshot is loaded into memory, and execution resumes from where it left off previously, allowing the emulator to restart in a fraction of the time needed for a cold boot to complete.
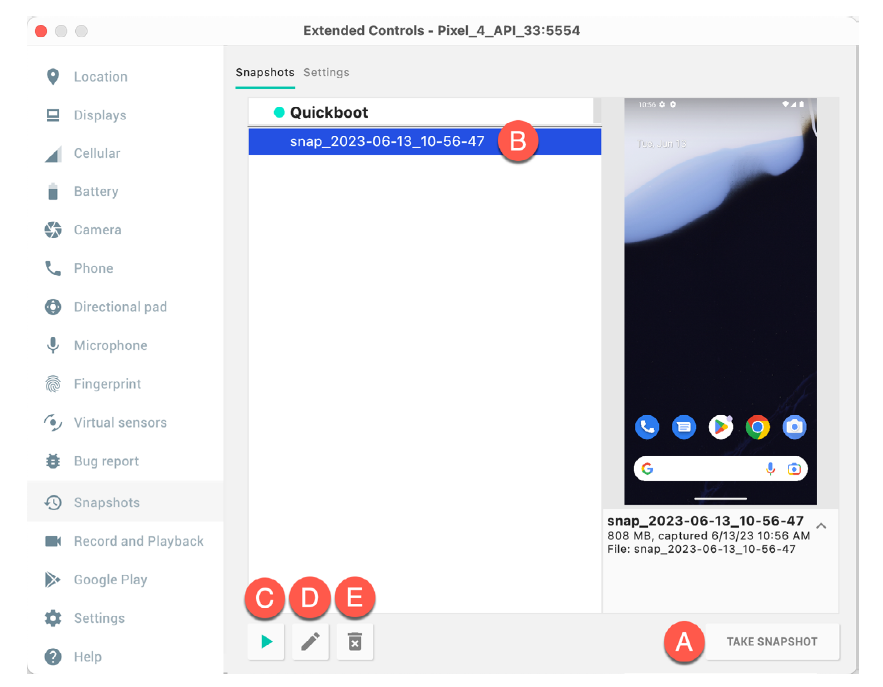
The Snapshots screen of the extended controls panel can store additional snapshots at any point during the execution of the emulator. This saves the exact state of the entire emulator allowing the emulator to be restored to the exact point in time that the snapshot was taken. From within the screen, snapshots can be taken using the Take Snapshot button (see screenshot). To restore an existing snapshot, select it from the list (B) and click the run button (C) located at the bottom of the screen. Options are also provided to edit (D) the snapshot name and description and to delete (E) the currently selected snapshot:
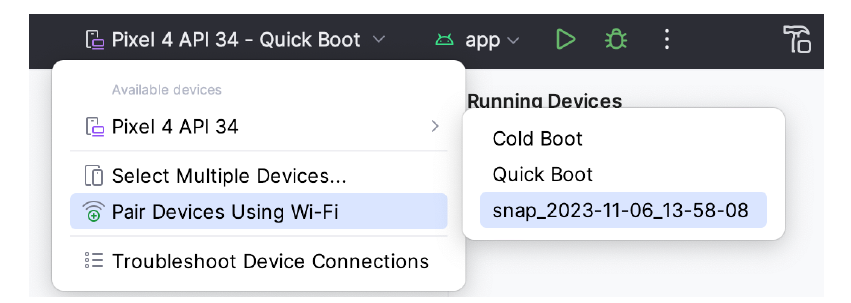
You can also choose whether to start an emulator using either a cold boot, the most recent quick-boot snapshot, or a previous snapshot by making a selection from the run target menu in the main toolbar, as illustrated below.
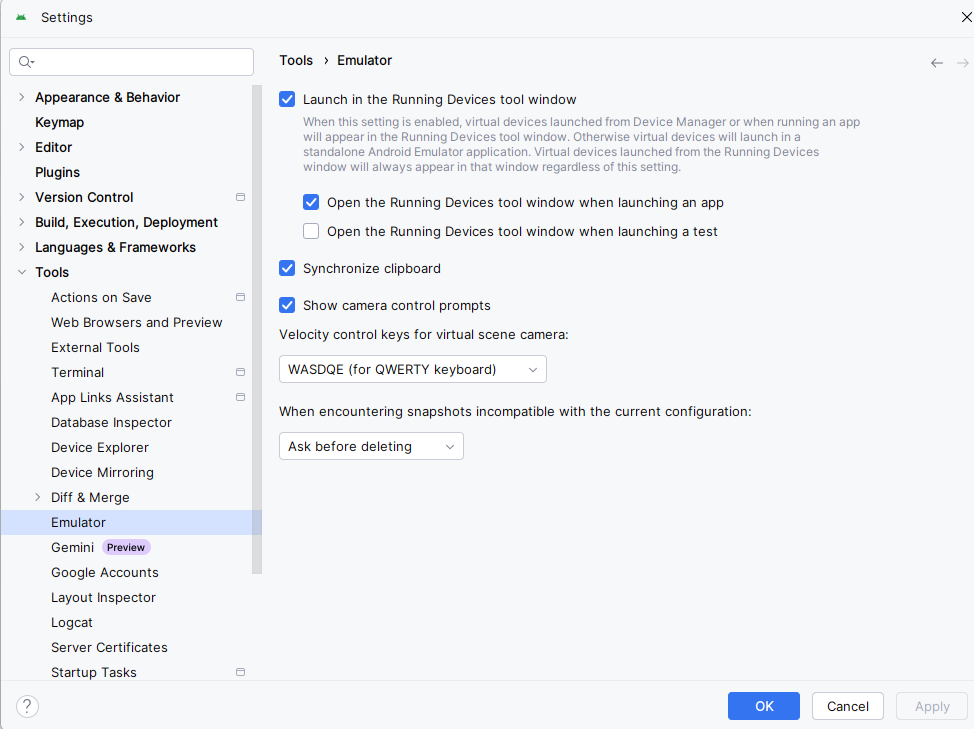
Set the Emulator to run in Tool Window Mode (part of Android Studio)
Just open the settings and click Tools->Emulator and check "Launch in the Running Devices tool window.
The Emulator in Tool Window Mode
When running in tool window mode, the same controls are available as in standalone mode. These buttons perform tasks like power, volume control, rotation, navigation, screenshots, snapshots, and extended controls.

From left to right, these buttons perform the following tasks (details of which match those for standalone mode):
- Power
- Volume Up
- Volume Down
- Rotate Left
- Rotate Right
- Back
- Home
- Overview
- Screenshot
- Snapshots
- Extended Controls