
Drawers and Tabs
Drawers and Tabs?
Think of navigation drawers and tabs like the organization system in a library. Navigation drawers are like the main catalog that slides out from the side, showing you all the different sections (like fiction, non-fiction, science, etc.). Tabs are like the dividers in a filing cabinet - they help you quickly switch between related categories without losing your place.
Navigation drawers slide in from the left side of the screen and contain your app's main navigation menu. Tabs appear at the top of the screen and let users switch between different views or sections of your app. Both help users navigate your app efficiently and find what they're looking for.
Quick Reference
| Component | Description | When to Use |
|---|---|---|
| Navigation Drawer | Slides in from left side with main menu | Main app navigation, settings, user profile |
| Top Tabs | Horizontal tabs at top of screen | Switching between related content sections |
| Tab Row | Scrollable row of tabs | Many categories that don't fit on screen |
When to Use Navigation Drawers and Tabs
Use Navigation Drawers When:
- You have many main sections in your app (5+ items)
- You want to save screen space for content
- You need to access settings, profile, or help sections
- You want to provide quick access to all app features
- You're building a complex app with multiple main areas
Use Tabs When:
- You have 2-5 related content sections
- Users need to switch between different views frequently
- You want to show related content side by side
- You're organizing content by categories or types
- You want to keep navigation visible and accessible
Common Components and Options
| Component | What It Does | When to Use It |
|---|---|---|
| DrawerState | Manages the open/closed state of the drawer | When you need to control drawer programmatically |
| TabRow | Creates a horizontal row of tabs | For top-level navigation between sections |
| Tab | Individual tab in a tab row | For each section or category in your app |
| TabPosition | Defines the position and styling of tabs | When you need custom tab appearance |
Practical Examples
Basic Navigation Drawer
@Composable
fun MyAppWithDrawer() {
    val drawerState = rememberDrawerState(initialValue = DrawerValue.Closed)
    val scope = rememberCoroutineScope()

    ModalNavigationDrawer(
        drawerState = drawerState,
        drawerContent = {
            ModalDrawerSheet {
                Spacer(modifier = Modifier.height(12.dp))
                Text(
                    "My App",
                    modifier = Modifier.padding(16.dp),
                    style = MaterialTheme.typography.titleMedium
                )
                Spacer(modifier = Modifier.height(12.dp))

                NavigationDrawerItem(
                    icon = { Icon(Icons.Default.Home, contentDescription = null) },
                    label = { Text("Home") },
                    selected = false,
                    onClick = { /* Navigate to home */ }
                )

                NavigationDrawerItem(
                    icon = { Icon(Icons.Default.Person, contentDescription = null) },
                    label = { Text("Profile") },
                    selected = false,
                    onClick = { /* Navigate to profile */ }
                )

                NavigationDrawerItem(
                    icon = { Icon(Icons.Default.Settings, contentDescription = null) },
                    label = { Text("Settings") },
                    selected = false,
                    onClick = { /* Navigate to settings */ }
                )
            }
        }
    ) {
        // Your main app content here
        Column {
            TopAppBar(
                title = { Text("My App") },
                navigationIcon = {
                    IconButton(onClick = { scope.launch { drawerState.open() } }) {
                        Icon(Icons.Default.Menu, contentDescription = "Menu")
                    }
                }
            )
            // Rest of your content
        }
    }
}
This example builds a basic app screen with a navigation drawer. When the user taps the menu icon in the top bar, the drawer slides in from the left and shows Home, Profile, and Settings.
How this code works (step by step)
- Create drawer state:
rememberDrawerState(DrawerValue.Closed)stores whether the drawer is open or closed. - Create a coroutine scope:
rememberCoroutineScope()is needed because opening the drawer uses a suspend function. - Wrap screen in ModalNavigationDrawer: this gives the screen drawer behavior.
- Define drawerContent:
ModalDrawerSheetcontains the title andNavigationDrawerItementries. - Add menu button: the
TopAppBarnavigation icon callsdrawerState.open()insidescope.launch { ... }.
Think of drawer state like a light switch: it is either ON (open) or OFF (closed). UI state variables like this are the foundation of Compose programming.
Top Tabs with Content
@Composable
fun TabbedContent() {
    var selectedTabIndex by remember { mutableStateOf(0) }
    val tabs = listOf("Recent", "Popular", "Favorites")

    Column {
        TabRow(selectedTabIndex = selectedTabIndex) {
            tabs.forEachIndexed { index, title ->
                Tab(
                    selected = selectedTabIndex == index,
                    onClick = { selectedTabIndex = index },
                    text = { Text(title) }
                )
            }
        }

        when (selectedTabIndex) {
            0 -> RecentContent()
            1 -> PopularContent()
            2 -> FavoritesContent()
        }
    }
}

@Composable
fun RecentContent() {
    LazyColumn {
        items(10) { index ->
            ListItem(
                headlineContent = { Text("Recent Item ${index + 1}") },
                supportingContent = { Text("This is a recent item") }
            )
        }
    }
}
This example creates a top tab menu with three choices: Recent, Popular, and Favorites. Tapping a tab updates a state variable, and the screen shows the matching content section.
How this code works (step by step)
- Track selected tab:
selectedTabIndexstarts at0, so the first tab is selected at launch. - Store tab labels: a list holds the names so tabs can be built in a loop.
- Build tabs in TabRow:
forEachIndexedcreates oneTabper label. - Handle clicks:
onClick = { selectedTabIndex = index }changes state when the user taps a tab. - Render content with when: the
when (selectedTabIndex)block decides which composable to display.
In Compose, changing state triggers recomposition (UI redraw). You do not manually refresh the screen.
Scrollable Tab Row
@Composable
fun ScrollableTabs() {
    var selectedTabIndex by remember { mutableStateOf(0) }
    val categories = listOf(
        "All", "Technology", "Science", "Sports", "Entertainment",
        "Politics", "Business", "Health", "Education", "Travel"
    )

    Column {
        ScrollableTabRow(
            selectedTabIndex = selectedTabIndex,
            edgePadding = 16.dp
        ) {
            categories.forEachIndexed { index, category ->
                Tab(
                    selected = selectedTabIndex == index,
                    onClick = { selectedTabIndex = index },
                    text = { Text(category) }
                )
            }
        }

        // Content based on selected tab
        when (selectedTabIndex) {
            0 -> AllContent()
            1 -> TechnologyContent()
            // ... other content
        }
    }
}
This example uses ScrollableTabRow because there are many categories. If all tabs cannot fit on one line, the user can scroll sideways to see more.
How this code works (step by step)
- Keep tab state:
selectedTabIndexstill controls which category is active. - Create a longer category list: labels like Technology, Science, Sports, and more are stored in one list.
- Use ScrollableTabRow: this is the key difference from
TabRow; it supports horizontal scrolling. - Set edge padding:
edgePadding = 16.dpadds visual breathing room at both ends. - Switch content by selected index: a
whenblock shows the right content composable.
Use TabRow for a few tabs and ScrollableTabRow when the number of tabs grows.
Combining Drawer and Tabs
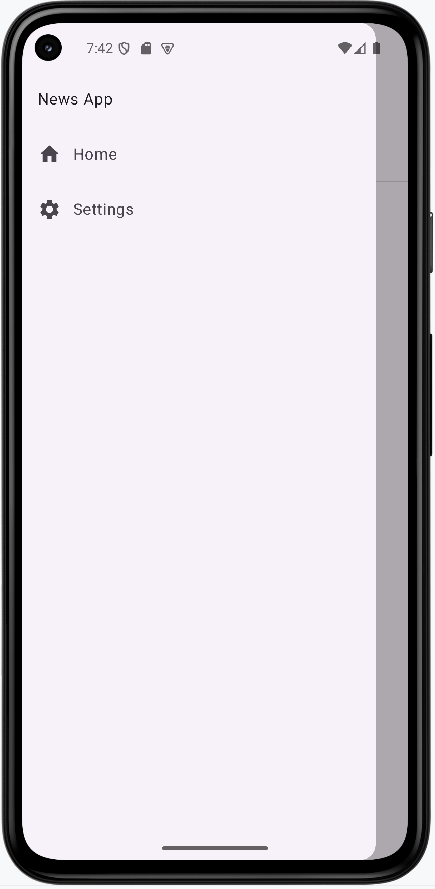
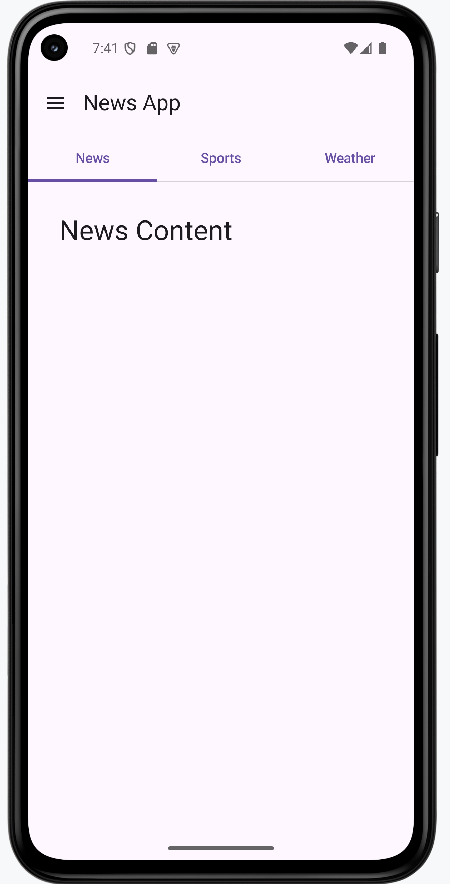
The sample drawerTab.kt uses a second piece of state—mainSection—so drawer destinations are not stubs: Home and Settings show full-screen pages (HomeContent, SettingsContent), while News, Sports & Weather returns to the tab strip. The tab row is only composed when mainSection is tabs; choosing Home or Settings hides the tabs and shows that screen instead.
private enum class MainSection { Tabs, Home, Settings }

@OptIn(ExperimentalMaterial3Api::class)
@Composable
fun AppWithDrawerAndTabs() {
    val drawerState = rememberDrawerState(initialValue = DrawerValue.Closed)
    val scope = rememberCoroutineScope()
    var selectedTab by remember { mutableStateOf(0) }
    var mainSection by remember { mutableStateOf(MainSection.Tabs) }
    val tabs = listOf("News", "Sports", "Weather")

    fun closeDrawer() {
        scope.launch { drawerState.close() }
    }

    ModalNavigationDrawer(
        drawerState = drawerState,
        drawerContent = {
            ModalDrawerSheet {
                Text("News App", modifier = Modifier.padding(16.dp))
                NavigationDrawerItem(
                    icon = { Icon(Icons.Filled.List, contentDescription = null) },
                    label = { Text("News, Sports & Weather") },
                    selected = mainSection == MainSection.Tabs,
                    onClick = {
                        mainSection = MainSection.Tabs
                        closeDrawer()
                    }
                )
                NavigationDrawerItem(
                    icon = { Icon(Icons.Filled.Home, contentDescription = "Home") },
                    label = { Text("Home") },
                    selected = mainSection == MainSection.Home,
                    onClick = {
                        mainSection = MainSection.Home
                        closeDrawer()
                    }
                )
                NavigationDrawerItem(
                    icon = { Icon(Icons.Filled.Settings, contentDescription = "Settings") },
                    label = { Text("Settings") },
                    selected = mainSection == MainSection.Settings,
                    onClick = {
                        mainSection = MainSection.Settings
                        closeDrawer()
                    }
                )
            }
        }
    ) {
        Scaffold(
            topBar = {
                TopAppBar(
                    title = {
                        Text(
                            when (mainSection) {
                                MainSection.Home -> "Home"
                                MainSection.Settings -> "Settings"
                                MainSection.Tabs -> "News App"
                            }
                        )
                    },
                    navigationIcon = {
                        IconButton(onClick = { scope.launch { drawerState.open() } }) {
                            Icon(Icons.Filled.Menu, contentDescription = "Menu")
                        }
                    }
                )
            }
        ) { padding ->
            Column(modifier = Modifier.padding(padding)) {
                if (mainSection == MainSection.Tabs) {
                    TabRow(selectedTabIndex = selectedTab) {
                        tabs.forEachIndexed { index, title ->
                            Tab(
                                selected = selectedTab == index,
                                onClick = { selectedTab = index },
                                text = { Text(title) }
                            )
                        }
                    }
                    when (selectedTab) {
                        0 -> NewsContent()
                        1 -> SportsContent()
                        2 -> WeatherContent()
                    }
                } else if (mainSection == MainSection.Home) {
                    HomeContent()
                } else {
                    SettingsContent()
                }
            }
        }
    }
}
HomeContent and SettingsContent are separate composables (same idea as NewsContent—a column with a headline and body text). The drawer’s selected parameter is tied to mainSection so the active destination is highlighted.
How this code works (step by step)
- Three layers of state:
drawerState(open/closed),selectedTab(which of News/Sports/Weather), andmainSection(tabs vs Home vs Settings). - Drawer items do real navigation: each
onClicksetsmainSection, thencloseDrawer()so the sheet dismisses after a choice. - Return to tabs: the first item (“News, Sports & Weather”) sets
mainSection = MainSection.Tabsso the user can get back to the tab row from Home or Settings. - App bar title follows mode:
when (mainSection)shows “News App”, “Home”, or “Settings”. - Conditional body: if
mainSection == Tabs, showTabRowpluswhen (selectedTab) { … }; otherwise showHomeContent()orSettingsContent().
Rule of thumb: Drawer = which top-level area (tabs vs Home vs Settings); tabs = which feed while you stay in the tabbed area.
How this example renders
Above is just a snippet of the code to view the full code, you need to go to my GitHub page and look at the chapter14 drawerTab.kt file.
Learning Aids
Tips for Success
- Use navigation drawers for apps with many main sections (5+)
- Use tabs for 2-5 related content sections
- Keep tab labels short and descriptive
- Use appropriate icons for navigation items
- Consider the user's mental model when organizing navigation
- Test navigation on different screen sizes
- Provide visual feedback for selected states
- Use consistent navigation patterns throughout your app
Common Mistakes to Avoid
- Using too many tabs (more than 5 can be overwhelming)
- Putting unrelated items in the same navigation drawer
- Not providing clear visual feedback for selected items
- Using navigation drawers for simple apps with few sections
- Making tab labels too long or unclear
- Not considering how navigation works on different screen sizes
- Forgetting to handle navigation state properly
- Using inconsistent navigation patterns
Best Practices
- Choose navigation based on the number and relationship of your content sections
- Use descriptive labels and appropriate icons for navigation items
- Provide clear visual feedback for the current selection
- Keep navigation consistent across your entire app
- Consider the user's workflow when organizing navigation
- Test navigation on different devices and screen orientations
- Use Material Design guidelines for navigation patterns
- Provide alternative navigation methods for accessibility