
Animations and Transitions in Material Design
Introduction
Animations and transitions are like the body language of your app—they help users understand what's happening, guide their attention, and make your app feel alive. In Material Design, motion isn't just for decoration; it helps users follow changes and makes your app more enjoyable to use. Jetpack Compose gives you easy tools to add smooth, meaningful animations to your UI, even if you've never done it before.
When to Use Animations and Transitions
- To show changes in state (for example, expanding a card or switching tabs)
- To guide the user's attention to important actions or new content
- To make your app feel more polished and professional
- To provide feedback (like a button press, loading spinner, or error message)
Common Animation Tools in Compose
| Tool | What It Does | When to Use It |
|---|---|---|
animate*AsState | Animates a value (like color, size, or position) smoothly from one state to another | For simple state changes, like making a button grow when pressed |
AnimatedVisibility | Animates showing or hiding content (fades, slides, etc.) | For expanding/collapsing UI, like showing extra details |
updateTransition | Coordinates multiple animations at once | For more complex transitions, like animating several properties together |
rememberInfiniteTransition | Creates looping or repeating animations | For effects like pulsing, spinning, or loading indicators |
Crossfade | Animates switching between two composables with a fade effect | For smoothly changing screens or content |
Animatable | Gives you manual control to animate to specific values, interrupt, or chain animations | For custom or interactive animations |
AnimationSpec | Customizes the timing, speed, and feel of your animations (spring, tween, keyframes, etc.) | When you want to fine-tune how your animation moves |
Transition | Animates multiple values together with more control | For advanced, coordinated animations |
Practical Example: Animated Card with Multiple Effects
@Composable
    fun AnimatedCardExample() {
        // State variables for animations
        var expanded by remember { mutableStateOf(false) }
        var showDetails by remember { mutableStateOf(false) }

        // Animated values
        val cardColor by animateColorAsState(
            targetValue = if (expanded) Color(0xFFBBDEFB) else Color.White,
            label = "cardColor"
        )
        val cardElevation by animateDpAsState(
            targetValue = if (expanded) 26.dp else 4.dp,
            label = "cardElevation"
        )
        val cardWidth by animateDpAsState(
            targetValue = if (expanded) 300.dp else 200.dp,
            label = "cardWidth"
        )

        // Card with animated properties
        Card(
            colors = CardDefaults.cardColors(
                containerColor = cardColor
            ),
            elevation = CardDefaults.cardElevation(
                defaultElevation = cardElevation
            ),
            modifier = Modifier
                .width(cardWidth)
                .padding(16.dp)
                .padding(top=50.dp)
                .clickable {
                    expanded = !expanded
                    showDetails = expanded
                }
        ) {
            Column(modifier = Modifier.padding(16.dp)) {
                Text(
                    text = "Tap to ${if (expanded) "collapse" else "expand"}",
                    style = MaterialTheme.typography.titleLarge
                )

                // Animated visibility for additional content
                AnimatedVisibility(visible = expanded) {
                    Column {
                        Spacer(modifier = Modifier.height(8.dp))
                        // Crossfade animation between states
                        Crossfade(targetState = showDetails) { detailsVisible ->
                            if (detailsVisible) {
                                Text("Here are more details! This text fades in.")
                            } else {
                                Text("Tap to see more details.")
                            }
                        }
                    }
                }
            }
        }
    }

    @Composable
    fun AnimatedBoxExample() {
        // State variable to track if box is expanded
        var isExpanded by remember { mutableStateOf(false) }

        // Animated size using animationSpec with tween()
        // tween() allows us to specify duration in milliseconds
        val boxSize by animateDpAsState(
            targetValue = if (isExpanded) 150.dp else 80.dp,
            animationSpec = tween(
                durationMillis = 500, // Animation duration: 500ms
                // easing = FastOutSlowInEasing (default) - starts fast, ends slow
            ),
            label = "boxSize"
        )

        // Animated color for visual feedback
        val boxColor by animateColorAsState(
            targetValue = if (isExpanded) Color(0xFF4CAF50) else Color(0xFF2196F3),
            animationSpec = tween(durationMillis = 500),
            label = "boxColor"
        )

        Column(
            modifier = Modifier.padding(16.dp),
            horizontalAlignment = Alignment.CenterHorizontally
        ) {
            Text(
                text = "Tap the box to animate!",
                style = MaterialTheme.typography.titleMedium,
                modifier = Modifier.padding(bottom = 16.dp)
            )

            // Animated box
            Box(
                modifier = Modifier
                    .size(boxSize)
                    .background(
                        color = boxColor,
                        shape = RoundedCornerShape(12.dp)
                    )
                    .clickable {
                        isExpanded = !isExpanded
                    }
            )

            Spacer(modifier = Modifier.height(8.dp))
            Text(
                text = if (isExpanded) "Tap to shrink" else "Tap to expand",
                style = MaterialTheme.typography.bodySmall
            )
        }
    }
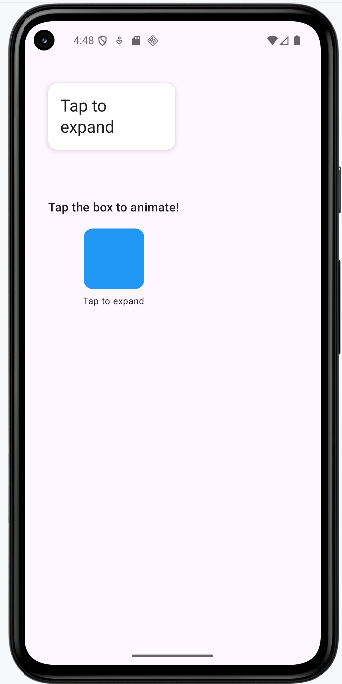
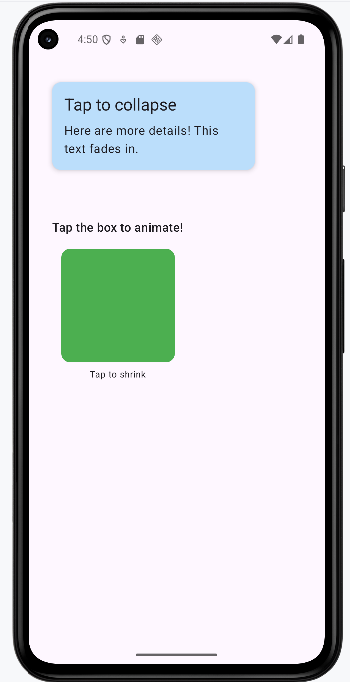
The block above defines two separate composables you could show on a screen: AnimatedCardExample (a tappable card) and AnimatedBoxExample (a tappable colored square). They are independent demos that use some of the same ideas—state that toggles when you tap, and “as state” animators that smooth the change—so you can compare a richer, multi-part animation (the card) with a smaller, timing-focused one (the box).
AnimatedCardExample
Imagine a card sitting on the screen. When you tap it, it does not jump instantly to a new look. Instead, several things change together, smoothly:
- Color — The card’s background eases from white to a light blue (
animateColorAsState). When you tap again to collapse, it eases back. - Shadow (elevation) — The shadow grows or shrinks (
animateDpAsStateon elevation) so the card feels like it lifts when “expanded” and sits flatter when collapsed. - Width — The card gets wider when expanded and narrower when collapsed (another
animateDpAsState), so the size change is animated, not an instant jump. - Title text — The line that says “Tap to expand” / “Tap to collapse” updates immediately with normal Kotlin string logic; it is not a fade, but it tells the user what will happen on the next tap.
- Extra content area — When the card is collapsed, the bottom section is not just empty: it is not drawn for that state.
AnimatedVisibility(visible = expanded)animates that section in and out (for example with a fade or slide, depending on defaults), so “more stuff” appears in a controlled way instead of popping in. - Two different messages inside that area — Inside the visible region,
Crossfadeswitches between two differentTextcomposables. WhenshowDetailsis true, you see the longer “Here are more details!” line; when it is false, you see the shorter hint. The transition between those two texts is a crossfade (one fades out while the other fades in). In this sample,showDetailsis set to matchexpandedwhen you tap, so after you expand you see the “more details” version; the main point is to show howCrossfadeanimates between two pieces of UI.
How the state fits together: expanded is a simple Boolean remembered in the composable. Tapping the card flips expanded and copies that value into showDetails. The “target” values passed into animateColorAsState and the two animateDpAsState calls all depend on expanded, so whenever expanded changes, Compose animates from the old values to the new ones. Together, this shows one pattern: one user action (a tap) can drive several animated properties plus visibility and a crossfade in the same card.
AnimatedBoxExample — a simpler “one tap, two things animate” demo
This composable is a smaller lesson. You see a label (“Tap the box to animate!”), a square Box, and a short hint under it (“Tap to expand” / “Tap to shrink”).
- Tap the box —
isExpandedtoggles betweenfalseandtrue. - Size animation — The box’s width and height are both tied to
boxSize(Modifier.size(boxSize)). That size comes fromanimateDpAsState, with an explicittween(durationMillis = 500), so the grow/shrink always takes half a second and uses the default easing curve unless you change it. - Color animation — At the same time,
boxColoranimates between blue and green (animateColorAsStatewith the same 500 mstween), so the user gets clear visual feedback that the state changed. - Why show this next to the card? The card uses default timing on its animators; the box shows how to attach a shared
animationSpecso you can control duration (and later easing) in one place. Same idea—state drives target values, animators interpolate—but with fewer moving parts.
Takeaway for both: You store “what mode are we in?” in simple state (expanded, isExpanded). You express “what should the UI look like in each mode?” as target colors, sizes, and visibility. Compose’s animation APIs fill in the frames between old and new targets so the interface feels smooth and easy to follow—especially important for users who are still learning what your screen does.
How this example renders
Above is just a snippet of the code to view the full code, you need to go to my GitHub page and look at the chapter13 animation.kt file. When you run the code it will look like the example below.
Tips for Success
- Use animations to clarify what's happening, not just to decorate
- Keep animations quick and smooth—most should finish in under 300ms
- Test on real devices to make sure animations look good and don't slow things down
- If you're not sure, start simple! Even a small animation can make a big difference
Common Mistakes to Avoid
- Overusing animations so your app feels slow or distracting
- Using animations that don't match Material Design guidelines (like odd timing or movement)
- Making animations too long or too flashy—users want to get things done!
- Forgetting to test on different devices (animations can look different on slow phones)
Best Practices
- Use motion to guide and inform, not just to decorate
- Follow Material Design's motion guidelines (see Google's docs for details)
- Keep your animations consistent across the app—use the same timing and style everywhere
- Comment your code to explain why you're animating something, especially if it's not obvious