Disk Usage & Filesystems
When a Linux system feels “broken,” a very common cause is not software—it is storage. If a disk (or partition) fills up, programs cannot save data. This leads to real problems:
- Applications fail to start or crash
- Logs stop recording (so you cannot diagnose issues)
- System updates fail
- Web servers and databases stop working
In other words, a “full disk” can make a healthy system look completely broken.
This lesson teaches you how to answer one key question:
“Where did all my disk space go?”
Disk Usage Commands
In this lesson, we will be using the following commands to find out where the disk space is going:
Quick Reference
| Command | What It Shows |
|---|---|
df |
How full each filesystem is |
lsblk |
Physical disks and partitions |
findmnt |
How paths map to filesystems |
du |
What directories/files are using space |
Note: These tools answer different parts of the same problem.
Find the filesystem that is full (df)
A filesystem is how Linux organizes and stores files on a disk or partition. It is not a single folder—it is the whole storage area, along with the rules for creating files, tracking folders, and keeping track of free space.
When the system starts (or when an administrator attaches storage), each filesystem is connected to a folder in the directory tree called a mount point. For example, one filesystem might be mounted at / (the root of the whole tree), and another might be mounted at /home. You still browse normal paths like /var/log, but different paths can belong to different filesystems, each with its own size limit.
A filesystem type is the specific format used on that storage. Think of a partition as empty space on a drive, and the filesystem type as the filing system installed on it—similar to how one USB drive might be formatted for Windows and another for Mac. Linux commonly uses types such as ext4 and xfs for everyday data. Small boot-related partitions may use vfat. Temporary in-memory filesystems show up as tmpfs. The type tells you how files are stored on disk; it is different from the mount point, which tells you where that storage appears in the directory tree.
The df command reports how full each mounted filesystem is—not how large one individual folder is. That is why /home can have plenty of free space while / is almost full: they may be separate filesystems on separate partitions.
Run df -h on your system. The -h option shows sizes in human-readable units (G for gigabytes, M for megabytes) instead of raw block counts. You will get a table like this:
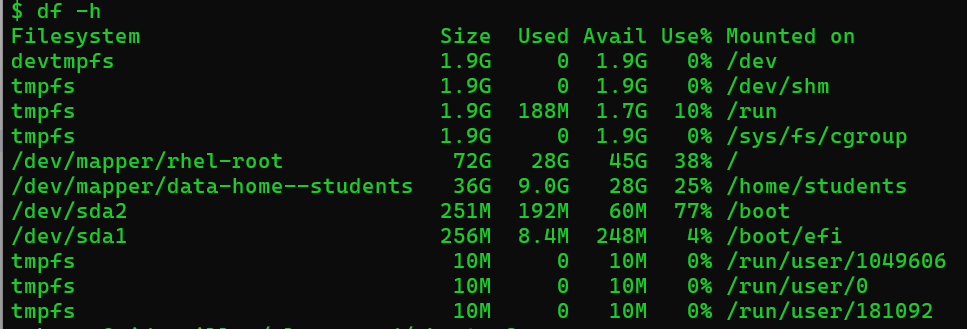
Each row is one mounted filesystem. Read the table from left to right:
- Filesystem → the storage device or volume name.
- Size → the total capacity of that filesystem
- Used → how much space files are taking now
- Avail → how much free space is left
- Use% → the percentage full; this is usually the first column you check when troubleshooting
- Mounted on → the mount point, the folder where that filesystem appears in the directory tree
Not every row is equally important. Lines named tmpfs or devtmpfs are temporary, in-memory filesystems used by the running system. They are normal and are not the cause of a “disk full” problem on your hard drive. Focus on rows that represent real storage, especially the main system filesystem mounted at / and any separate filesystems such as /home/students or /boot.
In this example, the root filesystem (/) is 38% full and /home/students is 25% full—both are healthy. /boot is at 77%, which is higher but still has 60M free. If you were troubleshooting, you would look for a row with a very high Use%, such as 98% or 100%, and note its Mounted on value. That mount point is where you would run du next to find which folders inside it grew.
df [options] [mountpoint_or_path]Common Options
| Option | What It Does | When to Use It |
|---|---|---|
-h |
Human-readable sizes | Almost always |
-T |
Show filesystem type | For troubleshooting |
-a |
Show all filesystems | For deeper inspection |
-t type |
Filter by type | Focus on specific storage |
-x type |
Exclude type | Ignore temporary filesystems |
--total |
Show totals | Quick overview |
Plain df -h does not show the filesystem type. Add -T to include a Type column so you can see whether a row is real disk storage (for example xfs or ext4) or a temporary tmpfs entry. That is useful when you want to focus on physical storage and ignore in-memory filesystems.
Practical Examples
# Human-readable disk usage by mount point
df -h

# Include filesystem type (ext4, xfs, tmpfs, etc.)
df -hT
Understand disk/partition layout (lsblk)
lsblk shows how storage is physically organized.
Key terms:
- Disk → the physical device (SSD/HDD)
- Partition → a slice of that disk
- Filesystem → how data is organized on that partition
Analogy:
- Disk = hard drive
- Partition = sections of the drive
- Filesystem = filing system inside each section
lsblk [options]Use -f to connect partitions to filesystems and mount points.
Practical Examples
# View disks/partitions + filesystem info
lsblk -f
When you run lsblk f, the output shows a “tree” of storage devices:
This is an example of the output:
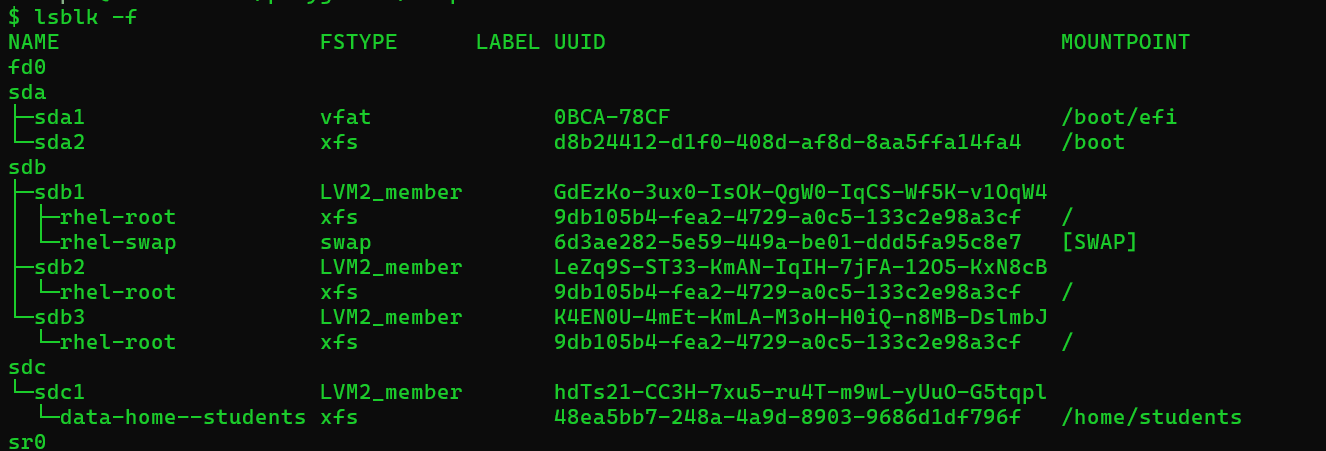
NAME: the device/partition name (for example,sdais a whole disk, andsda1is a partition on that disk).FSTYPE: the filesystem type that partition uses (for example,xfs,ext4, orvfat). If you seeLVM2_member, that part is part of an LVM setup rather than a normal filesystem.LABEL: a human-friendly name given to the filesystem (sometimes empty).UUID: a unique identifier for the filesystem (useful for reliably finding a filesystem even if it is renamed).MOUNTPOINT: the directory where that filesystem is currently mounted (this is the key connection todf).
In the screenshot, you can use MOUNTPOINT to spot which devices are actually visible in the directory tree (for example, items mounted at /boot, /boot/efi, or /home/students). Once you know the mount point, you can interpret disk-full symptoms with df and find large folders with du.
Why this matters: It helps you connect what df shows (mount points) to actual devices.
Map a path to its mount point (findmnt)
You already know that a directory like / or /boot can be a mount point. But most paths are inside a filesystem, not mount points themselves. For example, /var/log is a folder on whatever filesystem is mounted at / (unless your server uses a separate /var partition).
findmnt answers a practical question: “What filesystem is this path on?” Run it with no arguments to see the full mount tree, or give it a path to look up one location.
findmnt [path]The screenshot below shows the output of plain findmnt (no path). The tree layout shows which mount points sit under other mount points. Read the four columns like this:
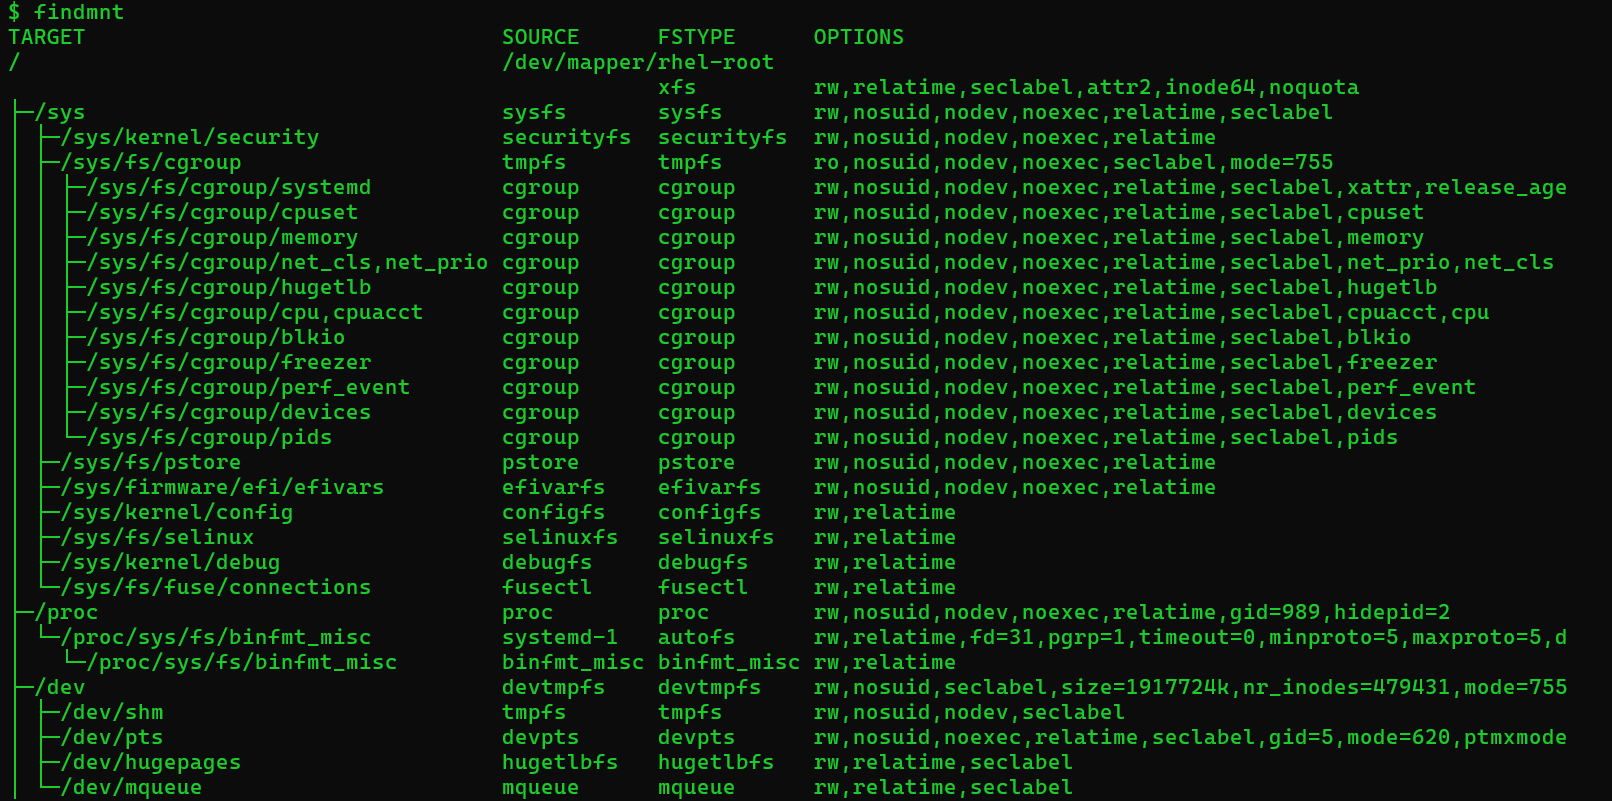
- TARGET → the mount point (the directory path in the tree)
- SOURCE → what is mounted there (often a device like
/dev/mapper/rhel-root, or a virtual name likesysfs) - FSTYPE → the filesystem type (for example
xfs,sysfs,tmpfs) - OPTIONS → how the filesystem was mounted (read/write, permissions, and other flags—you can ignore most of these for now)
At the top of the tree, the root filesystem is mounted at / from /dev/mapper/rhel-root with type xfs. That is real disk storage—the same row you would care about when df -h shows / getting full. Below it, many other paths are separate mounts for kernel interfaces, not user data on the hard drive.
If you run findmnt /sys, you are asking about the /sys directory specifically. In this screenshot, that matches the row where TARGET is /sys. It reports SOURCE sysfs, FSTYPE sysfs, and read/write options. That tells you /sys is its own virtual filesystem for kernel information—it is not a separate disk partition and it is not where your files or logs are stored. For a disk-full problem, you would not troubleshoot space usage under /sys.
For disk usage work, the more typical command is findmnt / or findmnt /var. Those tell you which real storage backs the path you plan to run du on, so you do not waste time searching a directory that lives on a different filesystem than the one df flagged as full.
Practical Examples
# Full mount tree (as in the screenshot)
findmnt

# Which filesystem is the root directory on?
findmnt /

# Which filesystem is /sys on? (virtual sysfs, not disk storage)
findmnt /sys

# Which filesystem is /var on? (often the same as / on classroom servers)
findmnt /var
Why this matters: df reports fullness by mount point. Before you drill down with du, use findmnt to confirm that the folder you are investigating is actually on the filesystem that is running out of space.
Find what directories are taking space (du)
du shows how much space directories and files are using.
This is where you actually find the problem.
Strategy:
- Start at a high level
- Find the biggest directory
- Go one level deeper
- Repeat
du [options] pathKey Concepts
--max-depth=1→ only show top-level folders (keeps output readable)2>/dev/null→ hide permission errors| sort -h→ sort from smallest to largest
Think of this pipeline:
du → clean output → sort → find biggest
Practical Examples
# Show top-level directories under /home (skip unreadable parts)
du -h --max-depth=1 /home 2>/dev/null | sort -h

# Show top-level under /var (often contains logs/cache)
du -h --max-depth=1 /var 2>/dev/null | sort -h

# If you find a big folder, go one level deeper
du -h --max-depth=1 /var/log 2>/dev/null | sort -h
Real-world tip: /var/log is one of the most common causes of disk filling up.
Disk Full Workflow (Putting It All Together)
When troubleshooting disk space, always follow this order:
- 1. Run
df -h→ find the full filesystem - 2. Run
du→ find the largest directories - 3. Drill down → find the exact cause
Simple mental model:
df= “Where is the problem?”du= “What is causing the problem?”