Chapter 1
Introduction to Linux
Welcome to the world of Linux! In this course, you'll learn about one of the most powerful and widely-used operating systems in the world. But before we dive into commands and technical details, let's understand where Linux came from and why it's important.
What is Linux?
Think of Linux as the engine that powers many of the devices and services you use every day. From smartphones to supercomputers, from web servers to smart TVs, Linux is everywhere. It's like the invisible foundation that makes modern technology work.
The Story of Linux
Linux has an interesting history that began with Unix, created in the 1960s at Bell Labs. Unix was revolutionary because it was:
- Simple and efficient
- Built with small, reusable tools
- Designed to be shared and modified
Fast forward to 1991, when a Finnish student named Linus Torvalds created Linux as a free alternative to Unix. He shared his work with the world, and something amazing happened - people from all over started contributing to make it better. This collaborative approach is what makes Linux special.
Why Linux Matters
Linux is important because it's:
- Free and Open Source: Anyone can use, modify, and share it
- Secure and Stable: Used by banks, governments, and major companies
- Flexible: Runs on everything from tiny devices to massive servers
- Community-Driven: Improved by thousands of developers worldwide
Linux in the Real World
You might be surprised to learn where Linux is used:
- Android phones (based on Linux)
- Most web servers
- Smart TVs and streaming devices
- Supercomputers
- Many smart home devices
How Linux Works
Linux is built in layers, like a house. Each layer has a specific job, and they work together so you can run programs, save files, and use the computer. Understanding these layers helps you see how your commands and programs actually get things done.
Hardware is the physical part of the computer: the processor (CPU), memory (RAM), disk drives, keyboard, mouse, and screen. Linux does not talk to these directly. Instead, the next layer does that.
The kernel is the core of Linux. It is a program that is always running and that manages the hardware. It decides which program gets to use the CPU when, how much memory each program can use, and how data is read from or written to the disk and network. When you run a command or open an application, the kernel is the one that actually allocates resources and talks to the hardware. You rarely interact with the kernel yourself; other software does that for you.
System libraries are collections of prewritten code that programs use to do common tasks. For example, opening a file, drawing on the screen, or sending data over the network usually goes through these libraries. That way, many programs can share the same, well-tested code instead of each program talking to the kernel in its own way. This makes software more reliable and easier to develop.
Applications (and utilities) are the programs you run: a text editor, a web browser, or a command like ls or cat. When you type a command in the terminal, you are running a small program that uses the libraries and the kernel to do work. So when you run ls, that program asks the kernel for a list of files in a directory, and the kernel reads that information from the disk and returns it.
In short: you use applications and commands; they use libraries; the libraries and the kernel work together to use the hardware. The table below summarizes these layers.
| Layer | Purpose | Real-World Example |
|---|---|---|
| Hardware | Physical components (CPU, memory, disk, keyboard, etc.) | The house's foundation and structure |
| Kernel | Core system: manages hardware and resources for all programs | The house's electrical and plumbing systems |
| System Libraries | Shared code that programs use to talk to the kernel and do common tasks | Standard house features (doors, windows) |
| Applications | Programs you run (editors, browsers, and commands like ls and cat) |
Furniture and appliances |
In this course you will spend most of your time using applications and commands (the top layer) and learning how to work with files, run programs, and use the shell. As you get more comfortable, you will see how the commands you type connect to the layers underneath.
The Linux Community
One of the most exciting things about Linux is its community. People from all over the world contribute to making Linux better by:
- Writing code
- Finding and fixing bugs
- Creating documentation
- Helping other users
Remember: Learning Linux is like learning a new language. Start with the basics, practice regularly, and don't be afraid to make mistakes that is part of the learning process.
The Terminal and Shell
When you use a computer, you usually point and click: you open apps from a menu, drag files into folders, and type in word processors. But there is another way to work—by typing text commands into a terminal. The terminal is the window or application where you type those commands. The shell is the program that reads what you type, interprets it, and runs the right actions. Think of the terminal as the keyboard and screen you use to talk to the computer, and the shell as the “translator” that turns your words into things the computer does. Learning to use the terminal and shell will give you more control and is essential for programming, working on servers, and using many development tools.
Terminal vs. Shell: What's the Difference?
It's easy to mix these up, but they refer to different parts of the same workflow:
| Term | What It Is | Analogy |
|---|---|---|
| Terminal | The application or window where you type and see output | The keyboard and monitor you use to interact |
| Shell | The program that reads your commands and runs them | The translator between you and the operating system |
When you "open a terminal," you're really opening an app that runs a shell. You type a command, press Enter, and the shell runs it and shows you the result.
Why Use the Terminal?
You might use the terminal when:
- You need to run programming tools (compilers, interpreters, package managers)
- You're working on a remote server or a lab machine that has no graphical interface
- You want to automate tasks with scripts
- You need more power or precision than point-and-click interfaces provide
The Command Line and the Prompt
When you open a terminal, you see a line of text that usually ends with a symbol such as $ or %. That line is called the prompt. It means "the shell is ready for your next command." You type a command and press Enter to run it.
$ pwd
/home/student
$
Here, pwd is the command (it prints your current folder). The line below is the output, and then you get a new prompt. Everything happens one command at a time.
Prompt Format
Prompts can look different on different systems. Common patterns:
| Prompt | Meaning |
|---|---|
$ |
Normal user (Bash-style) |
% |
Normal user (some shells, e.g. Zsh) |
# |
Often indicates root or administrator |
username@hostname:~$ |
Shows your username, computer name, and current directory |
In this course we'll often show just $ before a command. You type only what comes after the $; don't type the $ itself.
Common Shells
Different shells have slightly different features and syntax. The ideas in this course apply to all of them; we'll use Bash-style examples.
| Shell | Description | Common On |
|---|---|---|
bash |
Bourne Again Shell; very common, good for learning | Linux, macOS (older), Git Bash on Windows |
zsh |
Z Shell; default on newer macOS, many extras | macOS (default) |
sh |
Generic "shell"; often points to bash or another shell | Many Unix-like systems |
To see which shell you're using, you can run:
echo $SHELLOutput might be /bin/bash or /bin/zsh, for example.
Basic Interaction
Every time you use the terminal, you're doing the same basic loop:
- Read the prompt.
- Type a command (and any options or arguments).
- Press Enter.
- Read the output (or any error message).
- Repeat.
Your First Commands
Try these to get a feel for the terminal. After each line, press Enter. We will look at these commands in more detail in later lessons.
# Show current directory
pwd

# List files and folders here
ls

# Show which shell is running
echo $SHELL
Tips for Success
- Type carefully: Commands and file names are case-sensitive (
File.txtandfile.txtare different). - Use Tab completion: Type part of a command or path and press Tab; the shell often fills in the rest or shows options.
- Read error messages: They usually say what went wrong (e.g. “No such file or directory”).
- One command per line: Press Enter after each command.
- Don't type the prompt: Only type the command that comes after
$or%.
Common Mistakes to Avoid
- Typing the
$or%as part of the command - Forgetting that spaces matter (e.g. putting a space in a file name when the name has no space)
- Confusing the terminal (the window) with the shell (the program running inside it)
- Ignoring error messages instead of reading them to fix the problem
What Are Linux Commands?
The command line—the place where you type text instead of clicking icons—is one of the most important tools in computing. Servers, development environments, and many IT jobs rely on it. Learning the command line gives you direct control over the system, helps you automate tasks, and is the same on Linux, macOS, and most cloud and server environments. Even if you use a graphical interface day to day, knowing how to use the command line will make you more effective and prepare you for courses and careers in technology.
When you use the terminal in Linux, you type commands to tell the computer what to do. A command is the name of a small program or built-in action, and you can change how it behaves by adding options and arguments. This lesson explains what commands are and how their parts—options and arguments (sometimes called attributes or parameters)—fit together. You will use this structure for every command you learn in later lessons.
Quick Reference
| Term | Description | Example |
|---|---|---|
| Command | The name of the program or action you run | ls, cd, cat |
| Arguments | Inputs or targets you give the command (e.g. file or directory names) | file.txt, /home/user |
| Options (short) | Single-letter flags that change behavior, usually with one hyphen | -l, -a |
| Options (long) | Word-style flags that change behavior, usually with two hyphens | --all, --help |
| Option-argument | The value that some options need (e.g. a number or path). It comes right after the option. | tree -L 2 (2 = levels), head -n 5 (5 = lines) |
What Is a Linux Command?
A command is the first word you type in the terminal. It is the name of something the computer knows how to run: either a small program (like ls or grep) or a built-in action (like cd). When you press Enter, the shell looks up that name and runs the matching program or built-in. Everything else you type on the same line—options and arguments—is passed to that command so it knows how to behave and what to act on. In later lessons you will learn specific commands; here we focus on the general shape of any command line.
Why This Matters
Almost every Linux command follows the same pattern: command name, then optional options, then optional arguments. Once you understand that pattern, you can read the manual for any command (man commandname) and know what the listed "options" and "operands" mean. You will also be able to combine commands and use the same ideas in scripts.
The Structure of a Command Line
A typical command line has up to three kinds of parts:
- Command name — The program or built-in you are running (e.g.
ls,cp). - Options — Flags that change how the command runs (e.g. show more detail, include hidden files). Options usually start with
-or--. - Arguments — The things the command acts on: often file names, directory names, or other inputs. In some textbooks or courses these are called parameters or attributes of the command. (The word "attributes" is also used for file properties like permissions; in this lesson we use "arguments" for the items you type after the command.)
Not every command needs options or arguments. Some commands run with just the name; others require at least one argument (for example, a file name). The order often looks like this:
command_name [options] [arguments]Items in square brackets are optional. In practice, options and arguments can sometimes be mixed, but many commands expect options first, then arguments. When you learn a specific command, the manual page or your course materials will show the correct order.
Arguments (Parameters / Attributes)
Arguments are the extra words you type after the command (and usually after any options). They tell the command what to work on. For a command that lists files, the argument might be a directory name. For a command that reads a file, the argument is usually the file name. For example:
- A command that copies files might take two arguments: the source file and the destination.
- A command that changes into a directory takes one argument: the path to that directory.
- A command that displays a file takes one or more arguments: the file names to display.
If a command requires an argument and you don't give one, it may print an error message, prompt you for input, or use a default (depending on the command). In later lessons you will see exactly which arguments each command expects.
Options: Short Form and Long Form
Options (also called flags) change the behavior of a command. They do not name a file or directory; they turn on or off a feature (e.g. "show hidden files" or "list in long format"). Linux commands usually support two styles: short options and long options.
Short Options
Short options are usually a single letter preceded by a single hyphen -. For example, a list command might use -l for "long format" and -a for "all" (including hidden files). You can often combine several short options after one hyphen:
# One option
command -l

# Two options combined
command -la

# Same as -l -a (on many commands)
command -al
Not every command allows combining options this way; when in doubt, use one option at a time or check the manual.
Long Options
Long options are full words (or several words) preceded by two hyphens --. They are easier to remember and read. For example, --all might do the same thing as -a, and --help might print usage information. Long options are usually not combined on one hyphen; you write each one separately:
# Long form
command --all

# Multiple long options
command --all --long-format

# Mixing short and long (order depends on the command)
command -a --long-format
Many commands support both a short and a long form for the same behavior (e.g. -a and --all). The manual page for a command lists all supported options.
Options That Take a Value (Option-arguments)
Some options need a value right after them. That value is called an option-argument. It might be a number (e.g. how many lines to show, or how many directory levels to list) or a path or other value. With short options the value is often right next to the option (e.g. -n 5 or -n5). With long options you often use an equals sign (e.g. --lines=5) or a space (e.g. --lines 5). The exact syntax is given in the command's manual or help.
# Short option with value (two common styles)
command -n 5
command -n5

# Long option with value
command --lines=5
command --lines 5

# Example: limit directory depth (option -L with option-argument 2)
tree -L 2
Putting It Together
A full example might look like this (using placeholder names):
command_name -a --verbose file1.txt file2.txtHere, command_name is the command, -a and --verbose are options, and file1.txt and file2.txt are arguments. You will see real examples like this for ls, cp, grep, and others in later lessons.
Getting Help for a Command
Later in this chapter you will learn how to get help for a command using the man and help commands.
Tips for Success
- Start with the command name — Always type the command first; then add options and arguments as needed.
- Options modify behavior, arguments are the targets — Options usually start with
-or--; arguments are often file or directory names. - Use the manual —
man commandnamelists all options and how to use arguments for that command. - Long options can be clearer — If you're not sure,
--helpor a long option like--allis often easier to remember than-hor-a. - Spacing matters — Put spaces between the command, each option, and each argument unless the command's documentation says otherwise (e.g.
-n5). - Option-arguments follow the option — When an option needs a value (e.g.
tree -L 2), the value comes right after the option. Check the manual to see which options take an option-argument.
Common Mistakes to Avoid
- Forgetting the hyphen(s) before options —
lis not the same as-l; the shell will treatlas an argument or a different command. - Using a long option with one hyphen —
-allis often wrong; use--allfor the long form. - Assuming every command has the same options — Options are specific to each command; always check the manual or help.
- Putting options after arguments when the command expects options first — Some commands are strict about order; when something doesn't work, check the correct syntax.
Best Practices
- Read the command's help or man page before using unfamiliar options.
- Use meaningful arguments (e.g. correct file and directory names) and check that they exist when the command expects paths.
- Prefer long options in scripts or when you want the command to be easy to read later.
- When in doubt, run the command with
--helporman commandnameto confirm the options and argument order.
pwd, cd and tree Commands
The cd, pwd, and tree commands are essential tools for navigating the Linux file system efficiently. The cd (change directory) command allows users to move between directories, making it possible to access files and organize the system effectively. The pwd (print working directory) command helps users confirm their current location within the file system, which is particularly useful when working with deeply nested directories. The tree command provides a structured view of the directory hierarchy, displaying files and subdirectories in an easy-to-read format. Together, these commands enable users to move through the file system, verify their position, and visualize the directory structure, improving workflow and organization.
Using the examples in this lesson: The examples below use the directories created by the course setup.sh script.
Quick Reference
| Command | Description | Common Use |
|---|---|---|
pwd |
Print working directory | Show current location |
cd |
Change directory | Navigate between directories |
tree |
Display directory structure | View folder hierarchy |
pwd Command
The pwd command in Linux stands for "print working directory." It displays the full path of your current directory—that is, the path starting from the root of the file system. The root (written as /) is the top-level directory on a Linux system: all other folders and files live somewhere under it, so a full path might look like /home/username/playground/chapter1. (Some shells show your home directory as ~ instead of /home/username.) pwd is especially useful for verifying your location within the file system, which can help avoid confusion when navigating complex directory structures.
When to Use pwd
The pwd command is particularly useful in these scenarios:
- After navigating through multiple directories to confirm your location
- When working with scripts that need to know the current directory
- When troubleshooting path-related issues
- When documenting your workflow for others
Command Options
| Option | Description |
|---|---|
-P |
Display the physical path (resolves symbolic links) |
-L |
Display the logical path (default behavior) |
When do they differ? Most of the time pwd -L and pwd -P show the same path. They differ only when your current directory was reached by following a symbolic link (a shortcut that points to another folder). In that case, -L shows the path that includes the link name (the way you got there), and -P shows the real location on disk with the link “resolved.” You will learn about symbolic links later in this book; until then, either option is fine and the output will usually be the same. In most cases, you will not need to use these options and the default behavior of pwd will suffice.
# Basic usage
pwd

# Show physical path (resolves symlinks discussed later in this book)
pwd -P

# Show logical path (default)
pwd -L
Common Use Cases
# Verify current location
pwd

# Check path after navigation (using setup directories)
cd ~/playground/chapter1
pwd
cd Command
The cd command in Linux is used to change the current working directory. This command is fundamental for navigating the file system. Understanding how to use cd effectively will help you move between directories quickly and efficiently.
Path Types
Understanding the difference between relative and absolute paths is crucial for effective navigation in the Linux file system. Think of it like giving directions: absolute paths are like giving someone your full address, while relative paths are like saying "go two blocks down from where you are now." Though I am adding this to the cd command section, absolute and relative paths are also used with other commands, such as ls, mv, cp, rm, mkdir, rmdir, touch, cat, less, grep, chmod, chown, find, and tar. These commands can all use either relative paths (like ./file.txt or ../folder/) or absolute paths (like /home/user/file.txt). You will learn more about these commands in later sections.
Absolute Path
An absolute path is the complete path from the root directory to the desired directory or file. It always starts with a forward slash /, which represents the root of the file system.
# Examples of absolute paths (using your home directory and setup):
cd ~/playground/chapter1
cd ~/playground/chapter2
cd /var/log
cd /usr/local/bin
These commands use absolute paths to navigate to specific locations, regardless of where you currently are in the file system. It's like saying "go to 123 Main Street" - it works from anywhere!
Relative Path
A relative path specifies a location relative to your current directory. It does not start with a forward slash /. Think of it as giving directions from where you are standing.
# If you're in ~ (your home directory):
cd playground/chapter1     # Goes to ~/playground/chapter1
cd ../chapter2             # Goes to ~/playground/chapter2 (from chapter1)
cd ../../playground/chapter2   # From playground/chapter1, goes to ~/playground/chapter2
cd ./playground/chapter1   # From ~, goes to ~/playground/chapter1
Special characters in relative paths:
.means "current directory"..means "parent directory"./explicitly refers to the current directory (optional)
Real-world analogy: If you're in your living room and want to go to your bedroom, you could either:
- Use an absolute path: "Go to 123 Main Street, Apartment 4B, Bedroom"
- Use a relative path: "Go through the hallway to the bedroom"
Both methods work, but relative paths are often shorter and more convenient when you're already close to your destination!
Common Path Shortcuts
Here is a table of some of the most common path shortcuts you can use with the cd command and their descriptions:
| Shortcut | Description |
|---|---|
.. or ../ |
Move up one directory level (parent directory) |
~ |
Change to your home directory. Important: While ~ takes you directly to your personal home directory (like /home/username), /home takes you to the main directory that contains all users' home folders. When you log in, you're automatically taken to your home directory, which is why ~ is the default shortcut for it. Don't ever go to /home unless you're a system administrator. |
- |
Change to the previous directory |
/ |
Change to the root directory |
. or ./ |
Stay in the current directory |
Common Examples
Here are some practical examples of using the cd command:
Basic Navigation
# Change to chapter 1 playground (created by setup)
cd ~/playground/chapter1

# Move up one directory level (e.g. from chapter1 to playground)
cd ..

# Change to home directory
cd ~

# Change to root directory
cd /

# Return to previous directory
cd -

# Stay in current directory
cd .
Combining Commands
# Change directory and verify location (using setup paths)
cd ~/playground/chapter1 && pwd

# Navigate up two levels (e.g. from chapter1 to home)
cd ../..

# Change to a chapter subdirectory of home
cd ~/playground/chapter2

# Change to another chapter (created by setup)
cd ~/playground/chapter3

# Navigate using environment variables
cd $HOME/playground/chapter1
Common Errors and Solutions
# Error: No such file or directory
cd nonexistent_folder
# Solution: Check spelling and verify directory exists

# Error: Permission denied
cd /root
# Solution: Use sudo or check permissions

# Error: Not a directory
cd file.txt
# Solution: Verify target is a directory, not a file

# Error: Too many arguments
cd dir1 dir2
# Solution: Use only one directory path at a time
tree Command
The tree command in Linux is used to display the directory structure in a hierarchical format, making it easier to visualize the organization of files and subdirectories. By default, it starts from the current directory and recursively lists all files and directories in a tree-like structure. Users can modify its behavior with options such as -L to limit the depth of recursion or -d to show only directories.
When to Use tree
Use tree when you need to:
- View the complete directory structure
- Understand the relationship between directories
- Get a visual overview of a project's structure
- Document directory layouts
Common Options
The tree command supports several options to customize its output:
| Option | Description |
|---|---|
-L N |
Limits the depth of directory traversal to N levels |
-d |
Displays only directories, excluding files |
-a |
Shows all files, including hidden ones |
-f |
Prints the full path for each file and directory |
-h |
Displays file sizes in a human-readable format |
--du |
Shows the cumulative disk usage of each directory |
--dirsfirst |
Lists directories before files in the output | -v |
Sorts the output alphabetically |
Example Usage
Here are some practical examples of using the tree command:
# Basic usage (run from ~/playground/chapter1 to see the cat practice files)
tree

# Show only directories
tree -d

# Show 2 levels deep (try from ~/playground)
tree -L 2

# Show hidden files
tree -a

# Show with full paths
tree -f

# Show with human-readable sizes
tree -h

# Show specific directory (using setup path)
tree ~/playground/chapter1

# Show with directories first
tree --dirsfirst

# Show with disk usage
tree --du
Interpreting Output
The tree command output uses specific symbols to represent the directory structure:
.- Current directory├──- Branch with more items below└──- Last item in a branch│- Vertical line connecting branches
Sample Output
Below is a sample of what you might see when you run tree from ~/playground/chapter1 (after running the course setup). The exact files come from the setup script:
.
├── body.txt
├── debug.txt
├── file1.txt
├── file2.txt
├── footer.txt
├── header.txt
├── hello.txt
├── mixed.txt
├── special.txt
└── spaces.txt
Best Practices
- Always verify your location with
pwdafter navigation - Use absolute paths in scripts for reliability
- Use relative paths for quick navigation
- Combine commands with
&&for sequential operations - Use
treeto document project structures - Keep directory names simple and descriptive
- Avoid spaces in directory names when possible
ls Command
Have you ever wanted to see what's inside a folder on your computer? That's exactly what the ls command does! The name ls stands for list—it lists the files and folders in a directory. Think of it like opening a drawer to see what's inside: it shows you all the files and folders in your current location. This is one of the most important commands you'll use in Linux, and we'll explore all the cool things it can do.
The examples below are based on the course setup. Try them in ~/playground/chapter1 to see output like what is shown.
When to Use ls
- When you want to see what files and folders are in your current directory
- When you need to check if a file exists
- When you want to see file details like size and last modified date
- When you need to find hidden files
- When you want to explore subdirectories
Common Options
| Option | What It Does | When to Use It |
|---|---|---|
-l |
Shows detailed information (long format) | When you need to know file sizes, dates, and permissions |
-a |
Shows hidden files | When you need to see all files, including system files |
-h |
Shows sizes in KB, MB, GB | When you want to understand file sizes easily |
-t |
Sorts by date (newest first) | When you're looking for recently modified files |
-R |
Shows contents of subfolders | When you need to see everything in a folder and its subfolders |
-i |
Shows file inode numbers | When you need to know the unique identifier for each file |
Practical Examples
Basic Listing
This is the simplest way to see what's in your current folder. From ~/playground/chapter1 you might see:
lsOutput would be something like this:
body.txt debug.txt file1.txt file2.txt footer.txt header.txt hello.txt mixed.txt special.txt spaces.txtThis shows you all the visible files in your current directory (the exact order may vary).
Long Format Listing (-l)
Use -l to see detailed information about files. From ~/playground/chapter1:
ls -lOutput would be something like this (dates will be different):
-rw-r--r-- 1 student class   45 Jan 15 10:30 body.txt
-rw-r--r-- 1 student class   52 Jan 15 10:30 debug.txt
-rw-r--r-- 1 student class   11 Jan 15 10:30 file1.txt
-rw-r--r-- 1 student class   12 Jan 15 10:30 file2.txt
-rw-r--r-- 1 student class   28 Jan 15 10:30 footer.txt
-rw-r--r-- 1 student class   27 Jan 15 10:30 header.txt
-rw-r--r-- 1 student class   38 Jan 15 10:30 hello.txt
This shows you detailed information including:
- File permissions (like rwxr-xr-x)
- Number of hard links
- Owner and group
- File size in bytes
- Last modified date and time
- File name
We will look at permissions in more detail in later lessons.
Showing Hidden Files (-a)
Use -a to see all files, including hidden ones:
ls -aOutput would be something like this (in ~/playground/chapter1 you'll see the practice files plus . and ..):
. .. body.txt debug.txt file1.txt file2.txt footer.txt header.txt hello.txt mixed.txt special.txt spaces.txtThis reveals:
.(current directory)..(parent directory)- Hidden files (any starting with
.) - Regular files and directories
Showing Inode Numbers (-i)
Use -i to see the inode numbers of files. From ~/playground/chapter1:
ls -iOutput would be something like this (your inode numbers will differ):
1234567 body.txt
1234568 debug.txt
1234569 file1.txt
1234570 file2.txt
1234571 footer.txt
1234572 header.txt
1234573 hello.txt
Each file has a unique inode number that identifies it in the filesystem. This is useful for:
- Finding hard links to the same file
- System administration tasks
- Understanding file system structure
Tips for Success
- Start Simple: Begin with just
lsand add options as you need them - Combine Options: You can use multiple options together (like
ls -la) - Practice Regularly: Try these commands in
~/playground/chapter1or other chapter directories to get comfortable - Don't Panic: If you get lost, use
pwdto see where you are
Common Mistakes to Avoid
- Forgetting that Linux is case-sensitive (
LSis different fromls) - Not checking your current directory before using
ls - Getting overwhelmed by too many options at once
- Forgetting that hidden files exist
Best Practices
- Use
-lwhen you need detailed information about files - Use
-awhen you need to see all files, including hidden ones - Use
-hwhen you want to understand file sizes easily - Use
-Rwhen you need to explore subdirectories - Use
-iwhen you need to identify files uniquely
Chapter 2
mkdir Command
Think of the mkdir command as your digital folder creator. Just like you create folders on your desktop to organize files, mkdir helps you create directories (folders) in Linux to keep your files organized.
The examples below use the course setup. Work in ~/playground/chapter2 so you can create directories there alongside the existing practice files.
Why Use mkdir?
You'll use mkdir when you want to:
- Create a new folder for your project
- Organize your files into categories
- Set up a directory structure for a new task
- Create multiple folders at once
Basic Usage
The simplest way to create a directory is:
mkdir directory_nameFor example, to create a folder in your chapter 2 playground:
cd ~/playground/chapter2
mkdir class_notes
Common Options
| Option | What It Does | When to Use It |
|---|---|---|
-p |
Creates parent directories if they don't exist | When creating nested folders |
-v |
Shows what's being created | When you want to see the process |
-m |
Sets permissions for the new directory | When you need specific access rights |
-Z |
Sets SELinux security context | When working with SELinux systems |
--context |
Like -Z but specifies full context | When you need specific SELinux settings |
--mode |
Same as -m but more explicit | When you want to be very clear about permissions |
--parents |
Same as -p but more explicit | When you want to be very clear about parent creation |
--verbose |
Same as -v but more explicit | When you want to be very clear about verbosity |
--help |
Shows help information | When you need to see all options |
--version |
Shows version information | When you need to check the version |
Practical Examples
Creating a Single Directory
From ~/playground/chapter2, create a folder for a project:
cd ~/playground/chapter2
mkdir my_project
Creating Multiple Directories
You can create several folders at once in the chapter 2 playground:
cd ~/playground/chapter2
mkdir notes homework projects
Creating Nested Directories
To create a folder inside another folder (even if the parent doesn't exist), use -p. From ~/playground/chapter2:
cd ~/playground/chapter2
mkdir -p school/spring2024/cs101/assignments
This creates school, then school/spring2024, then school/spring2024/cs101, then school/spring2024/cs101/assignments in one command.
Creating with Permissions
To create a directory with specific access rights (for example in your chapter 2 playground):
cd ~/playground/chapter2
mkdir -m 755 shared_folder
This creates a folder that you can read, write, and execute, while others can only read and execute.
Tips for Success
- Use descriptive names: Make your directory names clear and meaningful
- Use -p for nested directories: It saves time and prevents errors
- Check your current location: Use
pwdto confirm you're in~/playground/chapter2(or where you want the new folders) - Use -v when learning: It helps you understand what's happening
Common Mistakes to Avoid
- Creating directories with spaces in names (use underscores instead)
- Forgetting the -p option when creating nested directories
- Not checking if a directory already exists
- Using special characters in directory names
Best Practices
- Keep directory names short but descriptive
- Use lowercase letters for consistency
- Use underscores instead of spaces
- Create a logical folder structure
file Command
Think of the file command as a detective that examines files to tell you what they really are. Unlike Windows or macOS, Linux doesn't rely on file extensions (like .txt or .jpg) to know what type of file something is. Instead, it looks at the actual content of the file to determine its type.
Why Use the file Command?
You might need the file command when:
- You download a file and don't know what it is
- You find a file without an extension
- You want to verify a file's type before opening it
- You're working with files from different operating systems
Basic Usage
The simplest way to use the file command is to type:
file filenameAfter running the course setup, try it on a file in ~/playground/chapter2. For example:
cd ~/playground/chapter2
file notes.txt
Output:
notes.txt: ASCII textCommon Options
Here are the most useful options you'll need as a beginner:
| Option | What It Does | When to Use It |
|---|---|---|
-b |
Shows only the file type (no filename) | When you want cleaner output |
-i |
Shows the MIME type | When working with web files |
-z |
Looks inside compressed files | When checking zip or tar files |
Practical Examples
Checking Different File Types
The course setup creates several file types in ~/playground/chapter2. Try checking a few at once:
cd ~/playground/chapter2
file notes.txt sample.sh index.html style.css readme empty_file sample.pdf sample.jpg
You should see output like:
notes.txt:    ASCII text
sample.sh:    Bourne-Again shell script, ASCII text executable
index.html:   HTML document, ASCII text
style.css:    ASCII text
readme:       ASCII text
empty_file:   empty
sample.pdf:   PDF document, version 1.4
sample.jpg:   JPEG image data, JFIF standard 1.01
Notice that readme has no extension, but file still identifies it as text by looking at its content. The empty_file is reported as "empty" because it has no content. The sample.pdf and sample.jpg files are minimal examples (they contain only the magic bytes that identify the format); they are not real documents or images, but file correctly reports their type.
Using Brief Mode
If you just want the file type without the filename, use -b:
cd ~/playground/chapter2
file -b notes.txt
file -b sample.sh
Output:
ASCII text
Bourne-Again shell script, ASCII text executable
Checking Web Files (MIME Type)
For web files, use -i to see the MIME type. The setup provides index.html and style.css in ~/playground/chapter2:
cd ~/playground/chapter2
file -i index.html style.css
Output:
index.html: text/html; charset=us-ascii
style.css: text/css; charset=us-ascii
Tips for Success
- Start Simple: Begin with basic file checks before using options
- Check Unknown Files: Always use
fileon files you're not sure about - Use Brief Mode: The
-boption gives cleaner output - Practice: Try checking different types of files to learn the output formats
Common Mistakes to Avoid
- Forgetting that Linux doesn't rely on file extensions
- Not checking file types before opening unknown files
- Getting confused between similar file types
- Not using the
-boption when you want cleaner output
Advanced Usage (For Later)
When you're more comfortable with Linux, you might want to try these advanced features:
- Using
-fto read filenames from a file - Using
-Lto follow symbolic links - Using
-sto read special files
less Command
Think of the less command as a smart way to read files in Linux. It's like having a book reader that lets you scroll through text files easily, search for specific words, and jump to different parts of the file. Unlike regular text editors, less is perfect for quickly viewing files without making changes.
The examples below use the course setup. In ~/playground/chapter2 the setup creates notes.txt and longfile.txt (a longer file) so you can practice scrolling and search. Use cd ~/playground/chapter2 before trying the commands.
What is Less?
less is a command-line tool that helps you view and navigate through text files. It's called "less" because it's "more" than the older more command (get it?). It's one of the most useful tools you'll use in Linux, especially when working with large files or log files.
Basic Usage
To start using less, just type the command followed by the name of the file you want to view:
less filename.txtThis opens the file in a viewer where you can scroll through it. The file stays in its original state - you're just looking at it, not changing it.
Navigation Keys
Here are the most important keys you'll use to move around in less:
| Key | What It Does |
|---|---|
Up/Down Arrows or k/j |
Move up (up arrow or k) or down (down arrow or j) one line at a time |
Page Up/Page Down or [b]/[SPACE] |
Move up (page up or b) or down (page down or space) one screen at a time |
G |
Jump to the end of the file |
1G or gg |
Jump to the beginning of the file |
/pattern |
Search for text (press n for next match) |
?pattern |
Search backwards (press N for previous match) |
q |
Quit and return to the command line |
Practical Examples
Use the practice files from the course setup in ~/playground/chapter2: notes.txt is short, and longfile.txt has many lines so you can practice scrolling and searching.
Viewing a File
From ~/playground/chapter2, open the notes file:
cd ~/playground/chapter2
less notes.txt
This opens your notes file for viewing. Press q to quit.
Viewing a Long File
Practice scrolling and jumping in a longer file:
cd ~/playground/chapter2
less longfile.txt
You can use the Up/Down Arrows or k/j keys to scroll through the file one line at a time. You can also use the Page Up/Page Down or [b]/[SPACE] keys to scroll through the file one screen at a time. Use G to jump to the end, 1G or gg to go to the start. Press q to quit.
Finding Information
Need to find something specific in a long file? Use the search feature. You just enter / for a forward search and ? for a backward search. Then type the pattern you are looking for. Press n for the next match and N for the previous match. Press q when you are done.
cd ~/playground/chapter2
less longfile.txt
Press /, then type a pattern that appears in the file. For longfile.txt (an ls -l /usr/bin listing), try /apt to find lines containing "apt", or /grep to find the grep command. Press n for the next match and N for the previous match. Press q when you are done.
Useful Options
Here are some helpful options you can use with less:
| Option | What It Does | When to Use It |
|---|---|---|
-N |
Shows line numbers | When you need to reference specific lines |
-i |
Ignores case in searches | When you're not sure about capitalization |
-S |
Truncates long lines | When viewing files with very long lines |
+<number> |
Starts at line number | When you want to jump to a specific part |
Tips for Success
- Start Simple: Begin with basic navigation before trying advanced features
- Remember to Quit: Press
qwhen you're done viewing a file - Use Search: The search feature (
/) is your friend for finding information - Practice: Try viewing
notes.txtandlongfile.txtin~/playground/chapter2to get comfortable
Common Mistakes to Avoid
- Forgetting to press
qto quit (you'll be stuck in the viewer) - Getting confused between
lessand text editors (remember,lessis for viewing only) - Not using search when looking for specific information
- Getting overwhelmed by too many options at once
The cat Command
Think of the cat command as your Swiss Army knife for working with text files in Linux. It's short for "concatenate" (which means to join things together), but it can do much more than just combine files. You can use it to view file contents, create new files, and even add text to existing files.
The examples below use the course setup. In ~/playground/chapter2 run cd ~/playground/chapter2 before trying the practice exercises at the bottom of the page.
Why Learn the cat Command?
The cat command is essential because:
- It's one of the most basic and frequently used commands
- It helps you quickly view file contents
- It's useful for creating and modifying text files
- It's often used in scripts and automation
Basic Syntax
cat [options] [file1] [file2] ...Common Options
| Option | What It Does | When to Use It |
|---|---|---|
-n |
Numbers all lines | When you need to reference specific lines |
-v |
Shows non-printing characters | When you need to see special characters |
-b |
Numbers only non-blank lines | When you want to ignore empty lines |
-s |
Removes extra blank lines | When your file has too many empty lines |
-E |
Shows $ at the end of each line | When you need to see line endings |
-T |
Shows tabs as ^I | When you need to see tab characters |
-A |
Shows all special characters | When debugging file formatting |
Practical Examples
Viewing a File
The most basic use of cat is to display a file's contents:
cat notes.txtThis shows everything in notes.txt on your screen.
Viewing Multiple Files
You can view several files at once:
cat file1.txt file2.txtThis shows the contents of both files, one after the other.
Creating a New File
NOTE: When writing to a file the > and >> operators are used to overwrite and append to the file respectively. The < and << are used to read from a file. This is known as redirection and will be covered in detail later in this book.
To create a new file and type its contents:
cat > newfile.txt
Type your text here
Press Ctrl+D when done
This creates newfile.txt with whatever you type. Press Ctrl+D to save and exit.
Adding to a File
To add text to the end of an existing file:
cat >> existing.txt
This text will be added to the end
Press Ctrl+D when done
This adds your new text to the end of existing.txt.
You can also create mutli-line files with the << 'EOF' syntax. This is a here document. It is a way to create a file with multiple lines of text.
cat > newfile.txt << 'EOF'
This is the first line
This is the second line
This is the third line
EOF
This creates newfile.txt with the three lines. NOTE: When using the << 'EOF' syntax, you do not need to use the Ctrl+D command to save and exit. The EOF is the end of the file just press the enter key to save and exit.
Viewing with Line Numbers
To see a file with line numbers:
cat -n notes.txtThis shows each line with its number, making it easier to reference specific parts.
Viewing Special Characters
To see all special characters (like tabs and line endings):
cat -A notes.txtThis shows:
- $ at the end of each line
- ^I for tab characters
- Other special characters
Viewing Non-Printing Characters
Sometimes text files contain characters that you can't see normally, like special formatting or control codes. The -v option makes these invisible characters visible:
cat -v notes.txtFor example, if your file contains:
- A tab character, it will show as
^I - A Windows-style line ending, it will show as
^M - Special characters like © or é, they will show as
M-followed by a code
Note: The -A option is actually more comprehensive than -v. It's equivalent to using -vET (showing non-printing characters, line endings with $, and tabs as ^I). Use -A when you want to see everything, or -v when you only need to see non-printing characters without the line ending $ symbols.
Practice Exercises
These exercises use practice files that are created by the course setup script. Make sure you are in the ~/playground/chapter2 directory before you start the exercises.
Practice these cat commands:
- Basic file viewing
cat hello.txt- View the contents of hello.txtcat file1.txt- View file1.txtcat file2.txt- View file2.txt
- View files with line numbers
cat -n hello.txt- View hello.txt with line numberscat -n file1.txt- View file1.txt with line numbers- What line number is "Hello, World!" on?
- View multiple files together
cat file1.txt file2.txt- View both files at oncecat hello.txt file1.txt file2.txt- View all three files- Notice how the contents are displayed one after the other
- Practice with line numbering options
cat -n mixed.txt- See all lines numbered (including blank lines)cat -b mixed.txt- See only non-blank lines numbered- Compare the output of both commands. What's the difference?
- View special characters
cat special.txt- View it normallycat -A special.txt- See the tab character displayed as^Icat -T special.txt- See only tabs as^Icat -E special.txt- See only line endings with$- Notice the differences between these options
- Combine files into a new file
cat file1.txt file2.txt > combined.txt- Combine the two files into a new filecat combined.txt- Verify the contentscat -n combined.txt- See the combined file with line numbers
- Practice with the -s option
cat spaces.txt- See it normally with multiple blank linescat -s spaces.txt- See how multiple blank lines are reduced to single blank lines- Compare the output - notice the difference?
- Debug formatting issues
cat debug.txt- View the file normallycat -A debug.txt- View all special characters- Identify where tabs (
^I) and line endings ($) appear cat -v debug.txt- View non-printing characters- Compare
-Aand-voutputs
- Add content to an existing file
cat >> hello.txt- Then type "This line was added later." and press Enter, then Ctrl+Dcat hello.txt- Verify the new line was added to the endcat -n hello.txt- View with line numbers to see the new line
- Challenge: Create a formatted report
cat header.txt body.txt footer.txt > report.txt- Combine all three into report.txtcat report.txt- View the complete reportcat -n report.txt- View with line numberscat >> report.txt- Then type "Generated: $(date)" and press Enter, then Ctrl+D (or just type a timestamp manually)cat report.txt- Verify the timestamp was added
Tips for completing these exercises:
- All commands assume you are in
~/playground/chapter2; usecd ~/playground/chapter2if needed. - If you need to reset the practice files (for example after modifying or deleting them), run
setup.shagain. - Use
lsto see all the files in the directory - Remember:
>overwrites,>>appends - When typing into a file with
cat >orcat >>, press Ctrl+D when you're done
Tips for Success
- Use -n for large files: Line numbers help you keep track of where you are
- Be careful with >: It overwrites existing files
- Use >> to add safely: It adds to the end without deleting
- Press Ctrl+D: This is how you finish typing when creating or adding to files
Common Mistakes to Avoid
- Using
>instead of>>when you want to add to a file - Forgetting to press Ctrl+D when creating or adding to files
- Not checking file contents before overwriting
- Using cat on very large files (use less instead)
Best Practices
- Use line numbers (-n) when working with code or configuration files
- Use -A when debugging formatting issues
- Always double-check before using > to overwrite files
- For large files, consider using less or more instead
cp, mv and rm Commands
Think of these commands as your file management toolkit in Linux. They're like the basic operations you do with files on your computer - copying, moving, and deleting - but with more power and flexibility.
The examples below use the course setup. Work in ~/playground/chapter2 so you have practice files and directories to use. Run cd ~/playground/chapter2 before trying the commands.
Quick Reference
| Command | Description | Common Use |
|---|---|---|
cp |
Copy files and directories | Make backups, duplicate files |
mv |
Move or rename files | Organize files, change names |
rm |
Remove files and directories | Delete unwanted files |
Why Learn These Commands?
These commands are essential because:
- They help you organize your files and directories
- They're faster than using a graphical interface
- They can handle multiple files at once
- They're used in scripts and automation
The cp Command (Copy)
The cp command is like making a photocopy of a file. It creates an exact duplicate of your file in a new location.
cp [options] source destinationCommon Options for cp
| Option | What It Does | When to Use It |
|---|---|---|
-i |
Asks before overwriting files | When you want to be safe |
-r |
Copies directories and their contents | When copying folders |
-v |
Shows what's being copied | When you want to see progress |
-p |
Preserves file attributes (permissions, timestamps) | When you need exact copies |
-a |
Archive mode (preserves everything, recursive) | When making complete backups |
-u |
Updates only newer files | When syncing directories |
-l |
Creates hard links instead of copying | When you want to save space |
Practical Examples
Copying a Single File
From ~/playground/chapter2, make a backup of notes.txt:
cd ~/playground/chapter2
cp notes.txt notes_backup.txt
Copying to a Directory
To copy a file into the documents folder (created by setup):
cd ~/playground/chapter2
cp notes.txt documents/
Copying Multiple Files
You can copy several files at once into a directory:
cd ~/playground/chapter2
cp report1.txt report2.txt documents/
Copying a Directory
To copy an entire folder and its contents, use cp -r. What you get depends on whether the destination already exists:
- Destination does not exist (e.g.
backup):cp -r documents backupcreates a new directory namedbackupand copies the contents ofdocumentsinto it. You getbackup/readme.txt, notbackup/documents/readme.txt. The new folder is named after the destination, not the source. - Destination exists (e.g.
backup/is already a directory):mkdir backupthencp -r documents backup/copies thedocumentsfolder intobackup, so you getbackup/documents/with its contents inside.
cd ~/playground/chapter2
# If you want backup/documents/ (folder and its contents inside backup), create backup first:
mkdir -p backup
cp -r documents backup/
Result: backup/documents/readme.txt (the folder documents is inside backup).
Copying Directory Contents Only
To copy only the contents of a directory (not the directory itself) into another folder:
cd ~/playground/chapter2
mkdir -p backup2
cp -r documents/* backup2/
Result: backup2/readme.txt (the files appear directly in backup2; there is no documents folder inside backup2). The * (asterisk) is a wildcard that means "all files and directories" here. You'll learn more about wildcards below.
Difference in one line: With cp -r documents backup/ (and backup existing), you get backup/documents/. With cp -r documents/* backup2/, you get the same files but directly in backup2/, with no documents subfolder.
The mv Command (Move/Rename)
The mv command does two things: it moves files to new locations and renames them. Think of it like picking up a file and putting it somewhere else.
mv [options] source destinationCommon Options for mv
| Option | What It Does | When to Use It |
|---|---|---|
-i |
Asks before overwriting | When you want to be safe |
-v |
Shows what's being moved | When you want to see progress |
-n |
Never overwrite existing files | When you want to protect existing files |
-b |
Makes backup of existing files | When you want to keep old versions |
-u |
Updates only newer files | When syncing directories |
-f |
Force move (overwrites without asking) | When you're sure about overwriting |
Practical Examples
Moving a File
To move a file into the documents folder:
cd ~/playground/chapter2
mv data_old.txt documents/
Renaming a File
To rename a file (moving it to the same location with a new name):
cd ~/playground/chapter2
cp notes.txt oldname.txt
mv oldname.txt newname.txt
Moving a Directory
To move an entire folder (create archive first if you like, then move backup into it):
cd ~/playground/chapter2
mkdir -p archive
mv backup archive/
The rm Command (Remove)
The rm command deletes files and directories. Be careful with this one - deleted files can't be recovered from the trash like in Windows or macOS!
rm [options] fileCommon Options for rm
| Option | What It Does | When to Use It |
|---|---|---|
-i |
Asks before deleting | Always use this when learning! |
-r |
Removes directories and their contents | When deleting folders |
-v |
Shows what's being deleted | When you want to see progress |
-f |
Force delete (no confirmation) | Use with extreme caution! |
-d |
Removes empty directories | When cleaning up empty folders |
-I |
Asks once before deleting many files | When deleting multiple files |
--preserve-root |
Prevents deleting the root directory | Safety feature (default in modern systems) |
Practical Examples
Deleting a File
To delete a single file (with confirmation). Use a file you created during practice, e.g. notes_backup.txt:
cd ~/playground/chapter2
rm -i notes_backup.txt
Deleting Multiple Files
To delete several files at once:
cd ~/playground/chapter2
rm -i report1.txt report2.txt
Deleting a Directory
To delete an entire folder and its contents (e.g. a backup folder you created):
cd ~/playground/chapter2
rm -ri backup/
Using Wildcards with cp, mv, and rm
Wildcards (also called glob patterns) let you specify many files at once using special characters. The shell expands the pattern into a list of matching file names before the command runs. They work with cp, mv, rm, ls, and many other commands.
Common Wildcard Characters
| Character | Meaning | Example |
|---|---|---|
* |
Matches any number of characters (including zero) | report*.txt matches report1.txt, report2.txt, report_final.txt |
? |
Matches exactly one character | report?.txt matches report1.txt, report2.txt but not report10.txt |
[ ] |
Matches one character from a set | data_[on]*.txt matches data_old.txt, data_new.txt |
Wildcard Examples (using ~/playground/chapter2)
The setup creates report1.txt, report2.txt, report3.txt, data_old.txt, and data_new.txt. From ~/playground/chapter2 you can try:
Copy all report files
cd ~/playground/chapter2
mkdir -p reports_backup
cp report*.txt reports_backup/
report*.txt expands to report1.txt, report2.txt, report3.txt (any filename that starts with "report" and ends with ".txt").
Copy files matching a single character
cd ~/playground/chapter2
cp report?.txt documents/
report?.txt matches report1.txt, report2.txt, report3.txt (one character where ? is). It would not match report10.txt because ? is only one character.
Copy with a character set
cd ~/playground/chapter2
cp data_[on]*.txt documents/
data_[on]*.txt matches data_old.txt and data_new.txt (one character that is either o or n, then any characters, then .txt).
Remove multiple files with a pattern
cd ~/playground/chapter2
rm -i data_*.txt
Always use -i with rm and wildcards so you don't delete more than you intend. The shell will list each matching file and ask for confirmation.
Tip: Use ls with the same pattern first to see what will match before running cp, mv, or rm. For example: ls report*.txt.
Tips for Success
- Always use -i when learning: It's better to be safe than sorry
- Double-check paths: Make sure you're working with the right files
- Start with simple operations: Master the basics before trying complex commands
- Use -v for visibility: It helps you understand what's happening
Common Mistakes to Avoid
- Using
rmwithout-i(especially as a beginner) - Forgetting the
-roption when working with directories - Not checking your current directory before running commands
- Using wildcards (*) without understanding what they'll match
Creating Symbolic and Hard Links
Think of links in Linux like shortcuts on your desktop, but more powerful. They let you access the same file from different locations without making copies. There are two types: hard links and symbolic (soft) links.
The examples below use the course setup. Work in ~/playground/chapter2 where the setup has created notes.txt and other files you can link to. Use cd ~/playground/chapter2 before trying the commands.
Why Use Links?
Links are useful when you want to:
- Access a file from multiple locations
- Create shortcuts to frequently used files
- Organize your files without duplicating them
- Share files between different directories
- Keep files synchronized - changes to either the original or linked file are reflected in both places
Hard Links
A hard link is like having multiple names for the same file. Think of it as a person with a nickname - both names refer to the same person. When you create a hard link, both the original file and the link point to the same data on your hard drive.
How Hard Links Work
In Linux, every file has an inode number - a unique identifier that points to the actual data on the disk. When you create a hard link:
- Both the original file and the hard link share the same inode number
- They point to exactly the same data on the disk
- The system keeps track of how many hard links point to each inode
- The data is only deleted when the last hard link is removed
Creating a Hard Link
ln original_file link_nameFor example, from ~/playground/chapter2:
cd ~/playground/chapter2
ln notes.txt notes_backup.txt
Important Things to Know About Hard Links
- Both files are exactly the same - changes to one affect the other
- Deleting one doesn't delete the other
- They must be on the same hard drive
- They can't link to directories
- You can create multiple hard links to the same file (limited only by the filesystem)
- The system keeps track of the number of hard links in the inode
Symbolic Links (Soft Links)
A symbolic link is like a shortcut on your desktop. It points to the original file's location. If you move or delete the original file, the link stops working.
Creating a Symbolic Link
ln -s original_file link_nameFor example, from ~/playground/chapter2:
cd ~/playground/chapter2
ln -s notes.txt notes_shortcut.txt
Important Things to Know About Symbolic Links
- They can point to files on different hard drives
- They can link to directories
- If the original file is moved or deleted, the link breaks
- They show where they point to when you list files
- You can create unlimited symbolic links to the same file
- Each symbolic link is independent and can be moved or deleted without affecting others
Understanding Paths
When creating links, you need to understand two types of paths:
Absolute Paths
These start from the root directory (/) and show the complete path:
ln -s /home/user/documents/file.txt /home/user/desktop/file_link.txtRelative Paths
These are based on your current location. For example, from ~/playground/chapter2 with a documents folder:
cd ~/playground/chapter2
ln -s notes.txt documents/notes_link.txt
Important note about relative paths in symbolic links:
- The path in a symbolic link is relative to the sources location, not where you are when you create it
- If you move the symbolic link, the relative path must still work from the link's new location
- Hard links don't have this issue because they point directly to the inode, not a path
For Example:
The course setup creates dir1 and dir2 in ~/playground/chapter2, with source.txt inside dir1. From ~/playground/chapter2 (the parent of dir1 and dir2), to create a symbolic link in dir2 that points to dir1/source.txt, run:
cd ~/playground/chapter2
ln -s ../dir1/source.txt dir2/symlink
Because the symbolic link lives in dir2, the path to the source file must be relative to dir2: ../ goes up to the parent (chapter2), then dir1/source.txt finds the file.
You could also use an absolute path for both the source file and the symbolic link.
What Happens When Source Files Are Deleted
Hard links and symbolic links behave very differently when the original file is deleted:
- Hard Links:
- If you delete the original file, the hard link still works perfectly
- This is because both point to the same inode and data
- The data is only deleted when all hard links are removed
- Symbolic Links:
- If you delete the original file, the symbolic link becomes "broken"
- The link still exists but points to nothing
- You'll get a "No such file or directory" error when trying to use it
Tips for Success
- Use symbolic links for directories: They're safer and more flexible
- Use hard links for important files: They provide better data protection
- Check your paths: Make sure you're using the right path type
- Use descriptive names: Make it clear what the link is for
Common Mistakes to Avoid
- Creating circular links (a link that points to itself)
- Using hard links across different hard drives
- Not checking if the original file exists
- Forgetting the -s option for symbolic links
Chapter 3
The type, help and man Commands
Think of help and man as your built-in Linux cheat sheets. When you're not sure how to use a command or need to look up its options, these commands are your best friends. They're like having a Linux expert right at your fingertips!
Quick Reference
| Command | Description | Common Use |
|---|---|---|
type |
Show what kind of command something is | Debugging, understanding commands |
help |
Show help for built-in shell commands only | Quick reference for commands like cd, echo, pwd |
man |
Show detailed manual pages for non-built-in commands | Complete documentation for commands like ls, grep, cat |
type Command
There are four types of commands in Linux: built-in, alias, function, and program.
| Type | Description | Example |
|---|---|---|
| Program | A program installed on your computer | grep |
| Built-in | A command that is built into the shell | cd |
| Alias | A shortcut for a command | ls is an alias for ls --color=auto |
| Function | A function in the shell | mkcd is a function that creates a directory and changes to it |
When you are not sure what a command is, you can use the type command to find out. For example, if you are not sure what ls is, you can use the type command to find out. The reason is due to the help files as help is only available for built-in commands and man is only available for non-built-in commands.
To check if a command is built into the shell, you can use type:
# Check if cd is a built-in command
type cd
# Output: cd is a shell builtin

# Check if ls is a built-in command
type ls
# Output: ls is /bin/ls  # This means it's not built-in
help Command
The help command is like a quick reference guide for built-in shell commands. It's perfect when you need a fast reminder of how to use commands like cd, echo, or pwd.
Common Options
| Option | What It Does | When to Use It |
|---|---|---|
-d |
Show brief description | When you just need a quick summary |
-m |
Show man-page style format | When you want more detailed help |
-s |
Show short usage summary | When you just need the basic syntax |
Practical Examples
Basic Usage
# Get help for cd command
help cd

# Get brief description
help -d echo

# Get usage summary
help -s pwd
Sample Output (for help cd)
# help cd output
cd: cd [-L|[-P [-e]] [-@]] [dir]
    Change the shell working directory.

    Options:
      -L  force symbolic links to be followed
      -P  use the physical directory structure
      -e  if the -P option is supplied, and the current working directory
          cannot be determined successfully, exit with a non-zero status
      -@  on systems that support it, present a file with extended attributes
          as a directory containing the attributes
man Command
The man command is like having a complete Linux manual at your fingertips. It provides detailed documentation for almost any command, including examples, options, and related commands.
When to Use man
Use man when you want to:
- Get complete documentation for a command
- See detailed examples and options
- Learn about related commands
- Understand command behavior in depth
- Find information about file formats or system calls
Common Options
| Option | What It Does | When to Use It |
|---|---|---|
-k |
Search for keywords | When you're not sure which command to use |
-f |
Show brief description | When you need a quick summary |
-a |
Show all matching pages | When a command has multiple manual pages |
-w |
Show file location | When you need to know where the man page is stored |
-K |
Performs a full-text search inside the actual man page contents. | When you need to find text across all manuals |
-k |
Runs a keyword search through the man page database. | When you need to find a specific keyword |
-l |
List manual pages | When you want to see all available man pages |
-P |
Use specific pager | When you want to use a different viewer |
Understanding Man Page Sections
Man pages are organized into numbered sections, each covering a different type of documentation. Not all commands will have pages in all sections - some might only appear in one section, while others (like passwd) might appear in multiple sections with different meanings.
| Section | What It Contains | Example | Notes |
|---|---|---|---|
| 1 | User commands | man 1 ls |
Most common section for everyday commands |
| 2 | System calls | man 2 open |
Functions provided by the kernel |
| 3 | Library functions | man 3 printf |
Programming library functions |
| 4 | Special files | man 4 null |
Device files in /dev |
| 5 | File formats | man 5 passwd |
Configuration file formats |
| 6 | Games | man 6 fortune |
Games and amusements |
| 7 | Miscellaneous | man 7 ascii |
Various topics and conventions |
| 8 | System admin | man 8 shutdown |
Commands for system administration |
How to Check Available Sections
To see which sections a command appears in, use the -f option:
# Check all sections for passwd
man -f passwd
# Output might show:
# passwd (1) - change user password
# passwd (5) - password file
Practical Examples
Basic Usage
# View manual for ls command
man ls

# Search for commands about files
man -k file

# View specific section
man 1 passwd

# Search all man pages for a term
man -K "regular expression"

# List all man pages
man -l
Navigation Tips
| Key | What It Does | When to Use It |
|---|---|---|
Space or f |
Move forward one page | When you want to read more |
b |
Move back one page | When you want to review previous content |
/pattern |
Search for text | When you're looking for specific information |
n |
Find next match | When you want to see more search results |
N |
Find previous match | When you want to go back to previous search results |
q |
Quit man page | When you're done reading |
h |
Show help | When you need to see all navigation options |
g |
Go to start | When you want to return to the beginning |
G |
Go to end | When you want to jump to the end |
Tips for Success
- Start with help: Use
helpfor built-in commands first - Use man for details: When you need complete documentation
- Try -k for discovery: Great for finding related commands
- Learn the navigation: Practice using man page navigation keys
Common Mistakes to Avoid
- Using
helpfor non-built-in commands - Forgetting to use
qto quit man pages - Not checking multiple sections when a command exists in more than one
- Not using
-kwhen you're not sure which command to use
Best Practices
- Use
helpfor quick reference of built-in commands - Use
manfor complete documentation - Learn the man page navigation shortcuts
- Use
-kto discover new commands
The sort and uniq Commands
Think of sort and uniq like organizing your music playlist. sort is like arranging your songs in order (by artist, title, or length), while uniq is like removing duplicate songs. Together, they help you organize and clean up your data, just like organizing your music collection!
The examples below use the course setup. Work in ~/playground/chapter3, where the setup has created names.txt, numbers.txt, items.txt, mixed_case.txt, data.txt, numbers_spaces.txt, dates.txt, complex_dates.txt and duplicates.txt. Use cd ~/playground/chapter3 before trying the commands.
Quick Reference
| Command | What It Does | Common Use |
|---|---|---|
sort |
Arranges lines in order | Organizing lists, sorting data |
uniq |
Removes duplicate lines | Finding unique items, counting duplicates |
When to Use These Commands
Use sort and uniq when you want to:
- Organize data alphabetically or numerically
- Remove duplicate entries from a list
- Count how many times items appear
- Find unique or duplicate items
- Clean up messy data
sort Command
The sort command is like a librarian organizing books. It can arrange your data in different ways, just like books can be sorted by title, author, or subject.
Common Options
| Option | What It Does | When to Use It |
|---|---|---|
-b |
Ignore spaces at start | When data has extra spaces |
-n |
Sort numbers correctly | When sorting numerical data |
-r |
Reverse the order | When you want descending order |
-f |
Ignore case | When case doesn't matter |
-k |
Sort by column | When data has multiple columns |
-M |
Sort by month | When sorting dates |
-u |
Remove duplicate lines | When you want unique lines only |
Practical Examples
From ~/playground/chapter3, the setup has created the practice files. Run the following commands there.
Basic Sorting
cd ~/playground/chapter3

# Sort names alphabetically
sort names.txt

# Sort numbers correctly
sort -n numbers.txt

# Sort in reverse order
sort -r items.txt

# Sort ignoring case
sort -f mixed_case.txt

# Sort and remove duplicates
sort -u duplicates.txt
Advanced sorting uses data.txt, numbers_spaces.txt, and dates.txt from the setup.
Advanced Sorting
In this example the -k2 means sort starting at field 2. The fields are separated by tabs and are considered columns.
# Sort by second column
sort -k2 data.txt

# Sort numbers and ignore spaces
sort -bn numbers_spaces.txt

# Sort by month names
sort -M dates.txt
If you have a file like the complex_dates.txt file, and your are asked to sort it in alphabetical order it will be a bit more complicated because you have to deal with the month names and the days of the month. To do that you need to sort each column.
As explained above, -k, the numbers are field (column) positions. -k2 means "sort starting at field 2". -k1,2M means "use fields 1 through 2 as the key" and treat month names correctly because of M. In -k2,2n, the key is only field 2 and n makes it numeric.
# Sort by month names and then by days of the month
sort -k1,2M -k2,2n complex_dates.txt

#To reverse the sort order you would do
sort -k1,2Mr -k2,2nr
uniq Command
The uniq command is like a librarian checking for duplicate books on a shelf. Just like a librarian can only spot duplicate books when they're next to each other on the shelf, uniq can only find duplicates when they're next to each other in the file. That's why we always sort the data first - it's like organizing all the books in order so the librarian can easily spot and remove the duplicates!
Common Options
| Option | What It Does | When to Use It |
|---|---|---|
-c |
Count occurrences | When you want to count duplicates |
-d |
Show only duplicates | When you want to find repeated items |
-u |
Show only unique items | When you want to find unique items |
-i |
Ignore case | When case doesn't matter |
Practical Examples
The setup has created duplicates.txt in ~/playground/chapter3: a file with duplicate lines that are not adjacent. Use it to see why sorting before uniq matters.
Basic Usage
Important: Understanding uniq without sorting first
Try using uniq directly on the unsorted file (this won't work correctly):
cd ~/playground/chapter3

# This won't work correctly because duplicates aren't adjacent
uniq duplicates.txt
# Output shows all lines because duplicates aren't next to each other:
# apple
# banana
# apple
# orange
# banana
# apple
# cherry
Now try uniq with sorting first (this works correctly):
# First sort the file, then use uniq
sort duplicates.txt | uniq
# Output shows only unique lines:
# apple
# banana
# cherry
# orange
Using uniq with the names.txt file (which has some duplicates):
# Remove duplicates (must sort first)
sort names.txt | uniq
# Output shows unique names:
# Jane
# Jill
# Jim
# John

# Count how many times each name appears
sort names.txt | uniq -c
# Output:
#       2 Jane
#       1 Jill
#       1 Jim
#       2 John

# Show only duplicate names
sort names.txt | uniq -d
# Output:
# Jane
# John

# Show only unique names (names that appear only once)
sort names.txt | uniq -u
# Output:
# Jill
# Jim
Key Differences:
- Without sorting:
uniqonly removes duplicates that are adjacent (next to each other). If duplicates are scattered throughout the file, they won't be removed. - With sorting: Sorting first groups all duplicates together, so
uniqcan properly identify and remove them. - Alternative: You can use
sort -uinstead ofsort | uniqfor the same result.
Tips for Success
- Always sort first: Remember that
uniqonly works on sorted data - Use -n for numbers: Always use
-nwhen sorting numbers - Check your data: Look at your data before sorting to choose the right options
- Combine commands: Use pipelines to combine
sortanduniqwith other commands
Common Mistakes to Avoid
- Using
uniqwithout sorting first - Forgetting
-nwhen sorting numbers - Not using
-bwhen data has extra spaces - Using wrong column numbers with
-k
Best Practices
- Always sort before using
uniq - Use descriptive filenames for sorted output
- Use
-nfor any numerical sorting - Combine options when needed (e.g.,
-bn) - Use pipelines to create powerful data processing chains
The head, tail and wc Commands
Think of these commands as your file viewing toolkit in Linux. They help you quickly peek at files without opening them completely, which is especially useful for large files. head shows you the beginning of a file, tail shows you the end, and wc gives you quick statistics about the file's contents.
Quick Reference
| Command | Description | Common Use |
|---|---|---|
head |
Show beginning of file | View first few lines |
tail |
Show end of file | View last few lines or monitor logs |
wc |
Count file contents | Get line/word/character counts |
head Command
The head command is like looking at the first page of a book - it shows you the beginning of a file. By default, it displays the first 10 lines, but you can change this number to see more or fewer lines.
When to Use head
Use head when you want to:
- Quickly check the beginning of a file
- See file headers or metadata
- Preview large files without loading them completely
- Check the format of a file
Common Options
| Option | What It Does | When to Use It |
|---|---|---|
-n |
Show first N lines | When you need a specific number of lines |
-c |
Show first N bytes | When you need to see a specific amount of data |
-q |
Hide file names | When viewing multiple files |
-v |
Show file names | When you need to know which file is which |
Practical Examples
The examples below use the course setup. Work in ~/playground/chapter3, where the setup has created headtail1.txt, headtail2.txt, and headtail3.txt. Use cd ~/playground/chapter3 before trying the commands.
View First Lines
# Show first 10 lines (default)
head headtail1.txt

# Show first 5 lines
head -n 5 headtail1.txt

# Show first 100 bytes
head -c 100 headtail1.txt
View Multiple Files
# Show first 3 lines of each file
head -n 3 headtail2.txt headtail3.txt

# Show first 3 lines without file names
head -n 3 -q headtail2.txt headtail3.txt
tail Command
The tail command is like looking at the last page of a book - it shows you the end of a file. It's especially useful for checking log files or seeing recent changes.
When to Use tail
Use tail when you want to:
- Check the end of a file
- Monitor log files in real-time
- See recent changes to a file
- Check the last few lines of output
Common Options
| Option | What It Does | When to Use It |
|---|---|---|
-n |
Show last N lines | When you need a specific number of lines |
-c |
Show last N bytes | When you need to see a specific amount of data |
-f |
Follow file changes | When monitoring log files |
-q |
Hide file names | When viewing multiple files |
-v |
Show file names | When you need to know which file is which |
Practical Examples
The examples below use the course setup. Work in ~/playground/chapter3, where the setup has created server1.log, server2.log, and server3.log. Use cd ~/playground/chapter3 before trying the commands.
View Last Lines
# Show last 10 lines (default)
tail headtail1.txt

# Show last 5 lines
tail -n 5 headtail1.txt

# Show last 100 bytes
tail -c 100 headtail1.txt
Monitor Log Files
# Watch a log file in real-time
tail -f server1.log

# Watch multiple log files
tail -f server2.log server3.log
wc Command
The wc (word count) command is like a quick statistics tool for files. It counts lines, words, and characters, giving you a quick overview of a file's contents.
When to Use wc
Use wc when you want to:
- Count lines in a file
- Count words in a document
- Check file size in characters/bytes
- Get quick statistics about text
Common Options
| Option | What It Does | When to Use It |
|---|---|---|
-l |
Count lines | When you need to know how many lines |
-w |
Count words | When you need to know how many words |
-c |
Count bytes | When you need to know file size |
-m |
Count characters | When you need to know character count |
-L |
Show longest line | When checking line lengths |
Practical Examples
The wc examples use the files created above (notes.txt, file1.txt, file2.txt, log1.txt, log2.txt).
Basic Counting
# Count lines, words, and bytes
wc notes.txt

# Count only lines
wc -l notes.txt

# Count only words
wc -w notes.txt

# Count only characters
wc -m notes.txt
Advanced Usage
# Count lines in multiple files
wc -l *.txt

# Find longest line
wc -L notes.txt

# Count words in all text files
wc -w *.txt
Tips for Success
- Use -n for specific numbers: Always specify how many lines you want
- Try -f for logs: Great for watching log files in real-time
- Combine with other commands: Use pipes (|) to process output
- Use -q for clean output: When viewing multiple files
Common Mistakes to Avoid
- Forgetting to specify number of lines with -n
- Using -f on non-log files
- Not using quotes for filenames with spaces
- Using wc without options when you need specific counts
Best Practices
- Use head/tail to preview large files
- Use -f to monitor important log files
- Use wc to check file sizes before processing
- Combine these commands with grep for powerful text processing
Linux Redirection
Redirection is a powerful feature in the shell that allows you to control where command output goes. It's like having a switch that lets you send data to different places - your screen, a file, or even a pipe. This is incredibly useful for tasks like creating log files, processing data from files, and keeping track of errors.
Think of redirection like rerouting traffic. Normally, commands take input from your keyboard and send output to your screen, just like cars driving on their usual routes. But sometimes you want to change where the data goes - like redirecting traffic to a different road. Redirection lets you send command output to files instead of the screen, or read input from files instead of the keyboard.
The examples below use the course setup. Work in ~/playground/chapter3, where the setup has created file1.txt, file2.txt, file3.txt, unsorted.txt, document.txt, and numbers_unsorted.txt. Use cd ~/playground/chapter3 before trying the commands.
Quick Reference
| Operator | What It Does | Common Use |
|---|---|---|
> |
Save output to file | Creating new files with command output |
>> |
Add to end of file | Appending to existing files |
2> |
Save errors to file | Logging error messages |
< |
Read from file | Using file contents as command input |
&> |
Save both output and errors | Logging everything to one file |
2>&1 |
Send errors to same place as output | Pipelines, portable scripts, same file |
When to Use Redirection
Use redirection when you want to:
- Save command output to a file
- Create log files
- Process data from files
- Keep track of errors
- Combine multiple outputs
Basic Redirection
Output Redirection
The most common form of redirection is sending output to a file. Think of it like saving a document instead of printing it.
Basic Output
From ~/playground/chapter3, the setup has already created file1.txt, file2.txt, and file3.txt. Practice output redirection:
cd ~/playground/chapter3

# Save directory listing to a file (overwrites if file exists)
ls *.txt > filelist.txt

# View what was saved
cat filelist.txt

# Add more content to the file (appends, doesn't overwrite)
echo "Additional files:" >> filelist.txt
ls *.txt >> filelist.txt

# View the updated file
cat filelist.txt
Error Redirection
Sometimes you want to save error messages separately from normal output. This is like having a special notebook just for mistakes.
Error Handling
From ~/playground/chapter3, practice error redirection (these commands intentionally use a non-existent file so an error is produced):
cd ~/playground/chapter3

# Save error messages to a file (file doesn't exist, so error is produced)
ls non_existent_file.txt 2> errors.txt

# View the error that was saved
cat errors.txt

# Add more errors to the file (append)
ls another_missing_file.txt 2>> errors.txt

# View all errors
cat errors.txt

# Compare: normal output goes to screen, errors go to file
ls file1.txt non_existent.txt 2> errors.txt
# Notice: file1.txt is listed on screen, error goes to errors.txt
Combined Redirection
You can save both normal output and errors to the same file. This is like keeping all your notes in one place.
Combined Output
From ~/playground/chapter3, practice combined redirection (saving both output and errors to the same file):
cd ~/playground/chapter3

# Save both normal output AND errors to one file
# file1.txt exists, missing_file.txt does not
ls file1.txt missing_file.txt &> combined.txt

# View what was saved (both the successful listing and the error)
cat combined.txt

# Add more to the combined file (append)
ls file2.txt another_missing.txt &>> combined.txt

# View the updated file
cat combined.txt

# Compare with separate redirection:
# This saves output to one file and errors to another
ls file1.txt missing_file.txt > output.txt 2> errors.txt
cat output.txt
cat errors.txt
Redirecting stderr to stdout: 2>&1
Another way to combine output and errors is 2>&1. Here, the numbers are file descriptors: 1 is standard output (stdout) and 2 is standard error (stderr). The syntax 2>&1 means “redirect file descriptor 2 (stderr) to wherever file descriptor 1 (stdout) is currently going.” So you first send stdout somewhere, then send stderr to the same place.
Why use 2>&1 instead of &>? Two main reasons:
- Portability:
2>&1works in all POSIX shells (sh, dash, older Bash). The&>form is a Bash extension, so scripts that might run in other shells often use2>&1. - Pipelines: To send both normal output and errors into a pipe, you must use
2>&1. Withcommand | other, only stdout goes to the pipe; stderr still goes to the screen. Withcommand 2>&1 | other, both streams go into the pipe so the next command can process everything.
Order matters. You must redirect stdout first, then stderr to stdout. If you write 2>&1 > file, stderr is sent to the old stdout (the screen), and only stdout goes to the file. The correct form is > file 2>&1 (or >> file 2>&1 to append).
cd ~/playground/chapter3

# Send both stdout and stderr to one file (same effect as &> file, but more portable since it works in all POSIX shells)
ls file1.txt missing_file.txt > combined2.txt 2>&1
cat combined2.txt

# Append both to a file
ls file2.txt another_missing.txt >> combined2.txt 2>&1

# Send both into a pipe (errors go through the pipe too)
ls file1.txt missing_file.txt 2>&1 | cat -n

# Discard both (send stdout to /dev/null, then stderr to same place)
ls file1.txt missing_file.txt > /dev/null 2>&1
Input Redirection
You can also use files as input for commands. This is like reading from a book instead of typing everything yourself.
File Input
The setup has created unsorted.txt and document.txt in ~/playground/chapter3. Practice input redirection:
NOTE: In the examples below we use the < operoator to recirect innput form a file. In the situations shown we use the < but we did nto have to as sort unsorted.txt is the same as sort < unsorted.txt. However, later in the course we will see how using the < operator is more flexible and can be used to redirect input from other sources such as pipes.
cd ~/playground/chapter3

# Sort contents of a file (file is used as input)
sort < unsorted.txt

# Sort and save to a new file (input from file, output to file)
sort < unsorted.txt > sorted.txt
cat sorted.txt

# Count words in a file (file is used as input)
wc < document.txt

# Count lines, words, and characters, then save to file
wc < document.txt > wordcount.txt
cat wordcount.txt
Practical Examples
Example 1: Creating a Log File
From ~/playground/chapter3, create a log file by redirecting command output:
cd ~/playground/chapter3

# Create a new log file (overwrites if exists)
date > my_log.txt

# Add more information to the log (appends)
echo "System information:" >> my_log.txt
uname -a >> my_log.txt

# Add current directory to log
echo "Current directory:" >> my_log.txt
pwd >> my_log.txt

# View the complete log
cat my_log.txt
Example 2: Processing Data with Redirection
The setup has created numbers_unsorted.txt in ~/playground/chapter3. Process the data using input and output redirection:
cd ~/playground/chapter3

# Sort numbers from file and save to new file
sort -n < numbers_unsorted.txt > sorted_numbers.txt

# View the sorted result
cat sorted_numbers.txt

# Count lines in the original file and save count
wc -l < numbers_unsorted.txt > line_count.txt
cat line_count.txt
Example 3: Separating Output and Errors
From ~/playground/chapter3, demonstrate separating normal output from errors:
cd ~/playground/chapter3

# List existing files (output) and non-existent files (errors)
# Output goes to one file, errors to another
ls file1.txt file2.txt nonexistent1.txt nonexistent2.txt > output.txt 2> errors.txt

# View the successful listings
cat output.txt

# View the error messages
cat errors.txt

# Or save everything together
ls file1.txt file2.txt nonexistent1.txt nonexistent2.txt &> all_output.txt
cat all_output.txt
Example 4: Building a Report
From ~/playground/chapter3, use redirection to build a report step by step:
cd ~/playground/chapter3

# Start a new report
echo "=== System Report ===" > report.txt
date >> report.txt
echo "" >> report.txt

# Add file listing
echo "Files in current directory:" >> report.txt
ls *.txt >> report.txt
echo "" >> report.txt

# Add file count
echo "Total .txt files:" >> report.txt
ls *.txt | wc -l >> report.txt

# View the complete report
cat report.txt
Advanced Redirection
Complex Redirection
# Save output and errors to different files
command > output.txt 2> errors.txt

# Discard error messages
command 2> /dev/null

# Save output and display it
command | tee output.txt

# Combine multiple outputs
(command1; command2) > combined.txt
Tips for Success
- Start simple: Begin with basic output redirection
- Check file permissions: Make sure you can write to the target file
- Use descriptive filenames: Name your files clearly
- Test first: Try commands without redirection first
Common Mistakes to Avoid
- Forgetting that
>overwrites existing files - Not using
2>for error messages - Using wrong redirection order (e.g.
2>&1 > filesends only stdout to the file; use> file 2>&1) - Not checking if input files exist
Best Practices
- Use
>>when you want to keep existing content - Use descriptive filenames for logs
- Check file permissions before redirecting
- Use
&>or> file 2>&1for complete logging; use2>&1when piping both output and errors - Test commands without redirection first
The grep Command
Think of grep as your text search superpower in Linux. It's like having a super-fast "Find" feature that can search through files, directories, and even output from other commands. The name "grep" comes from "global regular expression print," but don't worry about that for now - just think of it as your go-to tool for finding text in files.
The examples below use the course setup. Work in ~/playground/chapter3, where the setup has created notes.txt, log.txt, file1.txt, file2.txt, file3.txt, and code.py. Use cd ~/playground/chapter3 before trying the commands.
Why Learn grep?
The grep command is essential because:
- It helps you find information quickly in large files
- It's great for searching through code or configuration files
- It can search through multiple files at once
- It's often used in scripts and automation
Basic Syntax
grep [options] "what to search for" [where to search]Common Options
| Option | What It Does | When to Use It |
|---|---|---|
-i |
Ignores uppercase/lowercase differences | When you're not sure about capitalization |
-v |
Shows lines that DON'T match | When you want to exclude certain text |
-r |
Searches through folders and subfolders | When you need to search an entire directory |
-l |
Shows only filenames with matches | When you just want to know which files contain the text |
-n |
Shows line numbers with matches | When you need to find where matches occur |
-c |
Counts how many times text appears | When you want to know how often something occurs |
-w |
Matches whole words only | When you want to avoid partial matches |
-A |
Shows lines after the match | When you need to see what comes after |
-B |
Shows lines before the match | When you need to see what came before |
-C |
Shows lines around the match | When you need context around the match |
Practical Examples
Basic Search
To find a word in a file (from ~/playground/chapter3):
cd ~/playground/chapter3
grep "hello" notes.txt
This shows all lines in notes.txt that contain the word "hello".
Case-Insensitive Search
To find text regardless of uppercase/lowercase:
grep -i "hello" notes.txtThis finds "hello", "Hello", "HELLO", etc.
Finding What's Not There
To find lines that don't contain certain text:
grep -v "error" log.txtThis shows all lines in log.txt that don't contain the word "error".
Searching Multiple Files
To search through all text files in the directory:
grep "important" *.txtThis looks for "important" in all files ending with .txt (e.g. file1.txt, file2.txt).
Searching a Directory Recursively with -r
To search through every file in a directory (and any subfolders), use the -r option and give the directory path. From ~/playground/chapter3:
cd ~/playground/chapter3
grep -r "error" .
The . means "current directory," so this searches all files in chapter3 for the word "error". Grep prints each matching line and prefixes it with the filename (e.g. log.txt:2024-01-01 10:05:23 error: Connection failed). In the chapter3 setup you get matches in log.txt, app.log, server.log, error_log.txt, and error_report.txt. If the directory had subfolders, -r would search those too.
To search from the parent directory, you can pass the directory name instead:
cd ~/playground
grep -r "error" chapter3
This does the same search over all files inside chapter3 (and any subdirectories).
Searching with Line Numbers
To see where matches occur:
grep -n "bug" code.pyThis shows each match with its line number, like "42: bug in this line".
Counting Matches
To count how many times something appears:
grep -c "success" log.txtThis tells you how many lines contain the word "success".
Searching with Context
To see what's around your matches:
grep -C 2 "error" log.txtThis shows the matching line plus 2 lines before and after it.
Tips for Success
- Use quotes around your search text: Prevents confusion with special characters
- Start with -i: Case-insensitive searches catch more matches
- Use -n for code: Line numbers help you find where things are
- Try -C for context: Seeing surrounding lines helps understand matches
Common Mistakes to Avoid
- Forgetting to put search text in quotes
- Using -r when you only need to search one file
- Not using -w when you want whole words only
- Using grep on very large files without limiting the output
Best Practices
- Use -i for general searches to catch all variations
- Use -n when working with code or configuration files
- Use -C when you need to understand the context
- Combine grep with other commands using pipes (|)
Linux Pipelines
Think of Linux pipelines like a factory assembly line. Just as raw materials move from one station to another, getting transformed at each step, data flows through a series of commands, getting processed and transformed along the way. The pipe symbol (|) is like the conveyor belt that moves the data from one command to the next.
The examples below use the course setup. Work in ~/playground/chapter3, where the setup has created error_log.txt, error_report.txt, normal_file.txt, script1.py, script2.py, script3.py, file.txt, users.txt, access.log, app.log, server.log, and data.csv. Use cd ~/playground/chapter3 before trying the commands.
When to Use Pipelines
Use pipelines when you want to:
- Combine multiple commands to perform complex tasks
- Process data step by step without creating temporary files
- Filter and transform data in a single command
- Create powerful one-liners for data analysis
- Build custom data processing workflows
Basic Pipeline Concepts
A pipeline connects commands using the pipe symbol (|). The output of the command on the left becomes the input for the command on the right. Think of it like a chain of commands, where each link processes the data in some way.
Common Pipeline Patterns
| Pattern | What It Does | When to Use It |
|---|---|---|
command1 | command2 |
Basic two-command pipeline | Simple data processing |
command1 | command2 | command3 |
Three-command pipeline | Complex data processing |
command1 | tee file.txt |
Save and display output | When you need both output and a file |
Practical Examples
In some of these examples we are using commands that we have not yet covered. We will cover them in later chapters.
File Operations
cd ~/playground/chapter3

# Find all text files containing "error"
ls *.txt | grep "error"

# Count how many Python files are in the directory
ls *.py | wc -l

# Sort files by size
ls -l | sort -k5 -n
Text Processing
# Convert text to uppercase and count lines
cat file.txt | tr '[:lower:]' '[:upper:]' | wc -l

# Extract usernames from users.txt (similar to /etc/passwd format)
cat users.txt | cut -d: -f1 | sort

# Filter data.csv to rows for Engineers, take the name (first field, comma-delimited), then list sorted unique names
#NOTE a csv file is a text file with comma-separated values.
grep Engineer data.csv | cut -d, -f1 | sort -u
Tips for Success
- Start simple: Begin with two commands and add more as needed
- Test each step: Run each command separately first
- Use comments: Add comments to explain complex pipelines
- Break it down: Build pipelines step by step
Common Mistakes to Avoid
- Forgetting that some commands don't work well in pipelines
- Not checking if the first command produces the expected output
- Creating overly complex pipelines when a simpler solution exists
- Not using proper quoting for special characters
Best Practices
- Keep pipelines readable by using line breaks for long commands
- Use meaningful variable names when storing pipeline output
- Add comments to explain complex pipelines
- Test each part of the pipeline separately
- Use proper error handling
The tee Command
Think of the tee command like a photocopier for your command output. Just like a photocopier can make a copy while keeping the original, tee lets you save a copy of your command's output to a file while still showing it on your screen. It's perfect for when you want to both see what's happening and keep a record of it!
The examples below use the course setup. Work in ~/playground/chapter3, where the setup has created original.txt, data_tee.txt, file_tee.txt, diff1.txt, and diff2.txt. Use cd ~/playground/chapter3 before trying the commands.
Quick Reference
| Command | What It Does | Common Use |
|---|---|---|
tee |
Saves output to file while showing it on screen | Logging, debugging, saving command output |
When to Use tee
Use tee when you want to:
- Save command output while still seeing it on screen
- Create a log of what you're doing
- Debug a command by saving its output
- Send output to multiple places at once
- Keep a record of your work
Common Options
| Option | What It Does | When to Use It |
|---|---|---|
-a |
Adds to end of file instead of overwriting | When you want to keep existing content |
-i |
Ignores Ctrl+C interruptions | When you don't want to accidentally stop |
-p |
Checks for writing errors | When debugging file writing problems |
Practical Examples
Basic Usage
cd ~/playground/chapter3

# Save directory listing while showing it
ls -l | tee filelist.txt

# Save a message to a file while showing it
echo "Hello, World!" | tee greeting.txt

# Save to multiple files at once
echo "Important note" | tee note1.txt note2.txt
Real-World Scenarios
# Save installation output while watching it
make install | tee install_log.txt

# Keep adding to a log file
date | tee -a daily_log.txt
who | tee -a daily_log.txt

# Debug a command while saving output
ls -l /nonexistent 2>&1 | tee -i error_log.txt
Advanced Usage
cd ~/playground/chapter3

# Save full output and filtered results
ls -l | tee full_list.txt | grep ".txt" > text_files.txt

# Create a backup while processing (using original.txt from setup)
cat original.txt | tee backup.txt | sort > sorted.txt

# Monitor system while logging
top -b -n 1 | tee system_snapshot.txt
Multiple Tee Usage
cd ~/playground/chapter3

# Example 1: Save output at different stages
# This command:
# 1. Lists files (saved to stage1.txt)
# 2. Filters for .txt files (saved to stage2.txt)
# 3. Counts the lines (saved to stage3.txt)
ls -l | tee stage1.txt | grep ".txt" | tee stage2.txt | wc -l | tee stage3.txt

# Example 2: Save both original and filtered data (using data_tee.txt from setup)
# This command:
# 1. Shows original file (saved to original_copy.txt)
# 2. Finds error lines (saved to errors.txt)
# 3. Counts total error lines
cat data_tee.txt | tee original_copy.txt | grep "error" | tee errors.txt | wc -l

# Example 3: Create multiple backups (using file_tee.txt from setup)
# This command:
# 1. Shows original file (saved to backup1.txt)
# 2. Sorts the data (saved to backup2.txt)
# 3. Removes duplicates (saved to final.txt)
cat file_tee.txt | tee backup1.txt | sort | tee backup2.txt | uniq > final.txt

# Example 4: Back-to-back tee commands
# This command:
# 1. Shows file contents (from file_tee.txt)
# 2. Saves to backup.txt AND text.html at the same time
# Note: Both files get the exact same content
cat file_tee.txt | tee backup.txt | tee text.html

# Example 5: Multiple back-to-back tee commands
# This command:
# 1. Shows file contents
# 2. Saves to three different files at once
cat file_tee.txt | tee out1.txt | tee out2.txt | tee out3.txt
You can use tee as many times as you want in a pipeline. Each tee command:
- Saves a copy of the data at that point in the pipeline
- Passes the data along to the next command
- Can save to one or more files
Think of it like taking snapshots at different stages of your work. Each tee command is like taking a picture of your data at that moment, while the data continues flowing to the next command.
Complex Pipelines
cd ~/playground/chapter3

# Save both normal and error output
ls file1.txt missing.txt 2>&1 | tee output_and_errors.txt

# Process data while keeping original (using data_tee.txt from setup)
cat data_tee.txt | tee backup.txt | sort | uniq > unique.txt
Tips for Success
- Start simple: Try basic
teebefore adding options - Use -a carefully: Remember it adds to files instead of replacing them
- Check permissions: Make sure you can write to the target files
- Use descriptive names: Name your output files clearly
Common Mistakes to Avoid
- Forgetting that
teeoverwrites files by default - Not using
-awhen you want to keep existing content - Using wrong file permissions
- Forgetting the pipe (
|) beforetee
Best Practices
- Use
-afor logging to avoid losing data - Use descriptive filenames for your output
- Check file permissions before using
tee - Use
-ifor important operations you don't want interrupted - Combine with other commands for powerful data processing
Chapter 4
Linux Expansion
Linux expansions are a powerful feature that allows you to work with your files and commands more efficiently. They are a set of special characters and patterns that automatically expand into useful information. These expansions help you work faster and smarter with your files and commands. Linux expansion (specifically shell expansion) is a process where the shell interprets and replaces certain expressions in a command line before executing it. This allows you to write concise commands that the shell automatically transforms into more complex versions.
Think of it like a magic wand that transforms your commands into something more powerful. Just like how a chef uses different tools to prepare ingredients, Linux gives you special characters and patterns that automatically expand into useful information. These expansions help you work faster and smarter with your files and commands.
The examples below use the course setup. Work in ~/playground/chapter4, where the setup has created sample files and a subdir folder so you can try pathname expansion. Use cd ~/playground/chapter4 before running the pathname and tilde examples. Arithmetic, brace, parameter, and command substitution examples work from any directory; you can run them from ~/playground/chapter4 as well.
Quick Reference
| Expansion Type | What It Does | Common Use |
|---|---|---|
| Pathname | Matches files using patterns | Finding files, listing directories |
| Tilde | Expands to home directories | Navigating to home folders |
| Arithmetic | Performs math operations | Calculations in commands |
| Brace | Creates multiple strings | Making similar files/folders |
| Parameter | Uses variable values | Working with variables |
| Command Substitution | Uses command output | Combining commands |
Order matters: The shell applies expansions in a fixed sequence. Brace expansion runs before pathname (wildcard) expansion, so {...} is never a pathname pattern. Tilde and arithmetic expansion also happen before the shell matches * and ? against filenames.
When to Use Expansions
- When you need to work with multiple files at once
- When you want to save typing time
- When you need to perform calculations
- When you want to create similar files/folders
- When you need to use command output in other commands
Pathname Expansion (Wildcards)
Think of pathname expansion like a search pattern for files. It's like telling your computer "find all files that match this pattern" instead of listing each file individually.
| Pattern | What It Matches | Example |
|---|---|---|
* |
Any number of characters | *.txt matches all text files |
? |
Exactly one character | file?.txt matches file1.txt, fileA.txt |
[abc] |
Any character in the set | [a-c]*.jpg matches a.jpg, b.jpg, c.jpg |
[!abc] |
Any character NOT in the set | [!0-9]*.txt matches files not starting with numbers |
[[:class:]] |
Character class (alnum, alpha, digit, etc.) | [[:digit:]]*.txt matches files starting with numbers |
** |
Recursive matching (bash 4+ / zsh) | **/*.txt matches .txt files in all subdirectories |
Practical Examples
From ~/playground/chapter4, the setup has created file1.txt, file2.txt, file3.txt, fileA.txt, doc1.txt, doc2.txt, alpha.txt, beta.txt, a.jpg, b.jpg, c.jpg, readme.md, notes.md, image1.jpg, image2.png, image3.gif, file1a.txt, file2b.txt, and subdir/other.txt. Try these commands there:
cd ~/playground/chapter4

# List all text files in current directory
ls *.txt

# List files with single character before .txt (file1, file2, file3, fileA)
ls file?.txt

# List all jpg files starting with a, b, or c
ls [a-c]*.jpg

# List all files with numbers in their names
ls *[0-9]*

# List files NOT starting with numbers
ls [!0-9]*

# List files starting with letters
ls [[:alpha:]]*

# List all .txt files in all subdirectories (requires bash 4+ or zsh for **)
ls **/*.txt

# List files matching digit then letter then .txt
ls *[0-9][a-z].txt
Tilde Expansion
Think of the tilde (~) as a shortcut to your home directory. It's like having a "Home" button that takes you to your personal space on the computer.
| Form | What It Expands To | Example |
|---|---|---|
~ |
Your home directory | cd ~ |
~/path |
Home directory plus a path | ls ~/playground/chapter4 |
~username |
Another user's home directory (if permitted) | echo ~student |
Practical Examples
cd ~/playground/chapter4

# Go to your home directory
cd ~

# List files in your playground chapter4 folder (setup directory)
ls ~/playground/chapter4

# Copy a file to your home directory (e.g. copy file1.txt to home)
cp ~/playground/chapter4/file1.txt ~/

# Check another user's home directory (if you have permission)
echo ~username
Arithmetic Expansion
Think of arithmetic expansion like a calculator built into your commands. It lets you do math right in your terminal! In arithmetic expansion in Bash, the dollar sign ($) is used to signify the beginning of an arithmetic expression that needs to be evaluated. When you enclose an expression within $((...)), Bash treats the contents as an arithmetic expression and evaluates it accordingly.
| Form | What It Does | Example |
|---|---|---|
$((expression)) |
Evaluates integer math; result replaces the expression | echo $((5 + 3)) prints 8 |
+ - * / % |
Addition, subtraction, multiplication, division, remainder | echo $((10 % 3)) prints 1 |
( ) |
Groups operations (innermost first) | echo $(( (5 + 3) * 2 )) prints 16 |
| Variables | Variable names work inside $((...)) without $ |
count=5; echo $((count + 1)) prints 6 |
Practical Examples
# Basic math operations (work from any directory)
echo $((5 + 3))    # Addition
echo $((10 - 2))   # Subtraction
echo $((4 * 3))    # Multiplication
echo $((20 / 4))   # Division

# Using variables
count=5
echo $((count + 1))

# Complex calculations
echo $(( (5 + 3) * 2 ))  # Parentheses work too!
Brace Expansion
Think of brace expansion like a copy machine that creates multiple versions of similar names. It's perfect for when you need to create several similar files or folders. Brace expansion is not a wildcard: it does not look at existing files; it only generates new words on the command line. That is different from pathname patterns like * and ?, which match filenames on disk.
| Form | What It Generates | Example |
|---|---|---|
{a,b,c} |
Each comma-separated alternative | file{1,2,3}.txt → file1.txt file2.txt file3.txt |
{n..m} |
A numeric range (inclusive) | folder_{1..5} → folder_1 folder_2 ... folder_5 |
{a..z} |
A letter range (inclusive) | {a..c} → a b c |
{nnn..mmm} |
A range with leading zeros preserved | image_{001..003}.png → image_001.png image_002.png image_003.png |
| Nested braces | All combinations (Cartesian product) | {1..2}/{a..c} → 1/a 1/b 1/c 2/a 2/b 2/c |
When combined with globs, brace expansion runs first. For example, ls *.{txt,md} becomes ls *.txt *.md, and then pathname expansion finds matching files for each pattern.
Practical Examples
Run these in ~/playground/chapter4. The setup has already created sample files there (including readme.md, notes.md, and image1.jpg, image2.png, image3.gif) so you can try listing with brace expansion plus globs.
cd ~/playground/chapter4

# Create multiple files (adds file1.txt, file2.txt, file3.txt if not already there)
touch file{1,2,3}.txt

# Create numbered folders
mkdir folder_{1..5}

# Create directories inside of directories (1/a, 1/b, 1/c, 2/a, 2/b, 2/c, 3/a, 3/b, 3/c, 4/a, 4/b, 4/c)
mkdir -p {1..4}/{a..c}

# Create files with leading zeros
touch image_{001..005}.png

# Combine with other text
echo project_{alpha,beta,gamma}_test

# Brace + pathname: list both .txt and .md files (*.{txt,md} becomes *.txt *.md, then globs match)
ls *.{txt,md}

# Brace + pathname: list image files by extension
ls *.{jpg,png,gif}
Parameter Expansion
Think of parameter expansion as a way to use and modify variables in your commands. It's like having a toolbox for working with stored information.
In Bash, when you want to access the value of a variable, you need to use the dollar sign ($) before the variable name. For example, when you use $PATH, you are referencing the value stored in the PATH variable. The dollar sign tells the shell to replace $PATH with the actual value of the PATH variable when the command is executed.
Without the dollar sign, PATH would be treated as a literal string rather than a variable reference. So, to access the value stored in a variable like PATH, you need to use the dollar sign to indicate that you are referring to the variable itself.
Practical Examples
# Show your home directory
echo $HOME

# Show your username
echo $USER

# Show your PATH (first few lines if long)
echo ${PATH}
Command Substitution
Think of command substitution as a way to use the output of one command inside another command. It's like having a conversation where one command's answer becomes part of another command's question.
In Bash, the dollar sign ($) is used to indicate command substitution. Command substitution allows you to run a command and use its output as part of another command or expression.
When you enclose a command within $(), Bash executes the command inside the parentheses and replaces the entire expression with the output of that command. The dollar sign is essential to signify the start of command substitution and to distinguish it from regular text or variables.
Practical Examples
cd ~/playground/chapter4

# Get current date
echo "Today is: $(date)"

# Count files in directory
echo "Files: $(ls | wc -l)"

# Create a file with timestamp
touch "log_$(date +%Y%m%d).txt"

# Use command output in another command (largest file by size)
echo "The largest file is: $(ls -S | head -1)"
Tips for Success
- Start with simple patterns and build up to more complex ones
- Use quotes when you want to prevent expansion
- Test your patterns with
echobefore using them in commands - Remember that different shells might handle expansions slightly differently
- Use
set -xto see how expansions work in real-time
Common Mistakes to Avoid
- Forgetting that spaces in filenames need special handling
- Using the wrong type of quotes (single vs double)
- Not testing patterns before using them with destructive commands
- Forgetting that some expansions need spaces around them
- Mixing up the order of operations in arithmetic expansion
Best Practices
- Use descriptive variable names
- Test expansions with
echofirst - Use quotes when in doubt
- Keep expansions simple and readable
- Comment your code when using complex expansions
Single and Double Quotes
In Linux, quotes play a crucial role in how the shell interprets and processes text. Single quotes (' ') and double quotes (" ") are used to define strings and manage the interpretation of special characters within those strings. Understanding the differences between single and double quotes is essential for effective command-line usage.
The examples below use the course setup. Try them in ~/playground/chapter4 (run cd ~/playground/chapter4 first). The setup has created several files there, including a file named Old Name.txt (with a space) for the "creating files and folders with spaces" examples.
Single Quotes
Single quotes (' ') are used to preserve the literal value of each character within the quotes. This means that any special characters, such as $, *, or \, are treated as regular characters and not as special shell characters.
Example:
cd ~/playground/chapter4
echo 'text ~/*.txt {a,b} $(echo foo) $((2+2)) $USER'
Output:
text ~/*.txt {a,b} $(echo foo) $((2+2)) $USERIn this example, everything inside the single quotes is treated literally. The shell does not perform any expansion or interpretation of special characters. Thus, the output is exactly what was input.
Double Quotes
Double quotes (" ") preserve the literal value of most characters within the quotes. However, they allow the interpretation of certain special characters, such as $, \, !, and backticks `.
Example:
echo "text ~/*.txt {a,b} $(echo foo) $((2+2)) $USER"Output (your username will appear instead of me):
text ~/*.txt {a,b} foo 4 meIn this example, the double quotes allow for variable expansion and command substitution. Here's the breakdown of what happens inside the double quotes:
$(echo foo)is a command substitution and gets replaced byfoo.$((2+2))is an arithmetic expansion and gets replaced by4.$USERis a variable expansion and gets replaced by your username (e.g.me).
The tilde (~) and brace {} expansions are not processed within double quotes.
No Quotes
When no quotes are used, the shell processes all forms of expansion: pathname expansion, brace expansion, command substitution, arithmetic expansion, and variable expansion.
Example (run from ~/playground/chapter4 so *.txt expands to the setup's .txt files):
cd ~/playground/chapter4
echo text *.txt {a,b} $(echo foo) $((2+2)) $USER
Output will look similar to (the exact list of .txt files depends on what is in the directory):
text file1.txt file2.txt file3.txt fileA.txt doc1.txt doc2.txt alpha.txt beta.txt file1a.txt file2b.txt a b foo 4 meHere’s what happens step-by-step:
*.txtis pathname expansion: the shell replaces it with all filenames in the current directory that end with.txt(e.g.file1.txt file2.txt file3.txtand the other .txt files created by the setup).{a,b}is brace expansion and gets replaced byaandb.$(echo foo)is command substitution and gets replaced byfoo.$((2+2))is arithmetic expansion and gets replaced by4.$USERis variable expansion and gets replaced by your username.
Creating Files and Folders with Spaces
When creating files or folders with spaces in their names, quotes are essential to ensure the shell correctly interprets the spaces as part of the name rather than as separators between different arguments. That being said you should not create files or folders with spaces in their names.
Examples:
From ~/playground/chapter4, the setup has created a file named Old Name.txt. You can try renaming it with mv (use quotes around names that contain spaces):
cd ~/playground/chapter4
mv "Old Name.txt" "New Name.txt"
To rename it back (or create a new file with a space for practice):
mv "New Name.txt" "Old Name.txt"These commands create a directory or file with a space in the name (only for practice; avoid spaces in real filenames):
NOTE: The touch command will create an empty file with the given name. If the file already exists, it will be overwritten.
mkdir "My Folder"
touch "New Document.txt"
locate and find Commands
Think of searching for files on your Linux system like trying to find items in your home. The locate command is like asking someone who keeps a catalog of everything in your house - it's incredibly fast but might not know about things you've recently bought. The find command is like searching room by room yourself - it takes longer but will find even the newest items and can search based on detailed criteria like size, color, or when you got them. These powerful search tools help you track down files no matter how deeply they're tucked away in your system.
The examples below use the course setup. The script creates practice files under ~/playground/chapter4, including a locate_find subdirectory with sample files for both locate and find. You can run the find examples in either of two ways: change into the practice directory first (cd ~/playground/chapter4/locate_find and search with .), or stay in your home directory and give find the full path to search.
NOTE: You will have to run sudo updatedb once so locate can find the new files.
Quick Reference
| Command | What It Does | Common Use |
|---|---|---|
locate pattern |
Searches for files using a prebuilt database | Quickly finding files by name when speed matters |
updatedb |
Updates the locate database | Making sure locate has current information |
find path criteria |
Searches for files in real-time based on various criteria | Finding files based on detailed conditions or recent changes |
When to Use These Commands
- When you need to find a file but don't know where it's located
- When you need to find files based on specific characteristics (size, date, permissions)
- When you need to perform actions on multiple files that match certain criteria
- When troubleshooting missing or hidden files
- When cleaning up a system by finding old or large files
The locate Command
Think of locate as the lightning-fast card catalog in a library. It doesn't search your actual files - instead, it checks a pre-built index that gets updated regularly. This makes locate extremely fast but means it might miss recent changes if the database hasn't been updated. Another limitation is that it can only search by filename, not by other attributes like file size, permissions, or modification time. For those searches, find is needed.
| Option | What It Does | When to Use |
|---|---|---|
-i |
Makes the search case-insensitive | When you can't remember the exact capitalization |
-r |
Uses regular expressions for searching | When you need complex pattern matching |
-n NUMBER |
Limits results to a specific number | When you only need a few results from a large set |
-e |
Shows only files that actually exist | When you want to filter out deleted files still in the database |
-c |
Shows only the count of matching files | When you just need to know how many matches exist |
Practical Examples
# Find all files containing "homework" in their name
locate homework
# Lists all files with "homework" in their path

# Find files containing "report" regardless of case
locate -i report
# Finds "Report.pdf", "REPORT.txt", "weekly_report", etc.

# Find at most 5 PDF files
locate -n 5 "*.pdf"
# Shows only the first 5 PDF files found

# Find all configuration files using regular expressions
locate -r "/etc/.*\.conf$"
# Finds all .conf files in /etc and its subdirectories

# Count how many Python files you have
locate -c "*.py"
# Shows just the number of Python files found

# Update the locate database (do this after creating new files)
sudo updatedb
# Refreshes the database so locate will find new files
The find Command
Think of find as a detective that searches your entire system in real-time. Unlike locate, it doesn't use a database but instead looks through your actual directories. This makes it more versatile and accurate for recent changes, but slower than locate, especially on large systems.
Basic Structure
The basic structure of a find command is:
find [starting directory] [options] [tests] [actions]Common Tests (Search Criteria)
| Test | What It Does | When to Use |
|---|---|---|
-name "pattern" |
Matches files with the exact name/pattern | When you know the exact filename or pattern (case-sensitive) |
-iname "pattern" |
Like -name but case-insensitive | When you're unsure about capitalization |
-type f |
Matches only regular files | When you don't want directories, links, etc. |
-type d |
Matches only directories | When you're looking for folders only |
-size +10M |
Matches files larger than 10 megabytes | When looking for large files taking up space |
-size -10M |
Matches files smaller than 10 megabytes | When looking for small files |
-mtime -7 |
Files modified in the last 7 days | When looking for recently changed files |
-user username |
Files owned by a specific user | When looking for files belonging to someone |
-perm mode |
Files with specific permissions | When checking for security issues or access rights |
-empty |
Empty files or directories | When cleaning up wasted space |
Operators for Combining Tests
| Operator | What It Does | When to Use |
|---|---|---|
-and or just a space |
Both conditions must be true (logical AND) | When files must satisfy multiple criteria |
-or |
Either condition can be true (logical OR) | When looking for files that match any of several criteria |
! or -not |
Negates a condition (logical NOT) | When excluding certain files from results |
( ) |
Groups conditions (use with \( and \)) | When creating complex conditions with proper precedence |
Common Actions
| Action | What It Does | When to Use |
|---|---|---|
-print |
Prints matching files (default action) | When you just want to see what matches |
-delete |
Deletes matching files | When cleaning up files (use with caution!) |
-exec command {} \; |
Runs a command on each matching file | When you need to process matching files |
-exec command {} + |
Runs command once with all matches | More efficient than \; for many files |
xargs |
Runs a command on each file that matches your search criteria | When you need to process a large number of files |
Size Options
| Size Format | What It Means | Example |
|---|---|---|
+n |
Greater than n units | -size +10M (larger than 10MB) |
-n |
Less than n units | -size -1M (smaller than 1MB) |
n |
Exactly n units | -size 100k (exactly 100KB) |
c (bytes) |
Size in bytes | -size 1024c (1024 bytes) |
k (kilobytes) |
Size in kilobytes | -size 10k (10KB) |
M (megabytes) |
Size in megabytes | -size 5M (5MB) |
G (gigabytes) |
Size in gigabytes | -size 1G (1GB) |
Practical Examples — From the Practice Directory
In these examples the starting directory is the current directory, denoted by a period (.). Run cd ~/playground/chapter4/locate_find first. For examples that use -user john, replace john with your username (e.g. $(whoami)) so you see results.
# Find all text files in the current directory
find . -name "*.txt"
# Lists all .txt files in the current directory and subdirectories

# Find large files that might be wasting space
find . -type f -size +100M
# Finds files larger than 100MB in the current directory

# Find files between 10MB and 100MB in size (using "and" logic)
find . -type f -size +10M -size -100M
# Finds files larger than 10MB but smaller than 100MB

# Find recently modified files
find . -type f -mtime -2
# Finds files in the current directory modified in the last 2 days

# Find files with specific permissions
find . -type f -perm 0777
# Finds files with potentially insecure 777 permissions

# Find all empty files and directories
find . -empty
# Lists all empty files and directories in the current directory

# Find with complex conditions (find text files NOT owned by root)
find . -name "*.txt" -not -user root
# Finds text files that don't belong to root

# Find either PNG or JPG files (using "or" logic)
find . \( -name "*.png" -or -name "*.jpg" \)
# Finds all PNG or JPG files in the current directory

# Find executable files that are not shell scripts
find . -type f -executable -not -name "*.sh"
# Finds executable files that don't have the .sh extension

# Find docx files OR pdf files (OR example)
find . \( -name "*.docx" -o -name "*.pdf" \)
# Finds all Word documents or PDF files

# Find files with complex conditions using AND, OR, and NOT together
find . -type f \( -name "*.java" -o -name "*.py" \) -not -path "*/test/*"
# Finds Java or Python files that are not in test directories
Practical Examples — From Your Home Directory
You do not have to cd into the practice directory first. The first argument to find is the directory where the search begins. From your home directory (~), you can point find directly at ~/playground/chapter4 or a subdirectory such as ~/playground/chapter4/locate_find. These commands produce the same kinds of results as the examples above, but you can run them from anywhere.
# Find all text files in the locate_find practice directory (no cd required)
find ~/playground/chapter4/locate_find -name "*.txt"
# Same as: cd ~/playground/chapter4/locate_find, then find . -name "*.txt"

# Find large files in the practice directory
find ~/playground/chapter4/locate_find -type f -size +100M
# Finds large_file.dat (150MB) created by the setup script

# Search all of chapter4 — includes locate_find, subdir/, and files in chapter4 itself
find ~/playground/chapter4 -name "*.txt"
# Also finds file1.txt, doc1.txt, subdir/other.txt, etc.

# Find markdown files anywhere under chapter4
find ~/playground/chapter4 -name "*.md"
# Finds readme.md and notes.md in chapter4

# Find homework-related files without changing directory
find ~/playground/chapter4/locate_find -name "*homework*"
# Finds homework1.txt, homework2.txt, my_homework.pdf

# Find empty files and directories in the practice folder
find ~/playground/chapter4/locate_find -empty
# Finds empty.txt, empty_dir/, and other empty items

# Find PNG or JPG files using an explicit path
find ~/playground/chapter4/locate_find \( -name "*.png" -o -name "*.jpg" \)
# Same OR logic as the "." examples, but from your home directory

# Search your entire home directory, but only match PDFs in the practice folder
find ~ -path "*/playground/chapter4/locate_find/*.pdf"
# Useful when you start at ~ but want to limit results to a specific subtree
Using find with -exec and xargs
One of the most powerful features of find is the ability to perform actions on the files you find. You can do this with the -exec option or by piping to xargs.
Using -exec
-exec is used to run a command on each file that matches your search criteria. The {} placeholder is replaced with each filename, and \; marks the end of the command.
For Example:
If you had the code find my_project -type f -exec echo "Processing file: {} " \; the -exec option will run the echo "Processing file: {} " command on each file that matches the search criteria. The {} placeholder is replaced with each filename, and \; marks the end of the command. So for example if there are 3 files in the my_project directory that match the search criteria, the command will be run 3 times, once for each file.
# Find and delete all .tmp files
find /tmp -name "*.tmp" -exec rm {} \;
# The {} is replaced with each filename, and \; marks the end of the command

# Make all shell scripts executable
find ~/scripts -name "*.sh" -exec chmod +x {} \;
# Adds executable permission to all .sh files

# Find and copy all configuration files to a backup directory
find /etc -name "*.conf" -exec cp {} ~/backup/ \;
# Copies each .conf file to ~/backup/

# Find and long list PDF files
find ~/playground/chapter4 -name "*.pdf" -exec ls -la {} \;
# Shows detailed listing of each PDF file
Using xargs
xargs is used to run a command on each file that matches your search criteria. It is often used in combination with find to perform actions on the files you find.
For Example:
If you had the code find . -name "*.txt" | xargs wc -l the find command will locate all text files in the current directory, and the xargs command will run the wc -l command on each file. The | operator is used to pipe the output of the find command to the xargs command. So for example if there are 3 text files in the current directory, the command will be run 3 times, once for each file.
# Find and delete all .bak files (alternative to -exec)
find /home -name "*.bak" | xargs rm
# Pipes filenames to xargs which runs rm with those filenames as arguments

# Count lines of code in all Python files
find . -name "*.py" | xargs wc -l
# Counts lines in all Python files

# Create a tar archive of all HTML files
find . -name "*.html" | xargs tar -czf html_files.tar.gz
# Archives all HTML files into a single compressed file

# Replace text in multiple files
find . -name "*.txt" | xargs sed -i 's/old text/new text/g'
# Replaces "old text" with "new text" in all text files
Tips for Success
- Run
sudo updatedbregularly to keep thelocatedatabase current - Use
locatefor quick searches andfindwhen you need more detailed criteria - Test complex
findcommands without destructive actions first (remove-deleteor-exec) - When using
-execwith potentially destructive commands, run in a test directory first - Use quotes around patterns with wildcards to prevent shell expansion
- Add the
-type foption to find only files (not directories) when appropriate - Use
find -maxdepthto limit how deep find searches to improve performance - Remember that
locateshows file paths, not just filenames
Common Mistakes to Avoid
- Forgetting to update the locate database after creating new files (
sudo updatedb) - Not escaping parentheses in
findcommands: use\( \)instead of( ) - Forgetting to terminate
-execcommands with\; - Using
findwithout specifying a starting directory (defaults to current directory) - Not using quotes around patterns, causing the shell to expand wildcards before
findruns - Using
-deletewithout first verifying which files will be deleted - Assuming
locatecan search for files by criteria other than name - Running complex find commands as root without testing them first
Best Practices
- Use
locatefor simple filename searches andfindfor everything else - Combine multiple tests to narrow down search results precisely
- Use
-exec ... {} +instead of-exec ... {} \;when possible for better performance - Create aliases for commonly used find commands in your .bashrc
- When searching large filesystems, start with more specific directories to improve speed
- Use
2>/dev/nullto suppress permission denied errors when searching system directories - For complex file operations, consider using
findto create a list, review it, then execute - Document complex find commands you create for future reference
Real-World Scenarios
Cleaning Up Temporary Files
# Find and remove files older than 30 days in /tmp
find /tmp -type f -mtime +30 -delete

# Explanation:
# This finds all regular files (-type f) in the /tmp directory
# that haven't been modified in more than 30 days (-mtime +30)
# and deletes them (-delete)
# This is a common system maintenance task to free up disk space
Finding and Fixing Permissions
# Find and fix world-writable files
find . -type f -perm -0002 -exec chmod o-w {} \;

# Explanation:
# This finds all regular files in the current directory
# with world-writable permissions (potentially insecure)
# and removes the world-writable bit
# This improves security by preventing unauthorized users from modifying files
Creating a Backup of Important Files
# Back up all configuration files modified today
find . -name "*.conf" -type f -mtime 0 -exec cp {} ~/config_backup/ \;

# Explanation:
# This finds all .conf files in the current directory
# that were modified today (-mtime 0)
# and copies them to a backup directory
# This helps preserve important changes before making system changes
Terminal Efficiency
Once you're comfortable typing commands, the next step is to work faster. The shell gives you shortcuts to complete names, repeat past commands, and move around the line without retyping everything. This lesson covers tab completion, command history (including !! and !number), reverse search (Ctrl+R), and essential control keys: Ctrl+A, Ctrl+E, Ctrl+C, Ctrl+D, and Ctrl+L. Learning these will make you much more efficient at the terminal.
The examples below use the directories and files created by the course setup.sh script: ~/playground/chapter1 through ~/playground/chapter13 (and ~/assignments). You can try Tab completion and history with those paths and, in ~/playground/chapter4, with files like file1.txt and file2.txt. Run cd ~/playground/chapter4 to follow along with the examples that use the current chapter's files.
Note: When we write Ctrl+X, press and hold the Control key, then press the letter key. On Mac keyboards you may see "Control" or "ctrl"; use the Control key, not the Command (⌘) key.
Quick Reference
| Shortcut or Command | What It Does |
|---|---|
Tab |
Complete commands, file names, and paths |
history |
Show your command history (with numbers) |
!! |
Run the last command again |
!number |
Run the command with that history number |
Ctrl+R |
Search backward through history |
Ctrl+A |
Move cursor to start of line |
Ctrl+E |
Move cursor to end of line |
Ctrl+C |
Cancel the current command or line |
Ctrl+D |
End input (e.g. exit shell or finish cat) |
Ctrl+L |
Clear the screen |
Tab Completion
Tab completion lets the shell finish what you're typing. If you type part of a command name, file name, or path and press Tab, the shell tries to complete it. That means less typing and fewer typos.
How It Works
- Type the first few characters of a command, file, or directory name.
- Press Tab once. If there is exactly one match, the shell completes it.
- If there are multiple matches, press Tab twice to see a list of options. Then type a bit more to make the match unique and press Tab again.
- If nothing matches, the shell may beep or do nothing; check your spelling or path.
Tab Completion Examples
# Type part of a command and press Tab:
pw[TAB]     →  pwd
cd ~/pla[TAB]   →  cd ~/playground/

# If several names match, press Tab twice to list them:
ls ~/playground/ch[TAB][TAB]
chapter1/  chapter2/  chapter3/  chapter4/  ...

# Then add one more character and Tab again:
ls ~/playground/chapter[TAB]   →  e.g. ls ~/playground/chapter4/  (type 4 to get chapter4)
# or you get chapter1/ chapter2/ chapter3/ chapter4/ ... and choose by typing more
Completion is case-sensitive: Doc[TAB] and doc[TAB] can give different results. Use Tab often—it saves time and helps you avoid mistakes.
Command History and the history Command
The shell keeps a list of commands you've run in the current session (and often across sessions). You can view that list and run previous commands again without retyping them.
Viewing History
To see your command history (with numbers), run:
historyYou'll see lines like:
  42  cd ~/playground/chapter4
  43  ls
  44  cat file1.txt
  45  pwd
The number on the left is the history number. You use it with !number to run that command again. (The example uses ~/playground/chapter4 and file1.txt, which the setup creates.) The exact number of lines kept depends on your shell and settings (often hundreds or thousands).
!! and !number
Two of the most useful history shortcuts are !! and !number.
| Shortcut | What It Does | Example |
|---|---|---|
!! |
Run the last command again | You ran ls -l; type !! and Enter to run ls -l again |
!number |
Run the command with that history number | !44 runs whatever command was line 44 in history |
Using !! and !number
# After running a command, run it again with !!
$ ls -la ~/playground/chapter4
(... output ...)
$ !!
ls -la ~/playground/chapter4
(... same command runs again ...)

# Run a specific command from history (use the number from 'history')
$ history
  ...
  50  cat file1.txt
  51  pwd
$ !50
cat file1.txt
(... command 50 runs ...)
!! is handy when you run a command and immediately want to run it again (for example after fixing a permission or path). !number is useful when you've run history and see the number of the command you want.
Ctrl+R (Reverse Search)
Ctrl+R opens a search mode so you can find a past command by typing part of it. The shell searches backward through your history and shows the most recent match. This is faster than scrolling through history when you remember a word or phrase from the command.
How to Use Ctrl+R
- Press Ctrl+R. The prompt may change to something like
(reverse-i-search)'':. - Type a few characters that appear in the command you want (e.g.
cd,chapter4, orfile1). - The shell shows the most recent matching command. If that's the one you want, press Enter to run it.
- If it's not the right one, press Ctrl+R again to go to the next older match. Keep pressing Ctrl+R to step further back.
- To cancel the search without running anything, press Ctrl+C.
Reverse Search Example
# You ran 'cat file1.txt' in ~/playground/chapter4 earlier and want to run it again.
# Press Ctrl+R, then type: cat
(reverse-i-search)'cat': cat file1.txt
# If this is the command you want, press Enter to run it.
# If an older command appears, press Ctrl+R again to see the next match.
Reverse search is especially useful for long or complex commands you don't want to retype.
Ctrl+A and Ctrl+E
These two keys move the cursor to the start or end of the current line. They work while you're typing or editing a command (before you press Enter).
| Key | What It Does | When to Use It |
|---|---|---|
Ctrl+A |
Move cursor to the beginning of the line | When you need to add something at the start (e.g. sudo or cd) |
Ctrl+E |
Move cursor to the end of the line | When you need to add something at the end (e.g. an option or filename) |
Using Ctrl+A and Ctrl+E
# You typed: cat file1.txt
# You realize you meant to run it with sudo. Press Ctrl+A, then type "sudo " at the start.
# Result: sudo cat file1.txt

# You typed: ls -l
# You want to add a path. Press Ctrl+E to jump to the end, then type the path.
# Result: ls -l ~/playground/chapter4
Using Ctrl+A and Ctrl+E is faster than holding the left or right arrow key, especially on long lines.
Ctrl+C, Ctrl+D, and Ctrl+L
These three control keys do different things: cancel a command, signal “end of input,” and clear the screen.
| Key | What It Does | When to Use It |
|---|---|---|
Ctrl+C |
Cancel the current command or line | Stop a running command; discard the line you're typing and get a new prompt |
Ctrl+D |
Send end-of-input | Exit the current shell; or when typing into cat > file, finish input (like “I’m done typing”) |
Ctrl+L |
Clear the screen | When the terminal is cluttered; prompt moves to top, output is cleared |
Ctrl+C (Cancel)
Press Ctrl+C to stop a command that's running (e.g. a long process or a command that's waiting for input). It also cancels the line you're typing: the shell discards what you typed and gives you a fresh prompt. Use it when you change your mind or make a mistake and want to start over.
Ctrl+D (End of Input)
Ctrl+D tells the shell “no more input.” Its effect depends on context:
- At an empty prompt: Often exits the shell (logs you out of that terminal session). So use Ctrl+D when you're done with that terminal window.
- While typing into
cat > filenameorcat >> filename: Ctrl+D ends your input and saves the file. You don't type any text after Ctrl+D on that line.
Don't press Ctrl+D at the prompt unless you intend to exit the shell.
Ctrl+L (Clear Screen)
Press Ctrl+L to clear the terminal screen. The prompt moves to the top and previous output is cleared (though you can still scroll up in most terminals to see it). Use it when the screen is full or distracting. It does not stop or cancel any command.
Tips for Success
- Use Tab often: For commands, paths, and filenames—it saves time and reduces typos.
- Run
historywhen you forget a command: Find the number and use!numberto run it again. - Use Ctrl+R for recent commands: Type a few letters you remember instead of scrolling through history.
- Use Ctrl+A / Ctrl+E to fix or extend a command instead of retyping the whole line.
- Use Ctrl+C to stop a command or cancel a line; use Ctrl+L when the screen is cluttered.
Common Mistakes to Avoid
- Forgetting that Tab is case-sensitive (e.g.
Documentsvsdocuments). - Using Ctrl+D at the prompt when you only meant to clear the screen (use Ctrl+L to clear).
- Retyping long commands instead of using
!!,!number, or Ctrl+R. - Not pressing Tab twice when completion doesn't happen—there may be multiple matches to choose from.
Best Practices
- Make Tab completion a habit for every command and path.
- Use
historyand!numberto repeat or tweak recent commands. - Use Ctrl+R to quickly find and rerun a command by a word or phrase.
- Use Ctrl+A and Ctrl+E to edit the current line instead of retyping it.
- Use Ctrl+C to cancel; use Ctrl+L to clear the screen; use Ctrl+D only when you mean “end input” or exit.
Chapter 5
Linux Permissions
Think of Linux permissions like a security system for your files and folders. Just like how you might have different keys for different rooms in your house, Linux uses permissions to control who can access and modify your files. Understanding permissions helps you keep your work safe and share it with others when needed.
Quick Reference
| Permission Type | What It Does | Common Use |
|---|---|---|
| Read (r) | View file contents | Opening files, listing directories |
| Write (w) | Modify contents | Editing files, creating/deleting files |
| Execute (x) | Run programs/scripts | Running commands, accessing directories |
When to Use Permissions
- When you need to protect your files from others
- When you want to share files with specific people
- When you need to run scripts or programs
- When you want to control who can modify your work
- When you need to organize group projects
User Categories
Think of user categories like different groups of people who might need access to your files:
| Category | Who It Includes | Example |
|---|---|---|
| Owner (u) | You, the file creator | Like being the owner of a house |
| Group (g) | Users in the same group | Like family members sharing a house |
| Others (o) | Everyone else | Like visitors or guests |
Viewing Permissions
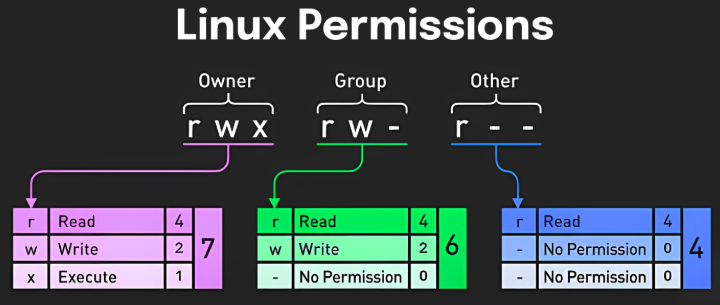
The above image break down the permissions of a file. Lets start with the code that would match those permissions.
-rwxrw-r-- 1 user group 4096 Jul 10 14:55 file.txt
Now lets break this down:
Owner- Owner of the fileGroup- Group that owns the file (in this case the group is the group name)Other- Other permissions meaning everyone else.
Every file and directory will have an owner, a group and an other. Each one of this will have a set of permissions assigned to them. In our example the owner is the user and the group is the group name. The other is everyone else.
The permissions are represented by the letters r, w, and x. r stands for read, w stands for write, and x stands for execute. The permissions are assigned to the owner, the group, and the other in the order of rwx.
In our example the owner has read, write, and execute permissions. The group has read and execute permissions. The other has read permissions.
Numeric Permissions
Numeric permissions in Linux use a three-digit number system (like 755 or 644) to represent file permissions. Each digit represents a different user category (owner, group, others) and is calculated by adding up the values of individual permissions:
- Read (r) = 4
- Write (w) = 2
- Execute (x) = 1
To understand how this works, let's break it down:
- First Digit (Owner): Controls what the file owner can do
- Second Digit (Group): Controls what group members can do
- Third Digit (Others): Controls what everyone else can do
For example, the number 7 (4+2+1) means full permissions (read, write, execute). Here's how to calculate common permission numbers:
| Number | Calculation | Permissions | What It Means |
|---|---|---|---|
| 7 | 4+2+1 | rwx | Full access (read, write, execute) |
| 6 | 4+2 | rw- | Can read and modify, but not execute |
| 5 | 4+1 | r-x | Can read and execute, but not modify |
| 4 | 4 | r-- | Read only access |
| 3 | 2+1 | -wx | Can write and execute, but not read |
| 2 | 2 | -w- | Write only access |
| 1 | 1 | --x | Execute only access |
| 0 | 0 | --- | No access at all |
When you see a three-digit number like 755, it means:
- First digit (7): Owner has full access (4+2+1 = read, write, execute)
- Second digit (5): Group can read and execute (4+1)
- Third digit (5): Others can read and execute (4+1)
This system makes it easy to set permissions with a single command. For example, chmod 755 file.txt sets the permissions to rwxr-xr-x in one step.
Common Numeric Permission Examples
# 755: Owner has full access, others can read and execute
# rwxr-xr-x
chmod 755 script.sh

# 644: Owner can read and write, others can only read
# rw-r--r--
chmod 644 document.txt

# 750: Owner has full access, group can read and execute, others have no access
# rwxr-x---
chmod 750 private/

# 600: Only owner can read and write
# rw-------
chmod 600 secret.txt
Symbolic Mode
Think of symbolic mode like using simple words to set permissions. You can use letters to specify who gets what permissions:
| Part | What It Means | Example |
|---|---|---|
| u (user) | File owner | You |
| g (group) | Group members | Your project team |
| o (others) | Everyone else | Other students |
| a (all) | All users | Everyone |
You can use these operators to change permissions:
| Operator | What It Does | Example |
|---|---|---|
| + | Add permission | Add execute permission |
| - | Remove permission | Remove write permission |
| = | Set exact permissions | Set read and write only |
Symbolic Mode Examples
# Add execute permission for owner
chmod u+x script.sh

# Remove write permission from group
chmod g-w document.txt

# Set read and write for others
chmod o=rw shared.txt

# Add execute for all users
chmod a+x program

# Set read and execute for group and others
chmod go=rx file.txt
What do the other parts mean?
-rwxrw-r-- 1 user group 4096 Jul 10 14:55 file.txt
To the other parts of the code example are broken down below:
-- The hash symbol means the file is a file not a directory. If it was a directory it would be a d. If it was a symbolic link it would be a l.1- Number of hard links (for a file this is always 1, for a directory this is the number of files in the directory but always starts with a d. For a symbolic link it is the number of links to the file or directory.4096- File size in bytesJul 10 14:55- Last modified date/timefile.txt- File name (in this case the file is called file.txt)
Tips for Success
- Always check permissions before trying to access files
- Use
ls -lto see current permissions - Remember that directories need execute permission to be entered
- Start with restrictive permissions and add more as needed
- Use groups to manage permissions for multiple users
Common Mistakes to Avoid
- Giving too many permissions (especially execute)
- Forgetting to set directory permissions
- Not checking group membership
- Using 777 permissions (too open)
- Not understanding the difference between file and directory permissions
Best Practices
- Use the principle of least privilege (give only needed permissions)
- Regularly review and update permissions
- Use groups for collaborative projects
- Document permission changes
- Test permissions after changing them
id, chmod, and umask
Think of chmod and umask like a security settings panel for your files. Just like how you can adjust who can enter your dorm room or use your computer, these commands let you control exactly who can access and modify your files in Linux.
Quick Reference
| Command | What It Does | Common Use |
|---|---|---|
chmod |
Changes file/directory permissions | Setting who can read/write/execute files |
umask |
Sets default permissions | Controlling how new files are created |
id |
Shows user/group information | Checking your permissions and groups |
When to Use These Commands
- When you need to share files with others
- When you want to protect your files
- When you need to run scripts or programs
- When you're working on group projects
- When you need to check your permissions
The id Command
Think of the id command like checking your ID card - it shows who you are and what groups you belong to in the system.
Practical Examples
# Check your own ID information
id

# Check another user's ID
id username

# See just your user ID
id -u

# See just your group ID
id -g
The chmod Command
Think of chmod like a permission switchboard. You can use it in two ways: with letters (symbolic mode) or numbers (numeric mode).
Symbolic Mode (Using Letters)
This is like using simple words to set permissions:
| Part | What It Means | Example |
|---|---|---|
| u (user) | File owner | You |
| g (group) | Group members | Your project team |
| o (others) | Everyone else | Other students |
| a (all) | All users | Everyone |
Symbolic Mode Examples
# Let owner read and write
chmod u+rw file.txt

# Let group read and execute
chmod g+rx script.sh

# Remove write permission from others
chmod o-w document.txt

# Set specific permissions for all
chmod a=rw file.txt
Numeric Mode (Using Numbers)
This is like using a code to set permissions:
| Number | Permission | What It Means |
|---|---|---|
| 4 | Read (r) | Can view the file |
| 2 | Write (w) | Can modify the file |
| 1 | Execute (x) | Can run the file |
Numeric Mode Examples
# Owner: read/write/execute (7)
# Group: read/execute (5)
# Others: read/execute (5)
chmod 755 script.sh

# Owner: read/write (6)
# Group: read (4)
# Others: read (4)
chmod 644 document.txt

# Owner: read/write/execute (7)
# Group: read/execute (5)
# Others: no access (0)
chmod 750 private/
The umask Command
Think of umask like setting default security rules for new files. It's like telling the system "whenever I create a new file, use these permissions by default." The umask value determines what permissions are automatically removed when new files and directories are created.
To understand how umask works:
- New files typically start with permissions 666 (rw-rw-rw-)
- New directories typically start with permissions 777 (rwxrwxrwx)
- The umask value is subtracted from these default permissions
| umask Value | New File Permissions | New Directory Permissions | When to Use |
|---|---|---|---|
| 022 | 644 (rw-r--r--) | 755 (rwxr-xr-x) | Default setting - owner has full access, others can read but not write |
| 027 | 640 (rw-r-----) | 750 (rwxr-x---) | More restrictive - owner has full access, group can read, others have no access |
| 077 | 600 (rw-------) | 700 (rwx------) | Very private - only owner has access |
How umask Calculations Work
# Example: umask 022
# For files (default 666)
666 (rw-rw-rw-)
- 022 (----w--w-)
= 644 (rw-r--r--)

# For directories (default 777)
777 (rwxrwxrwx)
- 022 (----w--w-)
= 755 (rwxr-xr-x)

# Example: umask 027
# For files (default 666)
666 (rw-rw-rw-)
- 027 (----w-rwx)
= 640 (rw-r-----)

# For directories (default 777)
777 (rwxrwxrwx)
- 027 (----w-rwx)
= 750 (rwxr-x---)
umask Examples
# Check current umask
umask

# Set more restrictive umask
umask 027

# Set very private umask
umask 077

# Temporarily use different umask for a single command
(umask 027 && touch newfile.txt)
Tips for Success
- Start with more restrictive permissions and add more as needed
- Use symbolic mode when making small changes
- Use numeric mode when setting all permissions at once
- Check current permissions with
ls -lbefore changing them - Remember that directories need execute permission to be entered
Common Mistakes to Avoid
- Using 777 permissions (too open)
- Forgetting to set execute permission on directories
- Not checking current permissions before changing them
- Using wrong umask values for new files
- Not understanding the difference between file and directory permissions
Best Practices
- Use the principle of least privilege
- Document permission changes
- Test permissions after changing them
- Use groups for collaborative projects
- Regularly review and update permissions
su and sudo Commands
Think of sudo and su like different ways to get special access. sudo is like having a temporary key card for specific tasks, while su is like changing your identity completely. Understanding when to use each command helps you work safely and efficiently.
Note: You do not have sudo access on the Cidermill server. However, it is still important to understand what sudo and su do.
Quick Reference
| Command | What It Does | When to Use |
|---|---|---|
sudo command |
Run single command as root | Quick admin tasks like installing software |
su |
Switch to root user | Extended root sessions |
su username |
Switch to another user | Working as different user |
When to Use Each Command
- Use sudo when:
- Running single admin commands
- Installing software
- Editing system files
- Managing services
- Use su when:
- Need extended root access
- Working as another user
- Multiple system changes
- System maintenance tasks
Basic sudo Usage
Think of sudo like a temporary promotion - it gives you special powers just for the command you're running.
Common Examples
# Install software
sudo apt install package-name

# Edit system configuration
sudo nano /etc/config-file

# Restart a service
sudo systemctl restart service-name

# Check disk space
sudo df -h

# View system logs
sudo journalctl -xe
Understanding su (Switch User)
Think of su like changing your identity completely - it lets you switch to another user account, including the root user. While sudo gives temporary privileges, su actually changes your user context.
su Examples
# Switch to root user
su
# Enter root password

# Switch to specific user
su username
# Enter user's password

# Switch to root with environment
su -

# Switch to user with environment
su - username

# Exit back to your original user
exit
Understanding sudo Options
| Option | What It Does | When to Use |
|---|---|---|
-i |
Start interactive root shell | Multiple admin tasks in sequence |
-u username |
Run as specific user | Testing user permissions |
-l |
List allowed commands | Checking your sudo privileges |
-v |
Extend sudo timeout | Keeping sudo active longer |
Option Examples
# Start root shell
sudo -i

# Run command as another user
sudo -u username command

# See what you're allowed to do
sudo -l

# Extend sudo timeout
sudo -v
Tips for Success
- Always double-check commands before using sudo or su
- Use sudo for single commands when possible
- Use su only when you need extended access
- Read error messages carefully
- Keep root sessions as short as possible
Common Mistakes to Avoid
- Using sudo or su for everything
- Not reading error messages
- Leaving root shells open
- Using sudo with untrusted commands
- Forgetting to exit su sessions
Best Practices
- Use sudo instead of su when possible
- Keep root sessions brief
- Read error messages carefully
- Use specific commands instead of root shell
- Document sudo/su usage in scripts
Advanced Techniques
Combining Commands
# Run multiple commands with one sudo
sudo sh -c 'command1 && command2'

# Use sudo in scripts
#!/bin/bash
if [ "$(id -u)" != "0" ]; then
    echo "This script must be run as root" 1>&2
    exit 1
fi

# Run commands as different users
sudo -u user1 command1
sudo -u user2 command2

# Use sudo with pipes
sudo cat /etc/passwd | grep username
Security Considerations
Think of sudo and su like powerful tools - they're useful but need to be handled carefully:
- Never share your sudo password or root password
- Be careful with sudo/su in scripts
- Check file permissions before editing
- Use specific commands instead of root shell
- Keep sudo timeout short
Security Examples
# Check file permissions before editing
ls -l /etc/config-file
sudo nano /etc/config-file

# Use specific commands instead of root shell
sudo apt update
sudo apt upgrade

# Set shorter sudo timeout
sudo visudo
# Add: Defaults timestamp_timeout=5
chown, chgrp and passwd Commands
Think of these commands like a user management system. chown lets you change who owns files, chgrp lets you change the group ownership, and passwd lets you manage user passwords. Together, they help you control who can access and modify your files and system.
NOTE: YOu do not have sudo access to the Cidermill server so you cannot actually run these commands. However, it is important to understand what they do and how to use them.
Quick Reference
| Command | What It Does | Common Use |
|---|---|---|
chown |
Change file/directory owner | Transferring file ownership |
chgrp |
Change file/directory group | Managing group access |
passwd |
Change user password | Updating login credentials |
When to Use These Commands
- When transferring files to another user (chown)
- When setting up group projects (chgrp)
- When changing your password (passwd)
- When fixing permission issues (chown/chgrp)
- When managing user access (passwd)
The chown Command
Think of chown like a property deed - it lets you transfer ownership of files and directories to someone else. This is crucial for managing who can access and modify files in a multi-user environment.
Key points about chown:
- Only root or the current owner can change file ownership
- Ownership changes affect file permissions
- Changing ownership doesn't automatically change group
- Recursive changes affect all files and subdirectories
| Option | What It Does | When to Use |
|---|---|---|
-R |
Change recursively | When changing entire directories |
-v |
Show verbose output | When you want to see what changed |
-c |
Show only changes | When you want to see only what changed |
-f |
Force changes | When you want to suppress errors |
Common Examples
# Change owner of a file
chown username file.txt

# Change owner of a directory
chown username directory/

# Change owner and group at once
chown username:groupname file.txt

# Change ownership recursively
chown -R username:groupname directory/

# Change only the owner, keep current group
chown username file.txt

# Change only the group (using chown syntax)
chown :groupname file.txt

# Change ownership of files matching a pattern
chown username *.txt

# Change ownership of files modified today
find . -mtime 0 -exec chown username {} \;
The chgrp Command
Think of chgrp like a group membership card - it lets you change which group owns a file or directory. This is essential for managing shared access to files among team members.
Key points about chgrp:
- You must be a member of the new group to use it
- Group changes affect group permissions
- Useful for collaborative projects
- Can be used with find for bulk changes
| Option | What It Does | When to Use |
|---|---|---|
-R |
Change recursively | When changing entire directories |
-v |
Show verbose output | When you want to see what changed |
-c |
Show only changes | When you want to see only what changed |
-f |
Force changes | When you want to suppress errors |
Common Examples
# Change group of a file
chgrp groupname file.txt

# Change group of a directory
chgrp groupname directory/

# Change group recursively
chgrp -R groupname directory/

# Change group of multiple files
chgrp groupname file1.txt file2.txt

# Change group of all files in directory
chgrp groupname *

# Change group of files matching a pattern
chgrp groupname *.txt

# Change group of files owned by specific user
find . -user username -exec chgrp groupname {} \;

# Change group and set permissions
chgrp groupname file.txt && chmod g+rw file.txt
The passwd Command
Think of passwd like a key change system - it lets you update your login credentials to keep your account secure. This command is essential for maintaining account security.
Key points about passwd:
- Regular password changes improve security
- Root can change any user's password
- Users can only change their own password
- Password policies can enforce complexity rules
| Option | What It Does | When to Use |
|---|---|---|
-l |
Lock account | When disabling a user account |
-u |
Unlock account | When re-enabling a user account |
-e |
Expire password | When forcing password change |
-x days |
Set maximum password age | When setting password expiration |
-n days |
Set minimum password age | When preventing frequent changes |
-w days |
Set warning period | When notifying of upcoming expiration |
Common Examples
# Change your own password
passwd
# You'll be prompted for:
# 1. Current password
# 2. New password
# 3. New password confirmation

# Change another user's password (root only)
sudo passwd username

# Lock a user account (prevent login)
sudo passwd -l username

# Unlock a user account
sudo passwd -u username

# Force password change on next login
sudo passwd -e username

# Remove password expiration
sudo passwd -x -1 username

# Set minimum days between password changes
sudo passwd -n 7 username

# Set password expiration warning
sudo passwd -w 7 username
Tips for Success
- Always check current ownership with
ls -l - Use
-Rcarefully with directories - Choose strong passwords with passwd
- Test access after changing ownership
- Document ownership and password changes
Common Mistakes to Avoid
- Changing ownership without checking first
- Using weak passwords
- Forgetting to set group ownership
- Not testing access after changes
- Changing system file ownership
Best Practices
- Check current ownership first
- Use groups for shared access
- Choose strong, unique passwords
- Test access after changes
- Document all changes
Advanced Techniques
Combining Commands
# Change ownership of specific file types
find . -name "*.txt" -exec chown username:groupname {} \;

# Change group of files modified today
find . -mtime 0 -exec chgrp groupname {} \;

# Change ownership and permissions at once
chown username:groupname file.txt && chmod 644 file.txt

# Set up group access
chgrp groupname directory/
chmod g+rwx directory/
Security Considerations
Think of these commands like security tools - they need to be used carefully:
- Never change system file ownership
- Use strong passwords with passwd
- Be careful with recursive changes
- Check permissions after changing ownership
- Use groups for shared access
Understanding /etc/passwd, /etc/shadow, and /etc/group
Linux stores user and group information in three main text files: /etc/passwd, /etc/shadow, and /etc/group. Think of /etc/passwd as the system's phone book for user accounts—it lists every user, with username, user ID, home directory, and default shell. /etc/shadow is the locked drawer where actual password hashes and expiration data are kept; only root can read it. /etc/group is the list of teams: it defines groups and which users belong to them for permission sharing. You normally don't edit these files by hand—tools like useradd, usermod, and passwd do that—but understanding their format helps you see how accounts are stored and how to look up information with grep, getent, and similar commands.
Quick Reference
| File | What It Is |
|---|---|
/etc/passwd |
Text file listing all user accounts (one per line); seven colon-separated fields |
/etc/shadow |
Secure file storing password hashes and aging info (root-only read); nine fields |
/etc/group |
Text file listing all groups (one per line); four colon-separated fields |
Understanding /etc/passwd
/etc/passwd lists every user who can log in (or run programs) on the system. Each line has exactly seven fields, separated by colons.
When This File Matters
- You need to see which user accounts exist on the system
- You're troubleshooting login or permission issues
- You want to know a user's UID, home directory, or default shell
- You're learning how Linux stores user information
Format of Each Line
A typical line looks like:
jdoe:x:1001:1001:Jane Doe:/home/jdoe:/bin/bash| Field | Name | Meaning | Example |
|---|---|---|---|
| 1 | Username | Login name | jdoe |
| 2 | Password placeholder | Usually x; real password is in /etc/shadow | x |
| 3 | UID | User ID (number); 0 = root | 1001 |
| 4 | GID | Primary group ID | 1001 |
| 5 | GECOS | Extra info (full name, etc.); often just the full name | Jane Doe |
| 6 | Home directory | User's home directory path | /home/jdoe |
| 7 | Shell | Default shell (e.g. /bin/bash or /usr/sbin/nologin) | /bin/bash |
Viewing /etc/passwd
You can read the file with cat, less, or grep. Only root can change it; normal users can usually read it.
View and search
# View the whole file (may be long)
cat /etc/passwd
# or
less /etc/passwd

# Search for one user
grep jdoe /etc/passwd

# List only usernames (first field)
cut -d: -f1 /etc/passwd
Special Accounts
You'll often see accounts with UID 0 (root), low UIDs for system accounts (e.g. daemon, nobody), and /usr/sbin/nologin or /bin/false as the shell—those are for services, not real people logging in.
Understanding /etc/shadow
/etc/shadow holds the actual password hashes and related data. Unlike /etc/passwd, it is readable only by root, so nobody can see or steal the password hashes. Each line corresponds to a user in passwd and has nine colon-separated fields.
When This File Matters
- You're managing password policies (expiration, minimum age)
- You need to lock or unlock an account (without changing the password)
- You're learning how Linux stores and protects passwords
- You're troubleshooting why a user can't log in (expired, locked)
Format of Each Line
A typical line looks like:
jdoe:$6$rounds=...$hashedpassword...:19000:0:99999:7:::| Field | Meaning | Example |
|---|---|---|
| 1 | Username (must match /etc/passwd) | jdoe |
| 2 | Password hash (or !/* for locked/disabled) | $6$... or ! |
| 3 | Last password change (days since Jan 1, 1970) | 19000 |
| 4 | Minimum days between password changes | 0 |
| 5 | Maximum days until password expires | 99999 |
| 6 | Days to warn before expiration | 7 |
| 7 | Account expiration date (days since epoch, or empty) | empty |
| 8 | Reserved | empty |
| 9 | Reserved | empty |
Viewing /etc/shadow
Only root can read /etc/shadow. Normal users get "Permission denied." Use sudo if your account has permission.
View and search (as root or with sudo)
# View the file (requires root)
sudo cat /etc/shadow

# Search for one user
sudo grep jdoe /etc/shadow

# Check if an account is locked (second field is ! or *)
sudo grep jdoe /etc/shadow
Security note: Don't share shadow output or copy hashes; treat them as secret. Use passwd, chage, or usermod to change passwords or policies instead of editing /etc/shadow by hand.
Understanding /etc/group
/etc/group is the list of teams on the system. Groups let you give permissions to several users at once (e.g. everyone in the "developers" group can read a project directory). Each line defines one group: group name, GID, and which users are members.
When This File Matters
- You need to see which groups exist and who belongs to them
- You're setting up permissions for a directory or file by group
- You're troubleshooting "permission denied" or group-based access
- You're learning how Linux organizes users into groups
Format of Each Line
Each line has four fields separated by colons:
developers:x:1005:jdoe,jsmith,mkay| Field | Meaning | Example |
|---|---|---|
| 1 | Group name | developers |
| 2 | Password (usually x; group passwords are rarely used) | x |
| 3 | GID (group ID) | 1005 |
| 4 | List of usernames in the group (comma-separated, no spaces) | jdoe,jsmith,mkay |
Every user has a primary group (stored in /etc/passwd); that group doesn't have to list the user in /etc/group because membership is implied. The member list in /etc/group is for additional (supplementary) groups.
Viewing /etc/group
Most systems allow any user to read /etc/group. You can use cat, grep, or getent.
View and search
# View the whole file
cat /etc/group
# or
less /etc/group

# Search for one group
grep developers /etc/group

# List only group names (first field)
cut -d: -f1 /etc/group

# See which groups a user is in
groups jdoe
# or
id jdoe
Tips for Success
- Use
getent passwd usernameandgetent group groupnameto look up users and groups (works with NIS/LDAP too) - Use
groups usernameorid usernameto see a user's groups - Don't edit these files by hand; use
usermod,passwd,chage,groupadd,groupdel, andusermod -aG - Use
chage -l usernameto see password aging in a readable way; lock an account withusermod -L username - Remember: the second field in
passwdis almost alwaysx; passwords are in/etc/shadow
Common Mistakes to Avoid
- Editing passwd, shadow, or group by hand and breaking the format (wrong colons, typos, spaces in group member list)
- Assuming the second field in passwd is the real password (it isn't on a normal system)
- Changing root's UID or deleting system accounts; removing a group that is the primary group for any user
- Copying or logging shadow contents where others can see them; assuming you can "decrypt" the hash—you can't
- Forgetting that the primary group doesn't have to list the user in the fourth field of
/etc/group
Best Practices
- Use
greporgetentto query; useusermod,passwd, andchageto change users; usegroupadd/groupdelandusermod -aGfor groups - Back up
/etc/passwd,/etc/shadow, and/etc/groupbefore making any changes (as root) - Use
sudoonly when needed and don't leave root shells open
useradd, userdel, and usermod Commands
Linux gives you three main commands to manage user accounts: useradd creates a new user, userdel removes one, and usermod changes an existing account. Think of them as the official way to add, remove, or update entries in /etc/passwd, /etc/shadow, and /etc/group—instead of editing those files by hand. Only root (or someone with the right sudo privileges) can run these commands. Together they cover the full lifecycle of a user account: create with useradd, change with usermod, and remove with userdel when access is no longer needed.
Quick Reference
| Command | What It Does | Common Use |
|---|---|---|
useradd |
Creates a new user account | Adding new users to the system |
userdel |
Removes a user account | Deleting users who no longer need access |
usermod |
Modifies an existing user account | Changing shell, home, groups, or locking an account |
Note: All three require root privileges. Use sudo useradd ..., sudo userdel ..., and sudo usermod ....
useradd Command
useradd creates a new user: it adds a line to /etc/passwd (and usually /etc/shadow and /etc/group), can create a home directory with -m, and uses defaults from /etc/default/useradd. It's the first step in giving a new person—or a service account—access to the machine.
When to Use useradd
- You need to create a new login account for a person
- You're setting up a system or service account (e.g. for a web server)
- You're managing users on a server or lab machine
Common useradd Options
| Option | What It Does | When to Use It |
|---|---|---|
-m | Create the user's home directory | Almost always for real users |
-d path | Set home directory path | When you want a custom path (e.g. /home/jdoe) |
-s shell | Set default shell | e.g. -s /bin/bash or -s /usr/sbin/nologin |
-c "comment" | Set GECOS (full name, etc.) | To store the user's full name |
-g group | Set primary group (by name or GID) | When the user should have a specific primary group |
-G group1,group2 | Add user to supplementary groups | To give extra group memberships |
-u UID | Set user ID (must be unique) | When you need a specific UID |
-e YYYY-MM-DD | Set account expiration date | For temporary accounts |
useradd Examples
# Create user jdoe with a home directory and set password
sudo useradd -m jdoe
sudo passwd jdoe

# Create user with full name and bash as shell
sudo useradd -m -c "Jane Doe" -s /bin/bash jdoe
sudo passwd jdoe

# Create user and add to supplementary groups (e.g. developers, sudo)
sudo useradd -m -G developers,sudo jdoe
sudo passwd jdoe

# System/service account (no login)
sudo useradd -r -s /usr/sbin/nologin myapp
-r creates a system account (low UID). /usr/sbin/nologin prevents interactive login. Always run passwd username after useradd for real users so they can log in.
userdel Command
userdel removes a user account from the system. It deletes the user's entry from /etc/passwd (and usually from /etc/shadow and /etc/group membership). You can choose whether to remove their home directory and mail spool as well.
When to Use userdel
- A user no longer needs an account (e.g. left the organization)
- You're removing a temporary or test account
- You're cleaning up after migrating or decommissioning a service
Common userdel Options
| Option | What It Does | When to Use It |
|---|---|---|
-r | Remove the user's home directory and mail spool | When you want to delete their files too |
-f | Force removal even if user is logged in (use with caution) | Only when necessary; can leave orphaned processes |
userdel Examples
# Remove account only; home directory stays (e.g. for backup)
sudo userdel jdoe

# Remove account and delete home directory and mail spool
sudo userdel -r jdoe

# Force removal even if user is logged in (use with care)
sudo userdel -f -r jdoe
Back up important data before using -r. Use -f only when you understand the impact: the user may be kicked out and processes may run as a non-existent user. Check with who or ps -u username that the user isn't logged in.
usermod Command
usermod changes an existing user account. It updates the user's entry in /etc/passwd (and related files): you can change the home directory, shell, full name, group memberships, lock or unlock the account, and more. Use it whenever you need to fix or update a user's settings instead of deleting and recreating the account.
When to Use usermod
- Change a user's default shell, home directory, or full name
- Add or remove the user from groups
- Lock or unlock an account (without deleting it)
- Set an account expiration date
Common usermod Options
| Option | What It Does | When to Use It |
|---|---|---|
-d path | Set new home directory path | When moving a user's home |
-m | Move contents of current home to new home (use with -d) | When changing home and keeping files |
-s shell | Set default shell | e.g. -s /bin/bash or -s /usr/sbin/nologin |
-c "comment" | Set GECOS (full name, etc.) | To update the user's full name |
-aG group1,group2 | Add user to supplementary groups (append) | To add groups without removing existing ones |
-G group1,group2 | Set supplementary groups (replaces list; use -aG to add) | When you want to set the full list |
-L | Lock the account (password invalid) | To disable login without deleting the account |
-U | Unlock the account | To re-enable after -L |
-e YYYY-MM-DD | Set account expiration date | For temporary access |
usermod Examples
# Change default shell
sudo usermod -s /bin/bash jdoe
sudo usermod -s /usr/sbin/nologin jdoe

# Add user to groups (use -aG so you don't remove existing groups)
sudo usermod -aG developers,sudo jdoe

# Change full name (GECOS)
sudo usermod -c "Jane Doe" jdoe

# Lock and unlock account
sudo usermod -L jdoe
sudo usermod -U jdoe

# Move home directory and move existing files there
sudo usermod -m -d /home/jdoe2 jdoe
Always use -aG when adding groups so you don't wipe out existing group memberships. The user should not be logged in when changing UID, GID, or home directory.
Tips for Success
- Almost always use
useradd -mfor real users so they get a home directory; always runpasswd usernameafteruseraddso they can log in - Back up important data from a user's home directory before using
userdel -r; checkwhoorps -u usernamethat they aren't logged in - Use
usermod -aGwhen adding groups so you don't remove existing memberships; use-Lto lock an account instead of deleting it when access should be temporary - Check current settings with
getent passwd usernameandgroups usernamebefore and after changes
Common Mistakes to Avoid
- Forgetting
-mwithuseraddor forgetting to set a password so the user can't log in - Using
userdel -rwithout backing up files the user might need; removing root or essential system accounts - Using
usermod -Gwithout-aand removing the user from other groups; changing UID/GID or home while the user is logged in - Using
userdel -forusermodfor major changes without understanding the impact on active sessions
Best Practices
- Use
useraddwith-mfor human users and set a password withpasswd; use-rand/usr/sbin/nologinfor service accounts - Prefer
userdel -ronly after backing up or confirming files aren't needed; avoid-funless you have a clear reason - Use
usermod -aGto add groups; use-Lto disable an account before deciding to delete it; verify withgetent passwd usernameandgroups username
groupadd and groupdel Commands
Think of groupadd and groupdel as the official ways to create and remove groups on a Linux system. groupadd adds a new line to /etc/group (and often creates an entry in /etc/gshadow). groupdel removes that line. Only root (or someone with the right sudo privileges) can run these commands. Use them when you need a new group for permissions (e.g. "developers" or "editors") or when you're cleaning up a group that's no longer needed.
Quick Reference
| Command | What It Does | Common Use |
|---|---|---|
groupadd |
Creates a new group | Adding groups for file permissions or team access |
groupdel |
Removes a group | Deleting groups that are no longer needed |
When to Use These Commands
- You need a new group so several users can share access to files or directories
- You're setting up a project or team and want a dedicated group
- You're removing an old group that nobody uses anymore
Note: You need root privileges. Use sudo groupadd ... and sudo groupdel ....
groupadd: Common Options
| Option | What It Does | When to Use It |
|---|---|---|
-g GID |
Set the group ID (must be unique) | When you need a specific GID |
-r |
Create a system group (uses a low GID from a system range) | For daemons or system services |
groupadd: Practical Examples
Create a normal group
# Create a group named developers
sudo groupadd developers
The system picks the next available GID. Add users with usermod -aG developers username.
Create a group with a specific GID
# Create group with GID 2000
sudo groupadd -g 2000 developers
Create a system group
# Create a system group (e.g. for an application)
sudo groupadd -r myapp
groupdel: Practical Examples
Remove a group
# Remove the group (only if no user has it as primary group)
sudo groupdel developers
groupdel will fail if any user in /etc/passwd has this group as their primary group (GID). Remove users from the group or change their primary group first, then delete the group.
Tips for Success
- After
groupadd, add users withusermod -aG groupname username - Before
groupdel, check that no user has this as primary group:grep :GID: /etc/passwd - You can remove a group even if it has members in the fourth field of
/etc/group; you cannot remove it if it's someone's primary group
Common Mistakes to Avoid
- Trying to delete a group that is the primary group for any user
- Creating a group with a GID that's already in use
- Expecting files owned by that group to disappear—they stay; only the group entry is removed (and the GID may show as a number)
Best Practices
- Use
groupaddandgroupdelinstead of editing/etc/groupby hand - Use meaningful group names (e.g.
developers,editors) - Before deleting a group, ensure no user has it as primary group and that you don't need the group for permissions anymore
Password Basics
On Linux, passwords are what prove you are who you say you are when you log in. The system doesn't store your actual password—it stores a hash (a one-way fingerprint) in /etc/shadow. When you type your password, the system hashes it and compares it to the stored hash. This lesson covers the basics: how to set and change passwords with the passwd command, how to check password aging with chage, and simple good practices. Only root can change other users' passwords; normal users can change only their own.
Quick Reference
| Command | What It Does | Common Use |
|---|---|---|
passwd |
Set or change a user's password | Setting a new password (self or another user as root) |
chage |
View or set password aging (expiration, warning) | Password policies, checking when a password expires |
When to Use These Commands
- Setting a password for a new user (after
useradd) - Changing your own password or (as root) another user's password
- Locking or unlocking an account (e.g.
passwd -l) - Checking or setting when a password expires and when the user is warned
passwd Command
passwd is the normal way to set or change a password. Without a username, it changes your own password; with a username, root can change that user's password.
Common Options for passwd
| Option | What It Does | When to Use It |
|---|---|---|
username |
Change that user's password (root only) | e.g. sudo passwd jdoe |
-l |
Lock the account (password invalid) | To disable login without deleting the user |
-u |
Unlock the account | To re-enable after -l |
-d |
Remove the password (empty password; root only) | Rare; use with caution |
-e |
Force password to expire so user must change it at next login | After setting a temporary password |
Practical Examples
Change your own password
# You'll be prompted for current password, then new password twice
passwd
Set another user's password (root)
# Root sets password for jdoe (no current password needed)
sudo passwd jdoe
Lock and unlock an account
# Lock so user cannot log in with password
sudo passwd -l jdoe

# Unlock
sudo passwd -u jdoe
Force password change at next login
# After setting a temporary password, force user to change it
sudo passwd jdoe
sudo passwd -e jdoe
chage Command
chage lets you view and set password aging: when the password was last changed, when it expires, how many days the user is warned, and when the account itself expires. Useful for security policies (e.g. "passwords must be changed every 90 days").
Common Options for chage
| Option | What It Does |
|---|---|
-l username |
List current aging info in a readable way |
-M days |
Maximum days the password is valid (after that it expires) |
-m days |
Minimum days between password changes |
-W days |
Days to warn before password expires |
-E YYYY-MM-DD |
Account expiration date |
-d YYYY-MM-DD |
Last password change date (can force change at next login with -d 0) |
View password aging
# See when password was last changed, when it expires, etc.
chage -l jdoe
Set password to expire in 90 days
sudo chage -M 90 jdoeWarn user 7 days before expiration
sudo chage -W 7 jdoeTips for Success
- Always set a password after
useraddso the user can log in (unless it's a nologin account) - Use
passwd -eafter setting a temporary password so the user must change it - Use
chage -l usernameto see why a user might be unable to log in (expired, etc.)
Common Mistakes to Avoid
- Setting a weak or shared password; encourage strong, unique passwords
- Forgetting to set a password after creating a user (they can't log in)
- Locking yourself out by changing root's password incorrectly—double-check when using
sudo passwd
Best Practices
- Use
passwdto set and change passwords; don't edit/etc/shadowby hand - Use
chageto enforce password expiration and warnings where policy requires it - Use
passwd -lorusermod -Lto disable an account instead of deleting it when appropriate
Chapter 6
jobs, fg and bg Commands
Think of Linux processes like juggling multiple balls at once. The jobs, fg, and bg commands are like your hands - they help you control which ball gets your attention right now (foreground), which ones keep moving on their own (background), and which ones pause in mid-air (suspended). These commands let you multitask in your terminal, working on several things simultaneously without needing to open multiple terminal windows. They work the same on Ubuntu Server as on other Linux systems.
The examples below use a practice script created by the course setup.sh script. After running setup, you'll have ~/playground/chapter6/count_loop.sh—a script that every 5 seconds increments a counter and appends a line to a file (count_output.txt by default). You can run it in the foreground (your terminal is busy until you press Ctrl-Z or Ctrl-C) or in the background (it keeps running while you run other commands, and you can watch the file grow with tail -f count_output.txt). Run cd ~/playground/chapter6 before trying the examples.
NOTE: In this lesson we will be running the script using the ./ in front of the script name to run it. We could also run the script using the bash command. For example: bash ~/playground/chapter6/count_loop.sh. However, we will be using the ./ syntax for the sake of consistency.
Quick Reference
| Command | What It Does | Common Use |
|---|---|---|
jobs |
Lists all background and stopped processes | Checking what processes are running |
fg |
Brings a background process to the foreground | Resuming work on a paused process |
bg |
Continues a stopped process in the background | Running a process without occupying your terminal |
command & |
Starts a command in the background | Running a command while keeping terminal access |
Ctrl-Z |
Pauses the current foreground process | Temporarily stopping a process to do something else |
Ctrl-C |
Terminates the current foreground process | Stopping a process that you don't want to continue |
When to Use These Commands
- When you need to run a long-running task but still want to use your terminal
- When you're working on multiple commands simultaneously
- When you need to pause a process temporarily to check something else
- When you want to switch between several active processes
- When you need to verify what background processes are running
Understanding Process States
Think of a Linux process as being in one of three states, like a traffic light:
| Process State | What It Means | Real-World Comparison |
|---|---|---|
| Foreground | Process is actively running and connected to your terminal | Green light - moving and has your full attention |
| Background | Process is running but doesn't have terminal control | Yellow light - moving but in the background |
| Stopped | Process is paused and waiting to be resumed | Red light - completely paused and not moving |
The bg Command
When you first run a script it will run in the foreground by default. This means that your terminal will be "busy" and you won't be able to run other commands until the script finishes.
So if we start this script ./count_loop.sh you will see the cursor blinking as the script runs. However you will not be able to run any other commands because the script is runnning in the foreground. To solve this issue we need to pause the script and run it in the background.
To pause the script we can press Ctrl-Z. You will see the following output:
[1]+ Stopped ./count_loop.shThis means that the process has been paused.
To resume the script we can run the bg command. If you have multiple paused processes you can use the %n syntax to resume a specific process. For example: bg %1. You will see the following output:
[1]+ ./count_loop.sh &This means that the process has been resumed and is now running in the background and we can now run other commands in the terminal.
NOTE: You can also run the script in the background when you first start it by adding the & symbol to the end of the command. For example: ./count_loop.sh &. You will see the following output:
[1] 12345This is the process ID of the background process. You can use this process ID to refer to the process in other commands.
This is the same as running the bg command after the script has been paused. However, if you run the script in the background when you first start it, you will not need to pause it and then resume it. You can just run the bg command to resume it.
| Syntax | What It Does | When to Use |
|---|---|---|
bg |
Continues the most recent stopped job in the background | When you've just paused a job with Ctrl-Z and want it to continue running |
bg %n |
Continues job number n in the background | When you want to resume a specific paused job |
Practical Examples
# Start a long-running process
./count_loop.sh

# Press Ctrl-Z to pause it
# You'll see something like: [1]+ Stopped ./myscript.sh

# Continue the paused process in the background
bg

# If you have multiple stopped jobs, resume a specific one
bg %2

# Check that your job is now running in the background (we will cover jobs command later in this lesson)
jobs
# Output should show: [1]+ Running ./myscript.sh &
The fg Command
Think of fg as bringing a task to center stage. When you have processes running in the background or temporarily paused, the fg command pulls them back into the foreground, making them the active process in your terminal.
When a process is in the foreground, it has control of your terminal - you'll see its output, and your keyboard input goes to that process. This is useful when you need to interact with a program or monitor its output carefully. That is not the case with our script as it does not give any output to the terminal. To bring it to the foreground all we need to do is run the fg command. Doing so will bring the script back to the foreground and the cursor will start blinking again and we will not be able to run other commands in the terminal until the script finishes, is paused again or is terminated.
Here is an example of how to bring the script to the foreground:
fgYou will see the following output:
[1]+ ./count_loop.shThis means that the process has been brought back to the foreground and we cannot run other commands in the terminal until the script finishes, is paused again or is terminated.
When a script is running in the foreground and you press Ctrl-C it will terminate the script. You will see the following output:
[1]+ Terminated ./count_loop.shThis means that the process has been terminated.
If you have multiple paused processes you can use the %n syntax to bring a specific process to the foreground. For example: fg %1. You will see the following output:
[1]+ ./count_loop.shThis means that the process has been brought back to the foreground and we can now run other commands in the terminal.
| Syntax | What It Does | When to Use |
|---|---|---|
fg |
Brings the most recent job to the foreground | When you want to continue your most recent background task |
fg %n |
Brings job number n to the foreground | When you want to continue a specific background task |
fg %- |
Brings the previous job to the foreground | When you want to switch between two jobs |
The jobs Command
Think of jobs as your process manager - it shows you a list of all the tasks you've set aside or put on autopilot in your current terminal session. It doesn't show all processes on your system, just the ones you've started in your current shell that are either running in the background or are temporarily paused.
Each job in the list gets a job number (like %1, %2) that you can use to refer to it with other commands. The jobs command also tells you the status of each job - whether it's Running (in the background) or Stopped (paused).
| Option | What It Does | When to Use |
|---|---|---|
-l |
Lists jobs with their PIDs (Process IDs) | When you need the numeric ID of a process |
-p |
Shows only PIDs of the jobs | When you only need process IDs for another command |
-r |
Lists only running jobs | When you want to see only active background jobs |
-s |
Lists only stopped jobs | When you want to see only paused jobs |
Practical Examples
To see the example in action you first need to run the count_loop.sh script. You can do this by running the following command in your terminal, we will start by running it in the background.
cd ~/playground/chapter6
./count_loop.sh &
You should see the following output:
[1] 12345This is the process ID of the background process. You can use this process ID to refer to the process in other commands.
Then you can run the following commands to see what the jobs command does:
# List all jobs in your current terminal session
jobs

# See all jobs with their process IDs
jobs -l

# Check which jobs are currently running in the background
jobs -r

# See which jobs are currently stopped/paused
jobs -s
Practice with the course script (count_loop.sh)
After running setup.sh, go to ~/playground/chapter6. The script count_loop.sh writes a counter to a file every 5 seconds. Try both ways:
cd ~/playground/chapter6

# Run in the background from the start — you get your prompt back immediately
./count_loop.sh &
# You'll see something like: [1] 12345

# In the same terminal, watch the output file grow (new line every 5 seconds)
tail -f count_output.txt
# Press Ctrl-C to stop watching (the script keeps running in the background)

# Check your jobs
jobs
# Bring the job to the foreground when you want to stop it
fg
# Then press Ctrl-C to stop the script
Foreground vs background: feel the difference
cd ~/playground/chapter6

# First, run in the foreground — your terminal is "busy" and you can't run other commands
./count_loop.sh
# Wait a few seconds; you'll see nothing in the terminal (output goes to the file)
# Press Ctrl-Z to pause it. You'll see: [1]+ Stopped ./count_loop.sh

# Now continue it in the background so you can use the terminal
bg
# Output: [1]+ ./count_loop.sh &

# Run other commands while the counter keeps updating the file
ls -l count_output.txt
tail -3 count_output.txt
jobs

# When done, bring the job to the foreground and stop it with Ctrl-C
fg
# Press Ctrl-C
Keyboard Shortcuts
Keyboard shortcuts are like quick gestures that let you control processes without typing full commands. They're essential for efficient terminal work.
| Shortcut | What It Does | When to Use |
|---|---|---|
Ctrl-C |
Sends the SIGINT signal to terminate the foreground process | When you want to stop a program immediately |
Ctrl-Z |
Sends the SIGTSTP signal to pause the foreground process | When you want to temporarily pause a program |
Ctrl-D |
Sends EOF (End of File) to the foreground process | When you want to signal the end of input to a program |
Practical Examples
# Start a script in the foreground
./myscript.sh

# Press Ctrl-Z to pause it
# Output: [1]+ Stopped ./myscript.sh

# Resume it in the background
bg

# Bring it back to the foreground
fg

# Press Ctrl-C to terminate it completely
# The script will stop running
Tips for Success
- Use
jobsregularly to keep track of what's running in your shell - For very long processes, consider using
nohup command &so they continue even if you log out - If a background process is producing too much output, redirect it with
command &> output.log & - Remember that each terminal window or tab has its own separate job list
- Use job numbers (
%1,%2) rather than relying on "most recent job" for clarity
Common Mistakes to Avoid
- Forgetting that background processes still output to your terminal (can be confusing)
- Not keeping track of what jobs you have running (use
jobsregularly) - Using
Ctrl-Cwhen you meant to useCtrl-Z(you can't undo termination) - Closing a terminal window with background jobs (they will be terminated)
- Running graphical applications in the background from terminal without
disownornohup
Best Practices
- For critical long-running tasks, use
nohuporscreen/tmuxinstead of simple& - Redirect output to files for background processes to keep your terminal clean
- Use meaningful script names to easily identify them in your jobs list
- Clean up your job list by bringing completed background tasks to the foreground
- For resource-intensive tasks, consider using
niceto set process priority
ps and top Commands
NOTE: In the following video I am able to show all the processes because I am running the commands as the root user. You will not be able to do that you will only be able to see the processes for your current user, which is very small sample of the processes that are running on the system.
Think of the ps and top commands like two different ways to check what's happening in a busy kitchen. The ps command is like taking a quick snapshot of the kitchen at one moment - you can see all the dishes being prepared, who's cooking what, and how much counter space each chef is using. The top command is more like watching a live security camera feed of the kitchen - you see everything happening in real-time, with constant updates about which dishes are taking the most resources. These commands help you understand what's running on your system and how resources are being used. They work the same on Ubuntu Server as on other Linux systems.
Quick Reference
| Command | What It Does | Common Use |
|---|---|---|
ps |
Shows a snapshot of current processes | Getting a quick list of running programs |
ps aux |
Shows detailed info about all processes | Troubleshooting or finding resource-heavy programs |
top |
Shows real-time, updating process information | Monitoring system performance over time |
top -u username |
Shows processes for a specific user | Checking what a particular user is running |
When to Use These Commands
- When your system feels slow and you want to identify what's using resources
- When you need to find the process ID (PID) of a program
- When you need to check if a program is still running
- When you want to monitor system performance over time
- When you're troubleshooting and need to see which processes might be causing problems
The ps Command
Think of ps as a camera that takes a quick snapshot of all the programs (processes) running on your computer at that exact moment. Unlike top, which keeps updating, ps just gives you a single report and then exits. This makes it perfect for quickly checking what's running or for use in scripts.
The name ps stands for "process status," and it's one of the most commonly used commands for system monitoring. By default, the basic ps command only shows processes running in your current terminal, but with options, you can see everything running on your system.
| Option | What It Does | When to Use |
|---|---|---|
-e |
Shows all processes | When you need to see everything running on the system |
-f |
Full format listing with more details | When you need to see parent-child relationships between processes |
-u username |
Shows processes for specific user | When you only care about what a particular user is running |
-l |
Long format with extra details | When you need priority and state information |
aux |
Shows all processes with detailed info | When you need comprehensive process information (most common) |
--sort=field |
Sorts output by a specific field | When you want to find the highest CPU or memory users |
Practical Examples
# Basic process view (only shows processes in your current terminal)
ps
# Output shows simple info like PID, TTY, TIME, and CMD

# See all processes on the system
ps -e
# Lists every process running on the system

# See detailed information about all processes (most common usage)
ps aux
# Shows USER, PID, %CPU, %MEM, and more for every process

# Find all processes owned by a specific user
ps -u your_username
# Shows only processes belonging to that user

# Sort processes by CPU usage (highest first)
ps -eo pid,ppid,cmd,%mem,%cpu --sort=-%cpu
# Great for finding what's consuming most CPU

# Sort processes by memory usage (highest first)
ps -eo pid,ppid,cmd,%mem,%cpu --sort=-%mem
# Helps identify memory hogs

# See process tree (parent-child relationships)
ps -ef --forest
# Shows processes in a tree-like format
Understanding ps Output
When you run ps -l, you'll see a table with many columns. They are defined below.
| Column | What It Shows | Why It's Important |
|---|---|---|
F |
Process flags | Indicates special attributes or system-level flags for the process |
S |
Current process state (e.g., R, S, D, T, Z) | Shows whether the process is running, sleeping, stopped, or a zombie |
UID |
User ID | Identifies which user owns the process |
PID |
Process ID | Unique number used to manage or terminate a specific process |
PPID |
Parent Process ID | Shows which process started this one, useful for tracing process trees |
C |
CPU utilization counter | Helps gauge how much CPU time the process has recently used |
PRI |
Scheduling priority | Determines the order in which processes are given CPU time |
NI |
Nice value | Indicates how “nice” the process is — higher values lower its priority |
ADDR |
Memory address | Displays where the process is loaded in memory (often unused on modern systems) |
SZ |
Process size in memory pages | Shows how large the process is in memory terms |
WCHAN |
Wait channel | Indicates the kernel function the process is waiting in, useful for debugging |
TTY |
Controlling terminal | Shows which terminal or session the process is attached to |
TIME |
Total CPU time | Displays how much processing time the process has consumed |
CMD |
Command name | Shows the command that launched the process |
When you run ps aux, you'll see a table with many columns. They are definded below.
| Column | What It Shows | Why It's Important |
|---|---|---|
USER |
Who owns the process | Helps identify whose programs are running |
PID |
Process ID (unique number) | Required when you need to stop or manage a process |
%CPU |
Percentage of CPU being used | Shows how computationally intensive the process is |
%MEM |
Percentage of memory being used | Shows how much RAM the process is consuming |
VSZ |
Virtual memory size (KB) | Shows total memory allocated to the process |
RSS |
Resident Set Size (actual memory used) | Shows actual physical memory the process is using |
TTY |
Controlling terminal | Shows which terminal or session the process is attached to; ? means it is not attached to a terminal |
STAT |
Process state (running, sleeping, etc.) | Tells you if the process is active, waiting, or stopped |
START |
When the process started | Helps identify long-running or recently started processes |
TIME |
CPU time used by the process | Shows total processing time consumed |
COMMAND |
Command that started the process | Shows what program the process belongs to |
Common Process States
The STAT column in ps aux output uses codes to show the state of each process. Here are the most important ones to know:
| Letter | What It Shows | Why It's Important |
|---|---|---|
R |
Running | The process is currently executing or ready to run on the CPU. |
S |
Sleeping | The process is idle, waiting for an event such as input or data. |
D |
Uninterruptible Sleep | The process is waiting for I/O operations and cannot be interrupted. |
T |
Stopped | The process has been stopped, often by a signal or user action. |
Z |
Zombie | The process has finished but remains in the table until the parent reaps it. |
X |
Dead | A defunct process being removed; rarely seen in normal operation. |
These are the additional codes you might see in the STAT column:
| Letter | What It Shows | Why It's Important |
|---|---|---|
s |
Session Leader | Indicates the process is the leader of its session, such as a login shell. |
l |
Multithreaded | Shows that the process uses multiple threads of execution. |
+ |
Foreground Process | Marks the process as attached to a terminal and running in the foreground. |
< |
High Priority | The process has a higher scheduling priority than normal. |
N |
Low Priority | The process has a lower scheduling priority (nice value greater than 0). |
L |
Locked Memory | The process has pages locked in memory that cannot be swapped out. |
n |
Low Priority (Legacy) | Older notation for a low-priority process, similar to N. |
I |
Idle Kernel Thread | Indicates a kernel thread that is not currently performing any work. |
The top Command
Think of top as a live, constantly updating dashboard for your computer. Unlike ps, which gives you a one-time snapshot, top refreshes every few seconds to show you what's happening in real-time. It's like having a monitoring screen that shows which programs are currently using the most resources.
The top command is interactive, meaning you can use keyboard commands while it's running to change how information is displayed, sort by different columns, or even manage processes directly. This makes it a powerful tool for system monitoring and troubleshooting.
IMPORTANT: To quit top, press 'q'.
| Option | What It Does | When to Use |
|---|---|---|
-d seconds |
Changes update frequency | When you want slower or faster updates than the default |
-u username |
Shows only a specific user's processes | When monitoring what a particular user is running |
-p PID |
Monitors specific process IDs | When you only care about watching certain programs |
-n number |
Exit after a certain number of updates | When you want top to run for a limited time |
-b |
Run in batch mode (for logging) | When saving output to a file for later analysis |
-o field |
Sort by a specific field | When you want to focus on CPU, memory, or other metrics |
Practical Examples
# Run top with default settings
top
# Shows real-time process information, refreshing every 3 seconds

# Update every 10 seconds instead of the default
top -d 10
# Slows down the refresh rate

# Show only processes from a specific user
top -u your_username
# Filters to only show your processes

# Monitor specific process IDs
top -p 1234,5678
# Only shows processes with those PIDs

# Run top once and save to a file
top -b -n 1 > system_snapshot.txt
# Useful for logging system state

# Sort processes by memory usage instead of CPU
top -o %MEM
# Shows memory-hungry processes at the top

# While top is running, press these keys for different actions:
# 'q' - Quit top
# 'k' - Kill a process (will prompt for PID)
# 'r' - Renice a process (change its priority)
# 'f' - Add/remove fields from display
# 'u' - Filter by user
# 'M' - Sort by memory usage
# 'P' - Sort by CPU usage (default)
Understanding top Display
The top display is divided into two main parts: the summary area at the top and the process list below it. Let's break down what you're seeing:
Summary Area
| Line | What It Shows | Why It's Important |
|---|---|---|
top - 14:49:25 up 76 days, 7:15, 4 users, load average: 0.02, 0.05, 0.05 |
System summary including current time, uptime, number of logged-in users, and load average. | Indicates how long the system has been running, how many users are active, and the average system load over 1, 5, and 15 minutes. |
Tasks: 2 total, 1 running, 1 sleeping, 0 stopped, 0 zombie |
Overview of all tasks (processes) and their states. | Shows how many processes are active, idle, stopped, or zombie. A zombie process has finished running but still has an entry in the process table because its parent process has not cleaned it up yet. |
%Cpu(s): 0.7 us, 1.5 sy, 0.0 ni, 97.7 id, 0.0 wa, 0.0 hi, 0.2 si, 0.0 st |
Breakdown of CPU usage by category. | Displays CPU utilization: user space (us), system (sy), nice (ni), idle (id), I/O wait (wa), hardware interrupts (hi), software interrupts (si), and steal time (st). |
KiB Mem : 3860580 total, 835048 free, 557080 used, 2468452 buff/cache |
Details of system memory (RAM) usage in kibibytes. Sometimes it will show MiB for Megabytes. | total is all installed RAM, free is RAM not currently being used, used is RAM in use by programs and the system, and buff/cache is RAM used for buffers and file cache that Linux can often reclaim if needed. |
KiB Swap: 524284 total, 488168 free, 36116 used. 2824680 avail Mem |
Swap space usage and available memory. Sometimes it will show MiB for Megabytes. | total is the full amount of swap space, free is unused swap, used is swap currently holding inactive memory pages moved out of RAM to disk, and avail Mem estimates how much memory is available for new applications without heavy swapping.What is Swap Space? When RAM gets crowded, Linux can move parts of memory that programs are not actively using from RAM to swap space on disk. If the program needs that data again, Linux moves it back into RAM. |
The load average numbers (like 0.15, 0.21, 0.18) tell you how busy your system is. Think of them as the number of processes waiting in line for the CPU. Numbers below 1.0 generally mean your system has capacity to spare, while higher numbers might indicate that your system is under stress.
Process List
The process list in top shows similar information to ps, but it's constantly updating and allows interactive control. The most important columns are %CPU and %MEM, which show you which processes are using the most resources.
Tips for Success
- Use
ps aux | grep program_nameto quickly find a specific program - Remember that
psgives a snapshot whiletopgives continuous updates - In
top, press 'h' to see a help screen with all available commands - Use
pswhen you need to pipe output to other commands - Learn to read the load average to gauge system health
Common Mistakes to Avoid
- Assuming high CPU usage always indicates a problem (some processes are naturally CPU-intensive)
- Looking only at %CPU and ignoring %MEM when troubleshooting performance
- Killing processes based solely on resource usage without understanding what they do
- Forgetting that
psonly gives a momentary snapshot which may miss intermittent issues - Not using the sort options when you have hundreds of processes to sift through
Best Practices
- Use
ps auxfor quick checks andtopfor ongoing monitoring - Learn to sort and filter output to find what you need quickly
- Combine with
grepto find specific processes - Check both CPU and memory usage when troubleshooting
- For system monitoring, consider specialized tools like
htoporglanceswhich build on these commands
Practical Monitoring Scenarios
Troubleshooting a Slow System
# First, check overall system load
top

# Look at the load average in the first line
# If it's consistently above 1.0 per CPU core, the system is under stress

# Sort by CPU usage to find resource hogs
# Press 'P' while in top, or use:
ps aux --sort=-%cpu | head -10
# Shows the top 10 CPU-consuming processes

# Check memory usage
# Press 'M' while in top, or use:
ps aux --sort=-%mem | head -10
# Shows the top 10 memory-consuming processes

# If you find a suspicious process, get more info
ps -p PROCESS_ID -f
# Shows detailed info about that specific process

# Check if the system is swapping heavily
free -m
# If swap 'used' is high and changing, this could explain slowness
Monitoring Multiple Systems
# Create a simple monitoring script
echo '#!/bin/bash
echo "System: $(hostname) - $(date)"
echo "Load Average: $(uptime | cut -d "," -f 3-5)"
echo "Top 5 CPU-consuming processes:"
ps aux --sort=-%cpu | head -6
echo "Memory Usage:"
free -m
echo "------------------------------"
' > monitor.sh

# Make it executable
chmod +x monitor.sh

# Run it on multiple systems or schedule with cron
./monitor.sh > system1_status.txt
# Or send the output to yourself by email with:
./monitor.sh | mail -s "System Status Report" your@email.com
Understanding the Environment in Linux
Think of the Linux environment like a personalized workspace that remembers your preferences. Just like how you might arrange your desk with specific tools and decorations, the Linux environment stores information about your system setup, favorite shortcuts, and personal settings. Understanding how to work with this environment helps you customize your Linux experience to work exactly the way you want it to. The commands and startup files described here apply to Ubuntu Server (and similar systems using bash).
Quick Reference
| Command | What It Does | Common Use |
|---|---|---|
printenv |
Display environment variables | Checking system configuration values |
set |
Display/set shell options and variables | Viewing all variables, changing shell behavior |
export |
Make variables available to child processes | Setting environment variables permanently |
alias |
Create command shortcuts | Creating custom commands and shortcuts |
When to Use Environment Commands
- When you need to check system configuration information
- When you want to customize your command line experience
- When you need to run programs with specific settings
- When you want to create shortcuts for frequently used commands
- When you're troubleshooting program behavior issues
Understanding Environment Types
Think of the Linux environment like layers of settings that affect how your system works:
| Type | What It Contains | Real-World Example |
|---|---|---|
| Environment Variables | System-wide settings shared with programs | Like the building rules everyone follows |
| Shell Variables | Settings specific to your current shell | Like your personal desk arrangement |
| Aliases | Custom command shortcuts | Like speed-dial numbers on your phone |
| Shell Functions | Mini-programs for your terminal | Like custom tools you've built for yourself |
The printenv Command
Think of printenv like a window into your system's configuration. It lets you see the environment variables that control how programs behave. Environment variables are like system-wide settings that programs can access to understand their operating context.
When you run printenv without any arguments, it displays all environment variables currently defined in your session. These variables contain information about your user account, system configuration, and program settings. Each line shows a variable name followed by an equals sign and its value.
Environment variables are used by many programs to determine how they should behave. For example, your terminal program uses the TERM variable to know what features your terminal supports, while commands like less and more use the PAGER variable to control their behavior.
| Option | What It Does | When to Use |
|---|---|---|
| No options | Shows all environment variables | When you want to see everything |
| Variable name | Shows value of specific variable | When you need one particular setting |
Practical Examples
# See all environment variables
printenv | less

# Check a specific variable
printenv USER

# Check your home directory path
printenv HOME

# See where programs are found
printenv PATH

# Check multiple variables at once
printenv USER HOME SHELL

# Check if a variable exists (returns nothing if it doesn't exist)
printenv NONEXISTENT_VARIABLE
Unlike the set command, printenv only shows environment variables (not shell variables). This makes it useful when you're specifically interested in variables that are passed to programs you run, rather than variables that only affect your current shell.
The set Command
Think of set as your control panel for the shell. It shows all variables (both environment and shell) and lets you change how your shell behaves. The set command is more comprehensive than printenv because it displays both environment variables and shell variables, along with any defined functions.
Shell variables are used only by the shell itself and aren't passed to programs you run. They control how the shell behaves, store temporary values for scripts, and hold special information about your shell session. Environment variables, on the other hand, are passed to child processes (programs you run).
The set command without options displays all variables in alphabetical order, making it easier to find specific variables. It also shows function definitions, which are mini-programs you can define in your shell.
Beyond viewing variables, set can change fundamental behaviors of your shell through shell options. These options can make your shell stricter or more verbose, which is particularly useful when debugging scripts.
| Option | What It Does | When to Use |
|---|---|---|
| No options | Shows all variables and functions | When you want to see everything |
-o |
Sets a shell option | When changing shell behavior |
+o |
Unsets a shell option | When reverting shell behavior |
-u |
Treats unset variables as errors | When writing robust scripts |
-x |
Prints commands as they execute | When debugging scripts |
-e |
Exits if a command fails | When you want scripts to stop on errors |
-v |
Prints input lines as they are read | When debugging complex scripts |
Practical Examples
# See all variables and functions
set | less

# Create a shell variable (not an environment variable)
MY_VAR="Hello World"
echo $MY_VAR

# Enable error on unset variables
set -u
echo $UNDEFINED_VARIABLE  # This will now cause an error

# Show commands as they execute (debugging)
set -x
ls -l
cd /tmp
set +x  # Turn off command printing

# Make scripts exit on first error
set -e

# See current shell options
set -o

# Turn on multiple options at once
set -eux
The set command is particularly valuable for script writers, as it provides options that can help catch errors early and make debugging easier. For everyday use, it's mainly used to view all variables or to see the current shell options.
The export Command
Think of export like sharing your settings with others. It makes variables available to any programs that your shell starts. In technical terms, it marks a variable for export to the environment of child processes (programs you run from your shell).
By default, variables you create in your shell (like X=123) are only available in that shell session. They're called "shell variables" and aren't passed to programs you run. When you use export, you're telling the shell "this variable should be shared with any programs I run from here."
For example, if you set EDITOR=vim but don't export it, programs that check the EDITOR variable won't see your preference. But if you use export EDITOR=vim, any program that looks for an editor preference will know to use vim.
The export command can be used in three main ways: to create and export a new variable in one step, to export an existing variable, or to list all currently exported variables.
| Syntax | What It Does | When to Use |
|---|---|---|
export VAR=value |
Creates and exports variable | When setting new environment variables |
export VAR |
Exports existing variable | When making shell variable available to programs |
export -p |
Lists all exported variables | When checking what's shared with programs |
export -n VAR |
Removes variable from export list | When preventing a variable from being shared |
Practical Examples
# Set and export a new variable
export EDITOR=vim

# Create a shell variable, then export it later
MY_VAR="Hello World"
export MY_VAR

# Add to PATH (preserving existing path)
export PATH=$PATH:$HOME/bin

# Set multiple variables at once
export VAR1="value1" VAR2="value2"

# List all exported variables
export -p

# Stop exporting a variable (it remains as a shell variable)
export -n SECRET_VAR

# Use exported variables in action
export GREP_COLOR='1;32'
grep --color=auto "pattern" file.txt  # Uses your color preference
The most common use of export is in startup files like .bashrc or .bash_profile, where it sets environment variables that will be available for your entire login session. Variables like PATH, EDITOR, LANG, and PS1 are typically set and exported in these files.
Remember that exported variables are only passed downstream to child processes. Changes you make in a child process (like a script) can't affect the parent shell's environment. For that, you would need to source a script using the source command or the . operator.
The alias Command
Think of alias like creating shortcuts for commands. It's like programming speed-dial numbers for frequently used commands. Aliases allow you to create your own command names that expand to longer or more complex commands, saving you time and typing effort.
An alias is essentially a text substitution. When you type an alias at the command line, the shell substitutes it with its defined value before execution. This allows you to create shorter names for commands you use often, add default options to commands, or create entirely new command names that combine multiple actions.
For example, if you frequently use ls -l to list files with details, you could create an alias ll that automatically expands to ls -l. Similarly, you might create safer versions of commands by adding options like -i (interactive) to rm, which prompts for confirmation before deleting files.
Aliases are just text substitutions, so they have some limitations: they can only be used as the first word on a command line, and they don't accept arguments in the middle of the alias definition. For more complex operations, shell functions (which are more flexible) are needed.
| Syntax | What It Does | When to Use |
|---|---|---|
alias |
Lists all defined aliases | When checking existing shortcuts |
alias name='command' |
Creates a new alias | When making a command shortcut |
unalias name |
Removes an alias | When deleting a shortcut |
unalias -a |
Removes all aliases | When resetting to default commands |
alias name |
Shows definition of specific alias | When checking what a shortcut does |
Practical Examples
# List all defined aliases
alias

# Create a shortcut for listing files
alias ll='ls -l'

# Create an alias with multiple commands (using semicolons)
alias update='sudo apt update; sudo apt upgrade'

# Create a safer remove command
alias rm='rm -i'

# Show what a specific alias does
alias ll

# Create an alias that includes options and arguments
alias grep='grep --color=auto'

# Create a completely new command name
alias showspace='du -sh * | sort -h'

# Remove an alias
unalias ll

# Remove all aliases
unalias -a
Aliases defined at the command line only last for your current session. To make them permanent, add them to your shell's startup files, typically ~/.bashrc. Most Linux distributions come with some default aliases already set up.
One caution with aliases: they can hide the original commands, which might be confusing to others using your account. You can always bypass an alias by using the full path to the command (like /bin/rm instead of rm) or by preceding the command with a backslash (like \rm).
Important Environment Variables
Think of these variables like the key settings that control your Linux experience:
| Variable | What It Stores | Why It's Important |
|---|---|---|
HOME |
Your home directory path | Used by programs to find your personal files |
PATH |
Where programs are found | Determines which commands are available |
USER |
Your username | Identifies who you are to programs |
SHELL |
Your default shell | Determines your command interpreter |
PS1 |
Your command prompt appearance | Controls how your prompt looks |
EDITOR |
Your preferred text editor | Used by programs that need to edit text |
LANG |
Your language preferences | Controls language and text formatting |
Startup Files
Startup files are scripts that the shell runs automatically at certain times. They set up your environment: variables like PATH and EDITOR, aliases, and other preferences. You edit these files to make your customizations permanent. On the course server (and on many Linux systems), each user's home directory has two main startup files: ~/.bashrc and ~/.profile. Understanding when each file is read helps you know where to put your settings.
What each file does
/etc/profile — This file is read by all users when they log in. Only system administrators can change it. It sets system-wide defaults (e.g. PATH for everyone). You don't edit this file; it runs first, then your personal files are read.
~/.profile — This file is read once when you log in (e.g. when you SSH in or open a login shell). Use it for settings that should happen only at login: things that need to run once per session, or variables that should be set before any other startup file. Many systems also have ~/.bash_profile; if both exist, bash reads ~/.bash_profile and may skip ~/.profile. On the course server you have ~/.profile, so put login-only settings there if you need them.
~/.bashrc — This file is read every time you start a new interactive bash shell: when you open a new terminal tab or window, or when you run bash from the command line. It is not read by default when you log in (login shells often read ~/.profile instead, and some systems have ~/.profile call ~/.bashrc so both run). Use ~/.bashrc for aliases, shell options, and customizations you want in every new terminal. This is the file you'll edit most often.
How they're used
To change your environment permanently, edit the right file with a text editor (e.g. nano ~/.bashrc). The changes apply the next time that file is read: for ~/.bashrc, the next time you open a new terminal (or run source ~/.bashrc to reload it in the current shell); for ~/.profile, the next time you log in. You don't run these files like scripts—the shell runs them automatically. If you add a line that has a syntax error, it can prevent your shell from starting correctly, so test carefully or keep a backup.
| File | When It's Read | What to Put There |
|---|---|---|
/etc/profile |
During login (all users) | System-wide settings—edited by admins only |
~/.profile |
Once at login (your user) | Login-only settings (e.g. run once per session). On the course server you have this file. |
~/.bashrc |
Every new interactive bash (new terminal) | Aliases, prompt (PS1), and options you want in every terminal. On the course server you have this file—use it for most of your customizations. |
~/.bash_profile |
Once at login (if it exists; some systems use this instead of ~/.profile for bash) |
User login settings when this file is present. Not used on the course server if only ~/.profile exists. |
On the course server, your home directory has ~/.bashrc and ~/.profile. Put day-to-day customizations (aliases, prompt, export of variables like EDITOR) in ~/.bashrc. Use ~/.profile only if you need something to run once at login; often ~/.profile is set up to run ~/.bashrc so that both are used when you log in.
Example .bashrc File
# Set some useful aliases
alias ll='ls -l'
alias la='ls -a'
alias rm='rm -i'

# Set custom prompt
PS1='\u@\h:\w\$ '

# Add personal bin directory to PATH
PATH=$PATH:$HOME/bin

# Set preferred editor
export EDITOR=vim

# Add custom function
weather() {
    curl wttr.in/$1
}
Tips for Success
- Make backups of startup files before editing them
- Test new environment settings in a temporary shell first
- Use comments in your startup files to document changes
- Keep your PATH variable organized and secure
- Create aliases for commands you frequently mistype
Common Mistakes to Avoid
- Putting space around the = sign in variable assignments (VAR = value is wrong!)
- Forgetting to export variables needed by programs
- Overriding system commands with dangerous aliases
- Making startup files too complex or slow to load
- Modifying the wrong startup file for your needs
Best Practices
- Keep environment customizations in .bashrc for most settings
- Use .bash_profile for PATH and environment variable settings
- Create a bin directory in your home folder for personal scripts
- Document all your customizations with comments
- Review your startup files periodically and clean up unused settings
Understanding System Services
Think of system services like background workers in a building: the web server that serves pages, the SSH server that lets you log in remotely, or the scheduler that runs tasks at certain times. They are programs that run in the background, often from the moment the computer boots, and keep running until you shut the system down. When you use ps or top, many of the processes you see are these services. Understanding what they are and how the system manages them helps you see why certain programs are always running and how to control them properly. This lesson describes how services work on an Ubuntu Server system (and other systemd-based Linux systems).
Quick Reference
| Term | What It Means | Common Use |
|---|---|---|
| Service (daemon) | A long-running background program | Web server, SSH, cron, database |
| Service manager | Program that starts, stops, and monitors services | systemd on most modern Linux systems |
| Unit | A configuration file that describes a service (or other resource) | Defines how and when a service runs |
| Target | A group of units; like a "runlevel" (e.g. multi-user mode) | What runs when the system boots normally |
When This Matters
- You see processes in
psortopand want to know what they are - You need to start, stop, or restart a service (e.g. a web server)
- You want a service to start automatically when the system boots
- You're troubleshooting why a feature (e.g. SSH or a web app) isn't working
What Is a Service?
A service (also called a daemon) is a program that runs in the background. Unlike a command you run in the terminal—which runs, does something, and exits—a service keeps running. It usually has no window or terminal attached; it just does its job (accepting network connections, running scheduled tasks, and so on) until the system shuts down or someone stops it.
Common examples:
| Service | What It Does |
|---|---|
| ssh | Lets you log in remotely via SSH |
| nginx or apache | Web server that serves web pages |
| cron | Runs commands on a schedule |
| systemd-logind | Manages logins and sessions |
How the System Manages Services
On most modern Linux systems, a program called systemd is the service manager. It is responsible for:
- Starting services when the system boots
- Keeping track of which services are running
- Restarting services if they crash (when configured to do so)
- Stopping services in an orderly way when the system shuts down
You don't usually run services by hand from the command line and then leave them in the background. Instead, you tell systemd to start or stop them using the systemctl command (covered in the next lesson). That way the system knows about them and can manage them correctly.
Units and Unit Files
systemd organizes everything into units. A unit is a "thing" that systemd can manage: a service, a mount point, a timer, and so on. Each unit is defined by a unit file—a configuration file that describes what to run and how.
For a service, the unit file might specify:
- The command to run (the program and its arguments)
- Whether the service should start automatically at boot
- What to do if the service crashes (e.g. restart it)
- Which other units must be started first (dependencies)
Unit files are stored in a few places:
| Location | What It's For |
|---|---|
/usr/lib/systemd/system/ |
Units installed by packages (don't edit these) |
/etc/systemd/system/ |
Local overrides and custom units (admin can edit) |
Service unit files usually end in .service, for example ssh.service or nginx.service on Ubuntu. The name without the .service suffix is the unit name you use with systemctl (e.g. ssh, nginx).
Targets (Boot and Run States)
A target is a group of units. Think of it as a "mode" the system is in. When the system boots, it enters a default target (usually multi-user.target or graphical.target), and systemd starts all the units that belong to that target.
| Target | What It Means |
|---|---|
multi-user.target |
Normal multi-user mode (text login, no desktop) |
graphical.target |
Full desktop with graphical login |
rescue.target |
Minimal single-user mode for recovery |
When you "enable" a service, you're often saying "start this when the system reaches a certain target (e.g. multi-user)." The next lesson shows how to do that with systemctl.
Services and Processes
When you run ps aux or top, you see many processes. A lot of them are services started by systemd. They might run as the root user or as a dedicated user (e.g. www-data for a web server). So when you learn about processes (as in the ps and top lessons), you're already looking at the same programs that systemd manages—you're just viewing them from a different angle. systemctl is the right tool to start, stop, or enable them; kill can stop a process but doesn't tell systemd, so it's better to use systemctl stop for services.
Tips for Success
- Use
systemctlto control services instead of running them by hand or killing them withkill - Don't edit unit files in
/usr/lib/systemd/system/; use/etc/systemd/system/for overrides if needed - If a feature isn't working (e.g. SSH or a web server), check whether the right service is running
Common Mistakes to Avoid
- Killing a service process with
killinstead of usingsystemctl stop—systemd may restart it or get confused about state - Editing unit files without understanding the syntax; small mistakes can prevent a service from starting
- Assuming every background process is a "service"—some are just programs you or another user started
Best Practices
- Use
systemctl status servicenameto see if a service is running and read its recent log - Enable only services you need at boot to keep startup fast and reduce risk
- When troubleshooting, check the service status and logs before changing configuration
systemctl Basics
Think of systemctl as the control panel for system services. Just as you might use a remote to turn a TV on or off or change channels, systemctl lets you start, stop, restart, and check the status of services. It also lets you enable or disable services so they start (or don't start) automatically when the computer boots. Most systemctl commands that change something—like starting or stopping a service—require root privileges, so you'll often use sudo systemctl. This lesson covers the basics you need for everyday use on an Ubuntu Server system.
Quick Reference
| Command | What It Does | Common Use |
|---|---|---|
systemctl start name |
Start a service | Starting a web server or other service |
systemctl stop name |
Stop a service | Stopping a service cleanly |
systemctl restart name |
Restart a service | Applying config changes or recovering from a problem |
systemctl status name |
Show service status and recent log | Checking if a service is running or why it failed |
systemctl enable name |
Enable service to start at boot | Making a service start automatically |
systemctl disable name |
Disable service from starting at boot | Stopping a service from auto-starting |
systemctl list-units --type=service |
List loaded services | Seeing what services are running |
Note: Starting, stopping, enabling, and disabling services usually require root. Use sudo systemctl .... Checking status often works without sudo.
When to Use systemctl
- You need to start, stop, or restart a service (e.g. after changing its config)
- You want a service to start automatically when the system boots
- You want to see whether a service is running and read its recent messages
- You're troubleshooting why something (SSH, web server, etc.) isn't working
Starting, Stopping, and Restarting Services
You use the service name (without .service) with systemctl. On Ubuntu Server, common service names include ssh (SSH server), nginx or apache2 (web server), and cron (scheduled tasks). You can say systemctl start ssh and systemd will find the matching unit (e.g. ssh.service).
| Command | What It Does | When to Use It |
|---|---|---|
start |
Start the service now | When the service isn't running and you want it to run |
stop |
Stop the service | When you want to shut it down cleanly |
restart |
Stop and then start the service | After changing config or to "reset" the service |
reload |
Reload config without full restart | When the service supports reloading config without dropping connections |
Practical Examples
# Start the SSH service (on Ubuntu the service is named ssh)
sudo systemctl start ssh

# Stop a service
sudo systemctl stop nginx

# Restart a service (e.g. after editing its config file)
sudo systemctl restart nginx

# Reload config without stopping the service (if supported)
sudo systemctl reload nginx
Checking Service Status
systemctl status servicename shows whether the service is running, stopped, or failed, and prints a few recent log lines. You usually don't need sudo to run status.
Status Examples
# Check if SSH service is running (on Ubuntu the service is named ssh)
systemctl status ssh

# Check a service by full name
systemctl status nginx.service

# Status shows: active (running), inactive (dead), failed, etc.
# It also shows recent log output for that service
Enabling and Disabling Services (Start at Boot)
"Enable" means "start this service when the system boots into its default target." "Disable" means "don't start it at boot." Enabling or disabling doesn't start or stop the service right now—it only affects what happens at the next boot. You often need sudo to enable or disable.
| Command | What It Does | When to Use It |
|---|---|---|
enable |
Start this service at boot | When you want the service to run whenever the system starts |
disable |
Don't start this service at boot | When you don't want it to auto-start |
is-enabled name |
Show whether the service is enabled | Checking if a service will start at boot |
Enable and Disable Examples
# Enable SSH to start at boot (on Ubuntu the service is named ssh)
sudo systemctl enable ssh

# Disable a service from starting at boot
sudo systemctl disable nginx

# Check if a service is enabled
systemctl is-enabled ssh
# Output: enabled  or  disabled
Listing Services
To see which services exist and whether they're running, use systemctl list-units. You can filter by type (e.g. only services) and by state (e.g. only active).
| Command | What It Does | When to Use It |
|---|---|---|
list-units --type=service |
List loaded service units | See what services are currently loaded |
list-units --type=service --all |
List all service units (including inactive) | Find a service name or see everything installed |
list-unit-files --type=service |
List unit files and enable state | See which services are enabled at boot |
Listing Examples
# List currently loaded/active services
systemctl list-units --type=service

# List all service units (active and inactive)
systemctl list-units --type=service --all

# List service unit files and whether they're enabled
systemctl list-unit-files --type=service

# Filter with grep (e.g. find ssh)
systemctl list-units --type=service --all | grep ssh
Tips for Success
- Use
systemctl status servicenamefirst when something isn't working—it shows state and recent errors - Remember:
enable/disableaffect boot;start/stopaffect the current run - Service names on Ubuntu are often the program or package name (e.g.
ssh,nginx,apache2,cron); uselist-units --allto find the exact name - After changing a unit file, run
sudo systemctl daemon-reloadbeforestartorrestart
Common Mistakes to Avoid
- Forgetting
sudowhen starting, stopping, enabling, or disabling—you'll get "Permission denied" or similar - Confusing
enable(start at boot) withstart(start now) - Using the full filename (e.g.
ssh.service) when the short name (ssh) works and is simpler - Editing unit files and then starting the service without running
daemon-reloadfirst
Best Practices
- Use
systemctl stopandsystemctl start(orrestart) instead ofkillfor services - Check
statusafter starting or restarting to confirm the service is running and healthy - Enable only services you need at boot to keep startup fast and reduce exposure
- Use
reloadinstead ofrestartwhen the service supports it and you only changed config
kill, killall and shutdown Commands
Think of these commands like different ways to turn things off in your home. The kill command is like pressing the power button on a specific device, killall is like using a universal remote to turn off all TVs of the same brand at once, and shutdown is like flipping the main breaker switch for your entire house. Understanding these commands helps you manage programs and your system with precision and control. These commands work the same way on Ubuntu Server as on other Linux systems.
Quick Reference
| Command | What It Does | Common Use |
|---|---|---|
kill |
Sends signals to specific processes using PID | Stopping individual misbehaving programs |
killall |
Sends signals to processes by name | Stopping all instances of a program at once |
shutdown |
Powers off, reboots, or halts the system | Safely shutting down or restarting your computer |
When to Use These Commands
- When a program freezes or becomes unresponsive
- When you need to free up system resources
- When you want to safely power off your system
- When multiple instances of a program need to be stopped at once
- When you need to schedule a system shutdown
The kill Command
Think of the kill command like a remote control that can send different types of signals to a specific program. Although its name suggests termination, kill can actually send various signals to processes, from a gentle request to close to a forceful shutdown.
Each program running on your system has a unique ID number called a PID (Process ID). The kill command uses this ID to target a specific program. It's like having a unique code for each device in your home that lets you control them individually.
| Signal | What It Does | When to Use |
|---|---|---|
-1 (SIGHUP) |
Hangup signal, can reload configuration | When you've changed a program's config file and want it to reload |
-2 (SIGINT) |
Interrupt signal (same as Ctrl+C) | When you want to terminate a program normally |
-9 (SIGKILL) |
Kill signal, forces immediate termination | When a program is completely frozen and won't respond to other signals |
-15 (SIGTERM) |
Termination signal, requests graceful exit | When you want a program to close properly (the default) |
-18 (SIGCONT) |
Continue signal, resumes a stopped process | When you want to resume a process you previously paused |
-19 (SIGSTOP) |
Stop signal, pauses the process | When you want to temporarily freeze a program without killing it |
Practical Examples
# First, find the PID of a process
ps aux | grep firefox

# Gracefully terminate a process (recommended first attempt)
kill -15 1234    # Asks Firefox (PID 1234) to close properly

# If a process won't respond to a normal termination
kill -9 1234     # Forces Firefox to close immediately, may lose unsaved data

# Temporarily pause a process
kill -19 1234    # Freezes Firefox without closing it

# Resume a paused process
kill -18 1234    # Continues a previously paused Firefox

# Reload a process configuration without restarting
kill -1 1234     # Tells Firefox to reload its configuration
The killall Command
Think of the killall command like having a remote that can control all devices of the same type at once. Instead of needing to know each process's ID number, you can simply specify the program name, and killall will affect all running instances of that program.
This is particularly useful when you have multiple copies of the same program running, or when you don't want to look up the specific PID. It's like saying "turn off all the lights" instead of turning off each light individually.
| Option | What It Does | When to Use |
|---|---|---|
-i |
Interactive mode, asks for confirmation | When you want to be extra careful about what you're closing |
-I |
Case-insensitive process matching | When you're not sure about the exact capitalization of the process name |
-u user |
Only kill processes owned by specific user | When you want to target only a specific user's programs |
-w |
Wait for processes to die | When you need to make sure processes have actually terminated |
Practical Examples
# Close all Firefox windows at once
killall firefox   # Gracefully closes all Firefox processes

# Force close all instances of a program that's not responding
killall -9 firefox   # Force closes all Firefox processes immediately

# Close all instances of a program for a specific user
killall -u username firefox   # Closes Firefox only for a specific user

# Kill processes with confirmation
killall -i firefox   # Asks before closing each Firefox process

# Kill all processes matching a name, regardless of case
killall -I firefox   # Matches firefox, Firefox, FIREFOX, etc.
The shutdown Command
Think of the shutdown command like the master power controls for your entire computer. It allows you to turn off, restart, or halt your system safely, making sure all programs have a chance to save their data and close properly before the power goes off.
The shutdown command can also schedule a shutdown for later, which is like setting a timer on your home's main power. This gives you and other users time to save work and exit programs before the system turns off.
Note: You will not have permissions to shutdown the Cidermill server in your class environment.
| Option | What It Does | When to Use |
|---|---|---|
-h |
Halts or powers off the system | When you're done using the computer and want to turn it off |
-r |
Reboots the system | When you need to restart the computer, like after updates |
-c |
Cancels a scheduled shutdown | When you no longer need to shut down at the scheduled time |
+m |
Schedules shutdown in m minutes | When you want to give users time to save work and log out |
now |
Executes shutdown immediately | When you need to shut down without delay |
Practical Examples
# Shut down the system immediately
shutdown -h now   # Turns off computer right away

# Reboot the system immediately
shutdown -r now   # Restarts computer right away

# Schedule a shutdown in 15 minutes with a warning message
shutdown -h +15 "System maintenance scheduled. Please save your work."   # Notifies all users

# Cancel a previously scheduled shutdown
shutdown -c   # Stops the countdown to shutdown

# Schedule a reboot at a specific time
shutdown -r 23:00   # Restarts the computer at 11:00 PM

# Alternate way to reboot
reboot   # Same as shutdown -r now
Tips for Success
- Always try
kill -15(gentle termination) before usingkill -9(force kill) - Save your work before issuing shutdown commands
- Use
ps auxto find the correct PID before using the kill command - Include a helpful message when scheduling shutdowns so users know why the system is going down
- Double-check process names with
killall -ito avoid accidentally killing the wrong programs
Common Mistakes to Avoid
- Using
kill -9as your first attempt to terminate a process - Forgetting to warn users before shutting down a shared system
- Killing system-critical processes, which can crash your system
- Using
killallwith common names that might match multiple programs - Confusing
shutdown -h(halt) andshutdown -r(reboot)
Best Practices
- Always try less forceful signals before resorting to
kill -9 - Schedule shutdowns with enough advance notice for users to save their work
- Use
psortopto verify the correct process before killing it - Include informative messages with scheduled shutdowns
- Consider using
killall -i(interactive mode) for safety
Chapter 7
ping and traceroute Commands
Think of the internet as a vast network of roads connecting different locations. The ping command is like sending a small paper airplane to a destination and seeing if it comes back - it tells you if a connection exists and how long the round trip takes. The traceroute command is like tracking a delivery truck's entire journey, showing you each stop (router) along the way from your computer to the destination. These tools help you understand if your network is working and where problems might be happening.
The course setup.sh script creates ~/playground/chapter7/hosts_to_ping.txt with sample hostnames and IPs (e.g. 8.8.8.8, google.com). You can run ping -c 4 on each line manually, or use the file as a reference when practicing. Run ping and traceroute from any directory; no need to change into chapter7 unless you use the hosts file.
Quick Reference
| Command | What It Does | Common Use |
|---|---|---|
ping hostname |
Tests if a host is reachable | Checking if a website or server is online |
ping -c 5 hostname |
Sends exactly 5 ping packets | Testing connection without running indefinitely |
traceroute hostname |
Shows the path to a destination | Finding where network problems occur |
traceroute -n hostname |
Shows path with IP addresses only | Getting faster results without DNS lookups |
When to Use These Commands
- When your internet connection seems slow or unreliable
- When a website or service isn't responding
- When troubleshooting network connection problems
- When trying to determine if an issue is with your network or a remote server
- When measuring network performance or latency
The ping Command
Think of ping like sonar on a submarine - it sends out a signal and listens for the echo coming back. The ping command sends small data packets to a specific address and measures how long it takes to get a response (if any). It's named after the sound of sonar because it works on the same principle: send a signal, wait for it to bounce back, and measure the time.
When you ping a website or server, your computer sends an "ICMP Echo Request" packet (think of it as asking "Are you there?"), and if the destination is reachable, it sends back an "ICMP Echo Reply" (essentially saying "Yes, I'm here!"). Your computer measures the time between sending and receiving to calculate how long the round trip took.
| Option | What It Does | When to Use |
|---|---|---|
-c count |
Limits the number of packets sent | When you want ping to stop automatically after a certain number of attempts |
-i seconds |
Sets the interval between packets | When you want to space out ping requests (default is 1 second) |
-s size |
Changes the packet size | When testing how different packet sizes affect performance |
-q |
Shows only summary results | When you only need the final statistics, not each ping result |
-w timeout |
Sets how long to wait before exiting | When you need ping to give up after a specific time period |
Practical Examples
# Basic ping to check if Google is reachable
ping google.com
# Will ping continuously until you press Ctrl+C

# Send exactly 4 pings and then stop
ping -c 4 google.com
# Useful for quick connection checks

# Send larger packets (default is 56 bytes)
ping -s 1000 google.com
# Tests how network handles larger packets

# Ping with 5-second intervals between packets
ping -i 5 google.com
# Reduces network load while still testing connectivity

# Show only summary results
ping -c 10 -q google.com
# Gets quick statistics without detailed output
Understanding ping Output
Sample Output Explained
PING google.com (172.217.16.206) 56(84) bytes of data.
64 bytes from dfw25s14-in-f14.1e100.net (172.217.16.206): icmp_seq=1 ttl=53 time=11.6 ms
64 bytes from dfw25s14-in-f14.1e100.net (172.217.16.206): icmp_seq=2 ttl=53 time=10.8 ms
64 bytes from dfw25s14-in-f14.1e100.net (172.217.16.206): icmp_seq=3 ttl=53 time=10.9 ms
64 bytes from dfw25s14-in-f14.1e100.net (172.217.16.206): icmp_seq=4 ttl=53 time=10.7 ms
--- google.com ping statistics ---
4 packets transmitted, 4 received, 0% packet loss, time 3002ms
rtt min/avg/max/mdev = 10.708/11.005/11.586/0.321 ms
Let's break down what this means:
PING google.com (172.217.16.206) 56(84) bytes of data: Shows the hostname, its IP address, and that you're sending 56 bytes of data (84 bytes including headers)64 bytes from dfw25s14-in-f14.1e100.net (172.217.16.206): icmp_seq=1 ttl=53 time=11.6 ms:- You received 64 bytes back (the response)
- It came from Google's server (with its domain name and IP)
icmp_seq=1: This is the first ping packetttl=53: Time To Live value, showing how many more network hops the packet could travel before it expires.time=11.6 ms: The round-trip took 11.6 milliseconds
- The statistics at the end summarize:
4 packets transmitted, 4 received: All pings were successful0% packet loss: No packets were lost (good connection)time 3002ms: Total time for all testsrtt min/avg/max/mdev = 10.708/11.005/11.586/0.321 ms: Round-trip times - minimum, average, maximum, and standard deviation
The traceroute Command
Think of traceroute like a GPS tracking system that shows every stop on a journey. When you send data across the internet, it doesn't travel directly from your computer to the destination - it passes through several routers (like relay stations). The traceroute command reveals this path, showing each "hop" and how long each step takes.
It works by sending packets with gradually increasing "Time To Live" (TTL) values. The first packet can only go one hop before expiring, the second can go two hops, and so on. Each router that receives an expired packet sends back a message, allowing traceroute to map the entire path step by step.
| Option | What It Does | When to Use |
|---|---|---|
-m maxhops |
Sets the maximum number of hops | When tracing routes to distant servers or limiting trace length |
-n |
Shows IP addresses only (no DNS lookup) | When you want faster results or numeric addresses only |
-q queries |
Sets packets to send per hop | When you want more accurate measurements for each hop |
-w seconds |
Sets wait time for responses | When dealing with slow networks or wanting to timeout faster |
-p port |
Specifies port number to use | When testing connectivity to a specific service |
Practical Examples
# Basic traceroute to a website
traceroute google.com
# Shows every hop between you and Google

# Use numeric addresses only (faster)
traceroute -n google.com
# Skips DNS lookups for each router

# Limit trace to 10 hops maximum
traceroute -m 10 github.com
# Stops after 10 routers even if destination isn't reached

# Send 2 packets per hop instead of 3
traceroute -q 2 yahoo.com
# Gets slightly less accurate but faster results

# Set wait time to 2 seconds
traceroute -w 2 microsoft.com
# Gives up more quickly on unresponsive routers
Understanding traceroute Output
Sample Output Explained
traceroute to google.com (172.217.16.206), 30 hops max, 60 byte packets
 1  192.168.1.1 (192.168.1.1)  2.232 ms  2.089 ms  2.055 ms
 2  * * *
 3  10.0.0.1 (10.0.0.1)  11.133 ms  11.052 ms  10.939 ms
 4  172.217.16.206 (172.217.16.206)  10.714 ms  10.544 ms  10.362 ms
Let's break down what this means:
traceroute to google.com (172.217.16.206), 30 hops max, 60 byte packets: Shows the destination, its IP, maximum number of hops to try, and packet size1 192.168.1.1 (192.168.1.1) 2.232 ms 2.089 ms 2.055 ms:- Hop #1 is your router at 192.168.1.1
- The three times (2.232 ms, 2.089 ms, 2.055 ms) are from three separate test packets
- This shows how long it takes to reach your router (very fast!)
2 * * *:- The asterisks mean the router at hop #2 didn't respond
- This is common and doesn't necessarily indicate a problem
- Some routers are configured not to respond to traceroute packets for security reasons
4 172.217.16.206 (172.217.16.206) 10.714 ms 10.544 ms 10.362 ms:- This is the destination (Google's server)
- It took about 10.5 milliseconds to reach Google from your router
Tips for Success
- Always use
ping -cwith a number when pinging, so it stops automatically - Look at packet loss percentage in ping results - anything above 1-2% indicates a problem
- Use
traceroute -nfor faster results when you don't need to see router names - Don't worry about occasional asterisks in traceroute - some routers are configured not to respond
- Save the output of these commands when troubleshooting to compare results over time
- Compare ping times to different destinations to identify if a problem is with one specific site
Common Mistakes to Avoid
- Running ping without the
-coption and forgetting it runs forever until stopped - Assuming a website is down just because ping fails (some sites block ping requests)
- Misinterpreting high ping times during peak internet usage hours
- Forgetting that traceroute uses UDP on some systems and ICMP on others, which can affect results
- Assuming a problem is always at the last hop - issues can occur anywhere along the path
- Running these commands too frequently on corporate networks (may trigger security alerts)
Best Practices
- Test multiple destinations when diagnosing network issues to isolate the problem
- Use ping first to check basic connectivity before running more detailed traceroute
- Keep a record of normal ping times to your common destinations for comparison
- When reporting network issues, include both ping and traceroute results
- Try both domain names and IP addresses - DNS issues can be confused with connectivity problems
- Run tests at different times of day to identify patterns in performance problems
ip and netstat Commands
Think of your Linux system's network like a postal service. The ip command is like the postal worker who manages addresses and delivery routes, helping set up where your data lives and how it travels. The netstat command is like a tracking system that shows you all the packages (data) coming and going, where they're headed, and if there are any delivery problems. Understanding these commands helps you see and control how your computer talks with others across networks.
The examples below work from any directory. On Ubuntu Server your main network interface may be eth0, ens33, or enp0s3 depending on the system; use ip link or ip addr to see the actual interface names on your machine.
Quick Reference
| Command | What It Does | Common Use |
|---|---|---|
ip addr |
Shows IP addresses assigned to interfaces | Checking your computer's network addresses |
ip link |
Displays network interface information | Checking if network cards are up and running |
ip route |
Shows routing table (traffic directions) | Finding how traffic leaves your computer |
netstat -tuln |
Shows listening ports and connections | Checking what services are running and connected |
netstat -r |
Displays routing table information | Viewing network routes in a different format |
netstat -i |
Shows network interface statistics | Monitoring network adapter performance |
When to Use These Commands
- When setting up a new network connection
- When troubleshooting connectivity problems
- When checking which programs are using the network
- When monitoring network performance issues
- When setting up or checking firewall rules
- When configuring or troubleshooting server applications
The ip Command
Think of the ip command as your network configuration toolbox. Just like you might use different tools to fix different parts of your house, the ip command has different "subcommands" for working with different parts of your network setup. The ip command is newer and more powerful than older commands like ifconfig, giving you more control over your network settings.
The basic structure of the ip command is:
ip [OPTIONS] OBJECT COMMANDWhere OBJECT is what you want to work with (like addresses, links, or routes), and COMMAND is what you want to do with it.
| Subcommand | What It Does | When to Use |
|---|---|---|
ip addr |
Manages IP addresses on interfaces | When checking or changing IP addresses |
ip link |
Manages network interfaces | When enabling/disabling network cards |
ip route |
Manages routing table entries | When controlling how traffic flows out |
ip neigh |
Shows neighbor table (like ARP) | When checking which MAC addresses are known |
ip -s |
Shows statistics for objects | When monitoring traffic volumes |
Practical Examples
# Check all your IP addresses
ip addr
# Shows all interfaces and their addresses

# View just network interfaces and their status
ip link
# Shows interfaces and if they're UP or DOWN

# See your routing table (where traffic goes)
ip route
# Shows default gateway and all routes

# Add a temporary IP address to an interface
ip addr add 192.168.1.200/24 dev eth0
# Adds additional IP without removing existing ones

# Bring a network interface up or down
ip link set eth0 down
ip link set eth0 up
# Disables and then enables the interface

# Add a temporary static route
ip route add 10.0.0.0/24 via 192.168.1.1
# Sends traffic for 10.0.0.x through the specified gateway
Understanding ip addr Output
Think of ip addr output like reading your home address, apartment number, and access codes all at once. Let's break down what you're seeing when you run this command:
Sample Output Explained
1: lo:  mtu 65536 qdisc noqueue state UNKNOWN
    link/loopback 00:00:00:00:00:00 brd 00:00:00:00:00:00
    inet 127.0.0.1/8 scope host lo
       valid_lft forever preferred_lft forever
This is your loopback interface - think of it like an internal phone line that only connects to yourself:
lo: The device name (loopback)LOOPBACK,UP,LOWER_UP: Status flags showing it's activemtu 65536: Maximum packet size (much larger than normal since it's internal)inet 127.0.0.1/8: Your "localhost" address that always points to your own computer
2: eth0:  mtu 1500 qdisc pfifo_fast state UP
    link/ether 08:00:27:53:8b:dc brd ff:ff:ff:ff:ff:ff
    inet 192.168.1.10/24 brd 192.168.1.255 scope global dynamic eth0
       valid_lft 86352sec preferred_lft 86352sec
This is your network interface - like your connection to the outside world:
eth0: The device name (first Ethernet adapter)BROADCAST,MULTICAST,UP,LOWER_UP: Status flags showing it's active and can send to multiple recipientsmtu 1500: Standard maximum packet size for Ethernetlink/ether 08:00:27:53:8b:dc: Your MAC address (like the serial number of your network card)inet 192.168.1.10/24: Your IP address on the local networkvalid_lft 86352sec: How long this address is valid (from DHCP)
Understanding ip route Output
Think of ip route output like a set of driving directions for your data. Just as you'd look at a map to see which roads to take, your computer uses routes to determine how to send traffic to different destinations.
Sample Output Explained
default via 192.168.1.1 dev eth0 proto dhcp metric 100
192.168.1.0/24 dev eth0 proto kernel scope link src 192.168.1.10 metric 100
Breaking this down:
default via 192.168.1.1: "For any destination not otherwise specified, send traffic to 192.168.1.1" (your router)dev eth0: Use the eth0 interface (your network card) for this routeproto dhcp: This route was learned from DHCP (your router told you to use it)192.168.1.0/24 dev eth0: "For destinations in the 192.168.1.x network, use eth0 directly"scope link: This route is for directly connected networkssrc 192.168.1.10: Use this source address when sending packets through this route
The netstat Command
Think of netstat as the health monitor for your network - like having a dashboard that shows all network activity. While ip helps you configure your network, netstat helps you see what's happening on it. It shows active connections, open ports, network statistics, and routing information.
Although netstat is gradually being replaced by newer tools like ss, it's still widely used and available on most systems.
| Option | What It Does | When to Use |
|---|---|---|
-a |
Shows all sockets (open connections) | When you want to see everything |
-t |
Shows only TCP connections | When checking web servers, SSH, etc. |
-u |
Shows only UDP connections | When checking DNS, streaming services |
-l |
Shows only listening sockets | When checking what services are running |
-n |
Shows numerical addresses | When you want IPs instead of hostnames |
-p |
Shows the process using each socket | When identifying which program is using a port |
-r |
Shows the routing table | When checking network routes |
-i |
Shows network interface statistics | When checking for packet errors or drops |
-s |
Shows summary statistics by protocol | When monitoring overall network performance |
Practical Examples
# See all active connections and listening ports
netstat -a
# Lists everything connected or listening

# See TCP connections with program names and don't resolve names
netstat -tnp
# Good for seeing which programs are connecting where

# Check what's listening for connections on TCP
netstat -tln
# Shows all TCP ports open for connections

# See network interface statistics (errors, drops)
netstat -i
# Useful for identifying network hardware issues

# Check the routing table
netstat -r
# Shows routes similar to "ip route" but in different format

# View summary statistics to check for issues
netstat -s
# Good for spotting unusual network behavior at a glance
Understanding netstat Output
Think of netstat output like a call log for your computer - it shows who's calling whom, which lines are open, and how many calls have been made.
Active Connections
Active Internet connections (servers and established)
Proto Recv-Q Send-Q Local Address           Foreign Address         State
tcp        0      0 0.0.0.0:22              0.0.0.0:*               LISTEN
tcp        0      0 192.168.1.10:22         192.168.1.100:54678     ESTABLISHED
Breaking this down:
Proto: Protocol (tcp or udp)Recv-Q/Send-Q: Data queued but not yet processed (high numbers indicate problems)Local Address: Your IP and port - 0.0.0.0:22 means "listening on port 22 on all interfaces"Foreign Address: Remote IP and port - the other end of the connectionState: Connection state - LISTEN means waiting for connections, ESTABLISHED means connected
From the above, we see:
- SSH server (port 22) is running and listening for connections from anywhere
- Someone from 192.168.1.100 is currently connected to our SSH server
Interface Statistics
Kernel Interface table
Iface   MTU  RX-OK RX-ERR RX-DRP RX-OVR  TX-OK TX-ERR TX-DRP TX-OVR Flag
eth0   1500  4823      0      0      0   4325      0      0      0 BMRU
This tells you how your network interfaces are performing:
RX-OK/TX-OK: Successfully received/transmitted packetsRX-ERR/TX-ERR: Packets with errorsRX-DRP/TX-DRP: Packets dropped (often due to congestion)Flag: Interface status flags (B=broadcast, M=multicast, R=running, U=up)
Tips for Success
- Always use
sudowhen making changes withip(like adding addresses or routes) - Use
ip -cto get color-coded output that's easier to read - Combine
netstatoptions to get exactly what you need (likenetstat -tuln) - Use
netstat -pto see which programs are using network connections (requires root) - Use
grepto filter output (likenetstat -an | grep :80to find web connections) - Remember that
ipchanges are temporary and will be lost after reboot unless saved to config files
Common Mistakes to Avoid
- Forgetting to use
sudowhen trying to make network changes - Confusing an interface name (like eth0) with an IP address
- Forgetting to bring an interface back up after configuration (
ip link set eth0 up) - Missing the slash and subnet mask when adding IP addresses (
ip addr add 192.168.1.10/24) - Setting a route without checking you have connectivity to the gateway
- Forgetting that
netstatmight needsudoto see all processes with-p
Best Practices
- Always check your current configuration before making changes
- Document network configurations for future reference
- Save working configurations to system files for persistence after reboot
- Use
netstat -tulnregularly to check for unexpected open ports (security) - Monitor interface statistics (
netstat -i) to spot network hardware issues early - Create scripts for complex or frequently used network configurations
Common Troubleshooting Techniques
Checking Connectivity Issues
# Check if interface has an IP address
ip addr show eth0
# Should show an IP address like 192.168.1.10/24

# Check if interface is actually up
ip link show eth0
# Should show state UP

# Check if you have a default route
ip route show
# Should have a "default via" entry

# Check if you can reach your gateway (router)
ping -c 4 $(ip route | grep default | awk '{print $3}')
# Should get responses from your router

# Check if DNS is working
ping -c 4 google.com
# If this fails but IP pings work, DNS is your problem
Finding What's Using Your Network
# Find programs listening for connections
sudo netstat -tulnp
# Shows all listening ports and what program is using them

# Find which connections are active
sudo netstat -tunp
# Shows all established connections and what programs are using them

# Check network usage by interface
netstat -i
# Look for high error or drop counts that might indicate problems
wget, ftp and sftp Commands
Think of file transfers on the internet like delivering packages. The wget command is like a delivery service that picks up a package (file) for you with no questions asked - you just give them the address and they bring it back. The ftp command is like going to a warehouse yourself to pick up or drop off packages, but everyone can see what you're carrying. The sftp command is like that same warehouse visit, but with a private, secure tunnel that keeps your packages hidden from prying eyes. These commands help you transfer files between computers over the internet, with varying levels of automation and security.
The course setup.sh script creates ~/playground/chapter7/sftp_practice/ with sample files (important.txt, report.txt) for SFTP get/put practice and urls_to_download.txt listing several URLs for wget -i practice (batch downloads from one file). Run cd ~/playground/chapter7/sftp_practice before trying the wget and SFTP examples that use local files.
Quick Reference
| Command | What It Does | Common Use |
|---|---|---|
wget URL |
Downloads files from the web | Getting files from websites without a browser |
wget -c URL |
Resumes interrupted downloads | Continuing large downloads after connection issues |
wget -i file |
Downloads every URL listed in a text file | Batch downloads without typing each URL on the command line |
ftp hostname |
Connects to FTP server (insecure) | Legacy systems that don't support SFTP |
sftp user@hostname |
Connects to SFTP server (secure) | Securely transferring files between computers |
get file |
Downloads a file (in FTP/SFTP) | Retrieving files from a remote server |
put file |
Uploads a file (in FTP/SFTP) | Sending files to a remote server |
When to Use These Commands
- When you need to download files from websites via command line
- When you need to transfer files between your computer and a remote server
- When you're working on servers without graphical interfaces
- When you want to automate file transfers
- When you need to securely move files across the internet
- When you're managing websites or remote systems
The wget Command
Think of wget as your personal delivery service on the internet. You give it an address (URL), and it goes and fetches whatever is at that location without you needing to interact with it further. It's perfect for downloading files from websites directly to your computer or server without using a browser.
| Option | What It Does | When to Use |
|---|---|---|
-O filename |
Saves the download with a different name | When you want to rename the file as it downloads |
-i filename |
Reads download URLs from a text file instead of typing them on the command line | When you have many URLs (one URL per line; lines starting with # are comments and are skipped) |
-c |
Resumes a partially downloaded file | When your download was interrupted and you want to continue |
-q |
Quiet mode (no output) | When running in scripts where you don't need progress info |
-r |
Downloads recursively (follows links) | When you want to download an entire directory or website |
-l depth |
Limits the recursion depth | When downloading recursively but want to limit how deep it goes |
--limit-rate=rate |
Limits download speed | When you need to avoid consuming all available bandwidth |
-P directory |
Sets the output directory | When you need to save the downloaded files to a specific directory |
Practical Examples
# Download the college website index page (saves as index.html in current directory)
wget https://www.wccnet.edu/
# Or save with a specific name:
wget -O wcc_homepage.html https://www.wccnet.edu/

cd ~/playground/chapter7/sftp_practice
wget -i urls_to_download.txt
# -i (--input-file) tells wget to read URLs from urls_to_download.txt: one URL per line;
# lines starting with # are treated as comments. Each file is downloaded to this directory.

# Resume a download that was interrupted
wget -c https://www.wccnet.edu/

# Download quietly (no progress information)
wget -q https://www.wccnet.edu/

# Download with a limit on speed (be considerate when practicing)
wget --limit-rate=500k https://www.wccnet.edu/
Understanding wget Output
Sample Output Explained
--2024-07-10 10:00:00--  https://www.wccnet.edu/
Resolving www.wccnet.edu (www.wccnet.edu)... 192.0.2.1
Connecting to www.wccnet.edu (www.wccnet.edu)|192.0.2.1|:443... connected.
HTTP request sent, awaiting response... 200 OK
Length: unspecified [text/html]
Saving to: 'index.html'

index.html                 [  <=>                ]  45.2K  --.-KB/s    in 0.1s

2024-07-10 10:00:01 (450 KB/s) - 'index.html' saved [46280]
Let's break down what this means:
--2024-07-10 10:00:00-- https://www.wccnet.edu/: Shows the time and URL being downloadedResolving www.wccnet.edu...: Converting the domain name to an IP addressConnecting to www.wccnet.edu...: Establishing a connection to the server (port 443 for HTTPS)HTTP request sent, awaiting response... 200 OK: Server responded with status 200 (success)Length: unspecified [text/html]: The file is HTML (a web page)Saving to: 'index.html': When you download a URL that ends in /, wget typically saves it as index.html- The progress line shows download completion
- The last line shows completion time, speed, and bytes downloaded
The ftp and sftp Commands
Think of ftp (File Transfer Protocol) as walking into a public storage facility where you can deposit or retrieve your files. Everyone can see what you're carrying in and out. In contrast, sftp (Secure File Transfer Protocol) is like that same facility but with a private, secured tunnel that keeps your files hidden from view. sftp uses SSH encryption to protect your data and login credentials, making it much safer for transferring sensitive files over the internet.
Due to security concerns, sftp should always be your first choice, as ftp transmits passwords and data in plaintext that can be intercepted. Think of it like the difference between shouting your credit card number across a crowded room versus whispering it directly to the cashier.
| Option | What It Does | When to Use |
|---|---|---|
-b batchfile |
Runs commands from a file | When automating multiple file transfers |
-C |
Enables compression | When transferring over slow connections to save bandwidth |
-P port |
Specifies a different port | When the server uses a non-standard port |
-i identity_file |
Uses a private key file | When using key-based authentication instead of a password |
-v |
Verbose mode (shows more details) | When troubleshooting connection problems |
Common SFTP Interactive Commands
Once connected to an SFTP server, you'll see an sftp> prompt where you can type various commands. Think of this like being in the file storage facility with a walkie-talkie to your computer - you can give instructions to retrieve files from either location.
| Command | What It Does | When to Use |
|---|---|---|
ls |
Lists files on the remote server | When you need to see what files are available on the server |
lls |
Lists files on your local computer | When you need to check your local files without leaving SFTP |
cd directory |
Changes directory on the remote server | When you need to navigate to different folders on the server |
lcd directory |
Changes directory on your local computer | When you need to change where files will be saved locally |
get file |
Downloads a file from server to your computer | When you need to retrieve a file from the server |
get -r directory |
Downloads an entire directory | When you need to download multiple files at once |
put file |
Uploads a file from your computer to server | When you need to send a file to the server |
put -r directory |
Uploads an entire directory | When you need to upload multiple files at once |
mkdir directory |
Creates a new directory on the server | When you need to organize files on the server |
rm file |
Deletes a file on the server | When you need to remove a file from the server |
exit or bye |
Closes the SFTP connection | When you're finished transferring files |
Practical Examples for SFTP
For the sftp> put report.pdf you can download this file to your local computer and then go into the directory where you downloaded the file and then use the sftp> put command to upload the file to the server.
# From the course practice directory you have important.txt and report.txt to get/put
cd ~/playground/chapter7/sftp_practice

# Connect to an SFTP server
sftp user@example.com
# Prompts for password, then connects to the server

# Connect with a specific port
sftp -P 2222 user@example.com
# Connects using port 2222 instead of the default port 22

# Navigate through directories
sftp> cd /var/www/html
sftp> lcd ~/Downloads
# Changes to /var/www/html on server and ~/Downloads locally

# Download a file
sftp> get important.txt
# Downloads important.txt from server to local computer

# Upload a file
sftp> put report.pdf
# Uploads report.pdf from local computer to server

# Download multiple files
sftp> get *.txt
# Downloads all .txt files from current remote directory

# Download an entire directory
sftp> get -r projects
# Downloads the projects directory and all its contents

# Upload an entire directory
sftp> put -r website
# Uploads the website directory and all its contents
Understanding SFTP Session Output
Sample Session Explained
$ sftp user@example.com
Connecting to example.com...
user@example.com's password:
sftp> ls
documents  images  index.html  styles.css
sftp> cd images
sftp> ls
logo.png  background.jpg  icon.svg
sftp> lcd ~/Downloads
sftp> get logo.png
Fetching /home/user/images/logo.png to logo.png
/home/user/images/logo.png                   100%   24KB  350.5KB/s   00:00
sftp> put new-image.jpg
Uploading new-image.jpg to /home/user/images/new-image.jpg
new-image.jpg                                100%   58KB  425.2KB/s   00:00
sftp> bye
$
Let's break down what happened:
$ sftp user@example.com: Started the SFTP client and tried to connect to example.com as "user"user@example.com's password:: Prompted for the user's password (not shown when typing)sftp> ls: Listed files in the current remote directorysftp> cd images: Changed to the "images" directory on the serversftp> lcd ~/Downloads: Changed to the Downloads directory on local computersftp> get logo.png: Downloaded logo.png from server to local Downloads folder- The system showed progress of the download (24KB at 350.5KB/s)
sftp> put new-image.jpg: Uploaded new-image.jpg from Downloads to server's images folder- The system showed progress of the upload (58KB at 425.2KB/s)
sftp> bye: Closed the SFTP connection
Tips for Success
- Always use
sftpinstead offtpwhenever possible for security - Use
wget -cto resume interrupted downloads, especially for large files - Before uploading files with
put, check available space withdf -hcommand - Use tab completion in SFTP to avoid typing long filenames
- Use
get -randput -rfor transferring entire directories - When using
wgetto download large websites, be considerate and use--limit-rate - Create scripts with
wgetcommands for tasks you perform regularly - Test your SFTP connection with
-v(verbose) flag if having trouble connecting
Common Mistakes to Avoid
- Using
ftpinstead ofsftpfor sensitive data (passwords and files can be intercepted) - Forgetting which directory you're in (use
pwdfor remote andlpwdfor local) - Downloading files to the wrong location (check with
llsbefore downloading) - Using
wget -rwithout limits, which could download an entire website - Ignoring error messages during file transfers
- Not using
byeorexitto properly close connections - Trying to transfer binary files in ASCII mode (in traditional FTP)
- Forgetting to use quotes for filenames with spaces in SFTP commands
Best Practices
- Use SSH keys instead of passwords for more secure SFTP connections
- Create bookmarks or aliases for frequently used SFTP connections
- Use
wget's--spideroption to check if links are valid before downloading - Create a batch file with common SFTP commands for automation
- Always verify file integrity after transfers (especially for critical files)
- Use compression (
-Coption) when transferring over slow connections - Set up proper file permissions after uploading files to a server
- Document your file transfer processes for team use or future reference
Linux Archiving and Zipping
Think of Linux archiving and compression tools like packing for different kinds of trips. The tar command is like a suitcase that lets you pack multiple items together for easy transport. The gzip command is like a vacuum-seal bag that makes individual items smaller, while zip is like a space-saving travel bag that both holds multiple items and compresses them. Just as you'd choose different packing methods depending on your travel needs, you'll select different archiving and compression tools based on what you're trying to accomplish.
The course setup.sh script creates ~/playground/chapter7/archiving/ with sample files and directories so you can run the examples below as written. It includes essay.docx, research.pdf, notes.txt for tar practice; src/, docs/, and README.md for a project archive; logs/ for gzip; and report.docx, data.csv, images.jpg for zip. Run cd ~/playground/chapter7/archiving before trying the examples.
Quick Reference
| Command | What It Does | Common Use |
|---|---|---|
tar |
Combines multiple files into a single archive | Bundling related files together for backup or transfer |
gzip |
Compresses single files to reduce size | Making individual files smaller to save space |
zip/unzip |
Creates/extracts compressed archives | Sharing files with users of different operating systems |
tar -z |
Creates compressed tar archives (tar+gzip) | Efficiently packaging and compressing multiple files |
When to Use These Commands
- When you need to transfer multiple files as a single unit
- When you want to save disk space by reducing file sizes
- When you need to prepare files for download or email
- When backing up directories or project folders
- When sharing files with users of different operating systems
The tar Command
Think of tar as a cardboard box that lets you pack multiple items together. The name tar stands for "tape archive" (from its original use with tape backups), but today it's used for bundling files together into a single container file called a "tarball." Importantly, tar by itself doesn't save any space – it just combines files together.
When you create a tar archive, the original files remain unchanged. It's like taking photos of your items and putting them in a box while leaving the originals where they are. To actually reduce the size, you'll typically combine tar with a compression tool like gzip.
| Option | What It Does | When to Use |
|---|---|---|
-c |
Creates a new archive | When you want to bundle files together |
-x |
Extracts files from an archive | When you want to unpack an archive |
-t |
Lists the contents of an archive | When you want to see what's inside without extracting |
-v |
Shows detailed output (verbose) | When you want to see which files are being processed |
-f |
Specifies the archive filename | Always needed to name the archive file (almost always used) |
-z |
Compresses with gzip | When you want a smaller compressed archive (.tar.gz) |
-j |
Compresses with bzip2 | When you need even smaller files (but slower compression) |
-C |
Changes to directory before performing operations | When extracting files to a specific location |
Practical Examples
# Use the course practice directory (run: cd ~/playground/chapter7/archiving first)
cd ~/playground/chapter7/archiving

# Create a tar archive of multiple files
tar -cvf homework.tar essay.docx research.pdf notes.txt
# This creates homework.tar containing all three files

# Create a compressed tar archive (using gzip)
tar -zcvf homework.tar.gz essay.docx research.pdf notes.txt
# This creates a compressed archive homework.tar.gz

# List contents of a tar archive without extracting
tar -tvf homework.tar
# Shows all files inside the archive with details

# Extract all files from a tar archive
tar -xvf homework.tar
# Extracts all files to current directory

# Extract a compressed tar.gz archive
tar -xzvf homework.tar.gz
# Extracts and decompresses in one step

# Extract to a different directory
tar -xvf homework.tar -C ~/backup/
# Extracts files to ~/backup/ directory (create ~/backup first if needed)
The gzip Command
Think of gzip like a vacuum-seal storage bag for individual items. It compresses single files to make them smaller, replacing the original file with a compressed version that has a .gz extension. Unlike tar, which bundles files together, gzip works on one file at a time.
When you gzip a file, it's like vacuum-sealing a single sweater to make it take up less space in your drawer. The compressed file contains the same data but uses less disk space. To use the original file again, you need to decompress it first.
| Option | What It Does | When to Use |
|---|---|---|
-d |
Decompresses files | When you need to restore a compressed file |
-c |
Writes to standard output, keeping original file | When you want to compress a file but keep the original, typically redirecting output to a new file |
-l |
Lists compression information | When you want to see compression statistics |
-r |
Recursively processes directories | When compressing many files in directories |
-v |
Shows verbose output | When you want to see compression details |
-1 to -9 |
Sets compression level | When balancing between speed (-1) and size (-9) |
Practical Examples
# From ~/playground/chapter7/archiving (course setup provides logs/ and other files)

# Compress a single file (original is replaced)
gzip large_file.txt
# Creates large_file.txt.gz and removes the original

# Compress but keep the original file
gzip -c notes.txt > notes_backup.txt.gz
# Creates notes_backup.txt.gz and keeps notes.txt

# Decompress a file
gzip -d large_file.txt.gz
# Restores the original large_file.txt

# See compression statistics
gzip -l *.gz
# Shows how much space was saved for each file

# Compress with maximum compression (use large_file.txt from course setup)
gzip -9 large_file.txt
# Takes longer but creates smallest possible file

# Compress all files in a directory (individually) — use the course logs/ directory
gzip -r logs/
# Compresses each file in the logs directory
The zip and unzip Commands
Think of zip as a specialized travel compression bag that both bundles multiple items together and compresses them at the same time. The zip format is especially useful because it's compatible with virtually all operating systems, making it perfect for sharing files with people using Windows or macOS.
When you create a zip archive, it's like packing a space-saving travel bag for a trip – you can include multiple items, they take up less space, and anyone can open it regardless of what luggage they use. The unzip command is used to extract files from zip archives.
| Option | What It Does | When to Use |
|---|---|---|
-r |
Recursively includes directories | When zipping folders with all their contents |
-u |
Updates existing entries | When adding newer versions of files to archives |
-d |
Deletes entries from archive | When removing specific files from a zip archive |
-v |
Shows verbose output | When you want to see what's being processed |
-e |
Encrypts the archive | When creating password-protected archives |
-l |
Lists contents (with unzip) | When checking what's in an archive |
Practical Examples
# From ~/playground/chapter7/archiving (course setup provides report.docx, data.csv, images.jpg)

# Create a zip archive with multiple files
zip assignment.zip report.docx data.csv images.jpg
# Creates assignment.zip containing all files

# Create a zip archive including all files in a directory
zip -r website.zip ./src/
# Recursively adds all files and subdirectories in src/

# Add a file to an existing zip archive
zip assignment.zip notes.txt
# Adds notes.txt to the existing archive

# Extract all files from a zip archive
unzip assignment.zip
# Extracts all files to current directory

# List the contents of a zip file without extracting
unzip -l assignment.zip
# Shows all files in the archive

# Extract to a specific directory
unzip assignment.zip -d ~/extracted/
# Extracts files to ~/extracted/ directory

# Create an encrypted zip archive with password
zip -e secret.zip notes.txt
# Will prompt for a password
Combining tar and gzip
We have already seen examples of this in the tar section of this lesson. Think of using tar with gzip like packing a suitcase and then using a vacuum to remove excess air. First, tar bundles multiple files together, then gzip compresses that bundle to save space. This is so common that tar has built-in options to handle it automatically.
When you create a .tar.gz file (also called a "tarball"), you're efficiently packaging files for storage or transfer. It's the most common archiving method in Linux because it maintains file permissions and structures while reducing size.
Common Tar+Gzip Patterns
# From ~/playground/chapter7/archiving

# Create a compressed archive (tar+gzip)
tar -czvf backup.tar.gz docs/ src/ README.md
# The z flag tells tar to use gzip compression

# Extract a compressed archive
tar -xzvf backup.tar.gz
# Extracts and decompresses in one step

# Examine contents without extracting
tar -tzvf backup.tar.gz
# Lists all files in the compressed archive
Common Archive Extensions
| Extension | What It Is | How to Create | How to Extract |
|---|---|---|---|
.tar |
Uncompressed tar archive | tar -cvf archive.tar files |
tar -xvf archive.tar |
.tar.gz or .tgz |
Compressed tar using gzip | tar -czvf archive.tar.gz files |
tar -xzvf archive.tar.gz |
.tar.bz2 or .tbz |
Compressed tar using bzip2 | tar -cjvf archive.tar.bz2 files |
tar -xjvf archive.tar.bz2 |
.gz |
Single file compressed with gzip | gzip file |
gzip -d file.gz |
.zip |
Zip archive (cross-platform) | zip -r archive.zip files |
unzip archive.zip |
Picking the Right Tool
Decision Guide
# When to use tar (without compression):
- For bundling files while preserving permissions
- When compression isn't needed
- For creating backups of system files

# When to use tar + gzip (tar.gz):
- For most Linux archiving and compression needs
- When sending files to other Linux/Unix users
- When both bundling and compression are needed

# When to use zip:
- When sharing files with Windows or Mac users
- When you need built-in encryption
- When you need to add/update specific files in archives

# When to use gzip alone:
- For compressing single large files (like logs)
- When you don't need to bundle multiple files
- For files that will be processed by other tools
Tips for Success
- Always use the
-foption withtarto specify the archive filename - Use
-v(verbose) when learning to see exactly what's happening - Check archive contents with
tar -torunzip -lbefore extracting - Use
.tar.gzfor Linux-only usage and.zipfor cross-platform files - Create archives with relative paths to avoid extraction problems
Common Mistakes to Avoid
- Forgetting the
-fflag intarcommands (it must come last before the filename) - Confusing
-c(create) with-x(extract) when usingtar - Not using
-rwithzipwhen trying to include directories - Using
gzipdirectly on directories without-r(or better, usetarfirst) - Extracting archives without checking their contents first
Best Practices
- Use meaningful archive names that indicate the contents and date
- For backups, include the date in the filename:
project-2023-04-15.tar.gz - Use
tar.gzfor most Linux purposes andzipwhen sharing with Windows users - Test your archives by extracting them to a temporary location
- Document what's in important archives, especially for backups
Chapter 8
cut, join and paste Commands
Imagine you're putting together a scrapbook. You need to cut out specific photos (cut), arrange them side by side on a page (paste), and then match up related pictures from different albums (join). Linux offers three powerful commands that work just like these scrapbooking tools, but for text files. Whether you're extracting columns from a CSV file, combining data side by side, or matching related information, these commands make text manipulation simple and efficient.
The course setup.sh script creates ~/playground/chapter8 with sample files for this lesson (e.g. students.csv, names.txt, scores.txt, shopping.txt, students.txt, grades.txt, employees.txt, projects.txt). Run cd ~/playground/chapter9 before trying the examples.
Quick Reference
| Command | Description | Common Use |
|---|---|---|
cut |
Extract sections from each line of input | Getting specific columns from CSV files or formatted data |
paste |
Merge lines from files side by side | Combining data horizontally (like adding columns) |
join |
Combine lines from two files based on a common field | Merging related data (similar to database joins) |
The cut Command
The cut command acts like a data surgeon, precisely extracting specific portions from each line of text. It can select data by column (using delimiters like commas or tabs) or by character position. Unlike many text processing tools, cut doesn't alter the content it extracts - it simply takes a "slice" of each line according to your specifications. This makes it perfect for extracting specific fields from CSV files, isolating columns from tables, or grabbing specific character positions from formatted output.
When to Use
- When you need to extract specific columns from CSV or tab-delimited files
- When you want to pull out specific characters from each line of text
- When processing log files to extract timestamps or specific data fields
- When you need to remove sensitive information from files before sharing
Common Options
| Option | What It Does | When to Use It |
|---|---|---|
-f LIST |
Selects specific fields (columns) separated by a delimiter | When working with structured data like CSV files |
-d DELIM |
Specifies the delimiter between fields (default is tab) | When your data uses commas, colons, or other separators |
-c LIST |
Selects specific character positions | When working with fixed-width files or need specific characters |
-b LIST |
Selects specific bytes | When working with binary files or multi-byte characters |
--complement |
Selects the inverse of the specified fields | When you want to exclude certain columns instead of including them |
Practical Examples
Imagine you have a CSV file with student information:
students.csv:
ID,First Name,Last Name,Major,GPA
101,John,Doe,Computer Science,3.8
102,Jane,Smith,Biology,3.9
103,Mike,Johnson,Engineering,3.5
To extract just the name and major (columns 2, 3, and 4):
# Get student names and majors
cut -d ',' -f 2,3,4 students.csv
Output:
First Name,Last Name,Major
John,Doe,Computer Science
Jane,Smith,Biology
Mike,Johnson,Engineering
Important Note: The -d option works well with single-character delimiters like commas or tabs, but it doesn't handle multiple spaces well. For example, with ls -l output, you should use -c instead:
Example with ls -l:
# This won't work well - ls -l uses multiple spaces
    ls -l | cut -d ' ' -f 1,9

    # This works better - extract specific character positions
    ls -l | cut -c 1-10
The reason is that ls -l uses variable-width spacing (multiple spaces) to align columns, not a consistent single-character delimiter. When you try to use -d ' ', cut treats each space as a separate delimiter, which breaks the field counting. Even if you try to use tabs with -d $'\t', it won't work because ls -l doesn't use tab characters at all - it only uses spaces for alignment. Unlike a file with a consistent delimiter, ls -l doesn't have a single character that separates the fields.
To extract just the first 10 characters of each line:
# Get the first 10 characters of each line
cut -c 1-10 students.csv
Output:
ID,First N
101,John,D
102,Jane,S
103,Mike,J
To exclude the GPA column using complement:
# Get all information except GPA
cut -d ',' -f 1-4 students.csv
Output:
ID,First Name,Last Name,Major
101,John,Doe,Computer Science
102,Jane,Smith,Biology
103,Mike,Johnson,Engineering
The paste Command
The paste command functions like a digital assembler, bringing together lines from multiple files side by side. While cut slices data vertically (by column), paste combines data horizontally, merging corresponding lines from different files with a delimiter between them. This command excels at creating tabular data from separate sources and converting data between row and column formats. It's particularly useful when you need to combine related information stored in separate files without complex processing.
When to Use
- When you need to combine multiple files side by side
- When building CSV files by combining columns from different sources
- When converting data from rows to columns or vice versa
- When you want to create a simple table from separate lists
Common Options
| Option | What It Does | When to Use It |
|---|---|---|
-d LIST |
Specifies delimiters to use between merged lines | When you need a specific separator between columns |
-s |
Merges lines from one file at a time (serial) | When converting rows to columns within a single file |
Practical Examples
Imagine you have two separate files with related information:
names.txt:
John
Jane
Mikescores.txt:
85
92
78
To combine names and scores side by side with a tab delimiter (default):
# Combine names and scores with tab separator
paste names.txt scores.txt
Output:
John    85
Jane    92
Mike    78
To create a CSV file by combining the files with a comma:
# Create a CSV from the two files
paste -d ',' names.txt scores.txtOutput:
John,85
Jane,92
Mike,78Working with a single file to convert rows to columns:
shopping.txt:
Apples
Bananas
Milk
Bread
Eggs
CheeseTo display items in two columns:
# Convert shopping list to two columns
paste - - < shopping.txt #you must have a space between - and - and < Output:
Apples Bananas
Milk Bread
Eggs CheeseOr using the serial option:
# Using serial paste for the same effect
paste -s -d '\t\n' shopping.txtThe join Command
The join command works much like a database JOIN operation, intelligently combining lines from two files based on a common field or "key". Unlike paste, which blindly combines lines by position, join matches lines that share the same value in a specified field. This makes it ideal for relating information across multiple data sources, similar to how you might combine tables in a database. Join requires sorted input files and provides various options to handle different join types (inner, outer) and field specifications.
When to Use
- When combining data from two files based on a common identifier (like a database join)
- When merging configuration files based on matching keys
- When you need to relate information from separate sources
- When performing data analysis across multiple data files
Common Options
| Option | What It Does | When to Use It |
|---|---|---|
-1 FIELD |
Specifies the join field from the first file | When the common key is not in the first column |
-2 FIELD |
Specifies the join field from the second file | When the common key is not in the first column |
-t CHAR |
Sets the field separator character | When fields are separated by something other than whitespace |
-a FILENUM |
Prints unpairable lines from specified file (1 or 2) | When you need an outer join (keep unmatched records) |
-o FORMAT |
Specifies the output format | When you need to control exactly which fields appear in output |
Practical Examples
Imagine you have two files with related student information:
students.txt (sorted by ID):
101 John Doe
102 Jane Smith
103 Mike Johnsongrades.txt (sorted by ID):
101 A Biology
102 B Chemistry
103 A Computer_ScienceTo join the files based on the student ID (first field):
# Join student info with their grades
join students.txt grades.txtOutput:
101 John Doe A Biology
102 Jane Smith B Chemistry
103 Mike Johnson A Computer_ScienceNow imagine you have files with different separators:
students_csv.txt:
101,John,Doe
102,Jane,Smith
103,Mike,Johnsongrades_csv.txt:
101,A,Biology
102,B,Chemistry
103,A,Computer_ScienceTo join CSV files (using comma as separator):
# Join CSV files
join -t ',' students_csv.txt grades_csv.txtOutput:
101,John,Doe,A,Biology
102,Jane,Smith,B,Chemistry
103,Mike,Johnson,A,Computer_ScienceTo perform an outer join (keep records from file 1 even if they don't match):
Imagine you have two files, employees.txt and projects.txt, with employee data and project assignments, respectively. You want to merge this data and include employees who are not currently assigned to a project.
employees.txt:
101 Alice
102 Bob
103 Charlie
104 Davidprojects.txt:
101 Project_A
102 Project_B
105 Project_CLeft outer join (including all employees)
This command will display all employees from the first file (employees.txt) and their assigned projects. Employees without a project will be shown with blank project fields.
Command:
join -a 1 <(sort employees.txt) <(sort projects.txt)Output:
101 Alice Project_A
102 Bob Project_B
103 Charlie
104 DavidExplanation of options:
join: The main command.-a 1: Specifies a left outer join. It includes all records from the first file,employees.txt.<(sort employees.txt)and<(sort projects.txt): This is process substitution. It sorts the files on the fly and passes the sorted output tojoinas if they were temporary files. The<()syntax is a modern alternative to using pipes and temporary files.
Right outer join (including all projects)
This command will display all projects from the second file (projects.txt), including those assigned to employees not listed in employees.txt. Unmatched fields will be left blank.
Command:
join -a 2 <(sort employees.txt) <(sort projects.txt)Output:
101 Alice Project_A
102 Bob Project_B
105 Project_CExplanation of options:
join: The main command.-a 2: Specifies a right outer join. It includes all records from the second file,projects.txt.
Full outer join (including all employees and all projects)
This command combines all records from both files. If a key (employee ID) exists in one file but not the other, the corresponding fields will be left empty.
Command:
join -a 1 -a 2 <(sort employees.txt) <(sort projects.txt)Output:
101 Alice Project_A
102 Bob Project_B
103 Charlie
104 David
105 Project_CExplanation of options:
join: The main command.-a 1 -a 2: Specifies a full outer join. It includes all unmatched records from both the first (-a 1) and second (-a 2) files.
Advanced usage with the -e and -o options
You can customize how unmatched fields appear and which columns are shown in the final output.
Command:
join -a 1 -a 2 -e '(N/A)' -o 0,1.2,2.2 <(sort employees.txt) <(sort projects.txt)Output:
101 Alice Project_A
102 Bob Project_B
103 Charlie (N/A)
104 David (N/A)
105 (N/A) Project_CExplanation of options:
-e '(N/A)': Replaces blank unmatched fields with(N/A).-o 0,1.2,2.2: Specifies the output format.0: The join field.1.2: Field 2 from file 1.2.2: Field 2 from file 2.
Tips for Success
- When using
join, both files must be sorted on the join field - Use
cutwith pipes to extract specific fields from command output - For
paste, ensure files have matching line counts or use it with caution - Create temporary header files to make your data clearer when working with columns
- Test complex commands with smaller data samples before running on large files
Common Mistakes to Avoid
- Using
joinon unsorted files (results will be incorrect) - Forgetting to specify the delimiter with
-dforcutandpaste - Using character positions (
-c) when fields would be more appropriate - Overwriting original files without making backups
- Confusing
pasteandjoin(paste is side-by-side, join is by matching fields)
Best Practices
- Use
headto preview the structure of your data files before processing - Pipe output to
lessor redirect to a new file rather than overwriting originals - Add comments to your scripts explaining complex text processing operations
- Combine these commands with
sort,uniq, andgrepfor powerful data processing
comm, diff and patch Commands
Imagine you're working on a group project and need to see what changes your teammate made to a document. Just like using "Track Changes" in a word processor, Linux provides powerful tools to compare files and apply changes selectively. In this chapter, we'll explore three commands that will help you spot differences, understand changes, and update files efficiently.
The course setup.sh script creates ~/playground/chapter8 with sample files for this lesson (e.g. todo1.txt, todo2.txt, recipe_v1.txt, recipe_v2.txt). Run cd ~/playground/chapter9 before trying the examples.
Quick Reference
| Command | Description | Common Use |
|---|---|---|
comm |
Compare two sorted files line by line | Finding common lines or unique elements between files |
diff |
Show line-by-line differences between files | Comparing code files or configuration files |
patch |
Apply changes from a diff file to an original file | Updating software or applying fixes from others |
The comm Command
The comm command is a specialized comparison tool that works like a Venn diagram for text files. It takes two sorted files and produces a three-column output showing lines unique to the first file, lines unique to the second file, and lines common to both files. This makes it perfect for finding overlaps and differences in sorted data like word lists, configuration files, or any text where you need to identify shared or unique elements. Unlike diff, which focuses on showing changes, comm is designed to highlight relationships between files.
When to Use
- When you need to find common lines between two files
- When you want to identify lines unique to one file or the other
- When working with sorted data like word lists or configuration options
- When you need a simple, column-based comparison output
Common Options
| Option | What It Does | When to Use It |
|---|---|---|
-1 |
Suppresses column 1 (lines unique to first file) | When you only care about common lines and lines in the second file |
-2 |
Suppresses column 2 (lines unique to second file) | When you only care about common lines and lines in the first file |
-3 |
Suppresses column 3 (lines common to both files) | When you only want to see differences, not similarities |
Practical Example
Imagine you have two todo lists and want to see what tasks are on both lists:
todo1.txt:
buy groceries
clean kitchen
finish homework
pay billstodo2.txt:
buy groceries
call mom
finish homework
schedule dentistCommand:
# Compare both todo lists
comm todo1.txt todo2.txtOutput:
buy groceries
call mom
clean kitchen
finish homework
pay bills
schedule dentistThis shows:
- Column 1 (no indent): Lines only in todo1.txt ("clean kitchen", "pay bills")
- Column 2 (tabbed once): Lines only in todo2.txt ("call mom", "schedule dentist")
- Column 3 (tabbed twice): Lines in both files ("buy groceries", "finish homework")
If you only want to see common tasks:
# Show only tasks that appear on both lists
comm -1 -2 todo1.txt todo2.txtOutput:
buy groceries
finish homeworkThe diff Command
The diff command is a powerful file comparison tool that shows exactly what changed between two files. It works like a forensic investigator, examining each line and reporting additions, deletions, and modifications. Unlike comm, which requires sorted files and shows relationships, diff focuses on showing the evolution of content over time. It's particularly useful for tracking changes in code, configuration files, or any text where you need to understand exactly what was modified. The output can be formatted in different ways to suit your needs, from simple line-by-line differences to more detailed context formats.
When to Use
- When you need detailed information about exactly what changed between files
- When working with code or configuration files
- When you want to create a patch file that can be applied later
- When you need to generate a human-readable report of differences
Common Options
| Option | What It Does | When to Use It |
|---|---|---|
-u |
Outputs in unified format (more readable) | For easier-to-read output when comparing code files |
-c |
Outputs in context format (shows surrounding context) | When you need to see the changes with some surrounding lines for context |
-i |
Ignores case differences | When comparing text where capitalization doesn't matter |
-w |
Ignores all whitespace | When comparing code where indentation or spacing might differ |
Practical Example
Let's say you have two versions of a small recipe:
recipe_v1.txt:
Pancake Recipe
--------------
2 cups flour
1 tablespoon sugar
1 teaspoon salt
2 eggs
1 cup milkrecipe_v2.txt:
Pancake Recipe
--------------
2 cups flour
2 tablespoons sugar
1 teaspoon baking powder
1 teaspoon salt
2 eggs
1 1/2 cups milkCommand (with context format):
# Compare recipes with context
diff -c recipe_v1.txt recipe_v2.txtOutput:
*** recipe_v1.txt 2025-10-29 10:52:58.044465834 -0400
--- recipe_v2.txt 2025-10-29 10:53:18.077660600 -0400
***************
*** 1,7 ****
Pancake Recipe
--------------
2 cups flour
! 1 tablespoon sugar
1 teaspoon salt
2 eggs
! 1 cup milk
--- 1,8 ----
Pancake Recipe
--------------
2 cups flour
! 2 tablespoons sugar
! 1 teaspoon baking powder
1 teaspoon salt
2 eggs
! 1 1/2 cups milkHow to Read diff Output:
- Lines with
!show lines that were changed - Lines with
+show lines that were added - Lines with
-show lines that were removed - The asterisks
***show line numbers from the original file - The dashes
---show line numbers from the new file
In this example, the recipe changed to use more sugar, add baking powder, and use more milk.
Creating a Patch File:
# Create a patch file to save these changes
diff -u recipe_v1.txt recipe_v2.txt > recipe_update.patchThis creates a file with all the changes that can be applied later with the patch command.
The patch Command
The patch command is the final piece of the file comparison puzzle, taking the changes identified by diff and applying them to files. Think of it as a precise editor that can automatically implement changes without you having to manually edit files. It reads a patch file (created by diff) and applies the specified changes to the original file, effectively updating it to match the new version. This makes it invaluable for software updates, collaborative editing, and any situation where you need to apply a set of changes consistently across multiple files or systems.
When to Use
- When you need to apply changes from a diff file to update your files
- When working with software updates distributed as patch files
- When collaborating on code and sharing changes without sending entire files
- When you want to roll back changes by applying a patch in reverse
Common Options
| Option | What It Does | When to Use It |
|---|---|---|
-pNUM |
Strips NUM leading components from file paths | When applying patches that have different directory structures |
-R |
Reverses the patch (undoes changes) | When you need to undo a previously applied patch |
-i |
Reads patch from a specified file | When your patch is in a file rather than from standard input |
-o |
Writes output to a specified file instead of changing original | When you want to keep the original file unchanged |
Practical Example
Let's continue with our recipe example. Imagine you received the recipe_update.patch file and want to update your original recipe:
Command:
# Apply the recipe changes to your file
patch recipe_v1.txt -i recipe_update.patchOutput:
patching file recipe_v1.txtNow recipe_v1.txt will have all the changes from recipe_v2.txt applied to it.
If you decide you liked the original recipe better, you can reverse the patch:
# Undo the changes by reversing the patch
patch -R recipe_v1.txt -i recipe_update.patchOutput:
patching file recipe_v1.txtThis will revert recipe_v1.txt back to its original state.
Tips for Success
- Always make backups of important files before applying patches
- The
commcommand requires input files to be sorted first (usesort file > sorted_file) - Use
diff -ufor the most readable output format for humans - When sharing patches with others, include clear descriptions of what the patch does
- Use
diff -wwhen comparing code files to ignore whitespace differences
Common Mistakes to Avoid
- Forgetting that
commrequires sorted input files - Applying patches to the wrong file or in the wrong directory
- Not checking patch output for errors or rejected hunks
- Creating patches with absolute file paths that won't work on other systems
- Forgetting to use
-Rwhen trying to reverse a patch
Best Practices
- Keep a changelog when creating patches for others to use
- Use meaningful filenames for patch files that describe what they change
- Test patches in a non-production environment before applying them to critical systems
- Use
diff -uordiff -cwhen creating patches to include context - When collaborating, use a version control system like Git instead of manually creating patches
tr, sed, awk and aspell Commands
Imagine you're editing a document and need to make the same change hundreds of times. Maybe you need to replace every instance of your name with "The Author," convert all text to uppercase, or find and fix spelling mistakes. Just as a find-and-replace function transforms your document in a word processor, Linux provides powerful commands that act like text transformation wizards. In this chapter, we'll explore four essential tools that help you modify and improve text without tedious manual editing.
The course setup.sh script creates ~/playground/chapter8 with sample files for this lesson (e.g. message.txt, email.txt, sales.csv, report.txt, access.log). Run cd ~/playground/chapter8 before trying the examples.
Quick Reference
| Command | Description | Common Use |
|---|---|---|
tr |
Translate or delete characters | Character-by-character substitution, case conversion, removing specific characters |
sed |
Stream editor for filtering and transforming text | Find and replace text, deleting lines, more complex text transformations |
awk |
Pattern scanning and processing language | Field-based text processing, data extraction, report generation, programming text operations |
aspell |
Interactive spell checker | Finding and correcting spelling errors in documents |
The tr Command
The tr (translate) command is a powerful text processing utility that works on a character-by-character basis. It reads from standard input, performs substitution or deletion of specified characters, and writes to standard output. Unlike more complex text processors, tr operates on individual characters rather than patterns or words, making it ideal for quick character transformations like case conversion, whitespace cleanup, or basic character removal. Think of tr as a character-level search and replace tool for your text streams.
When to Use
- When you need to convert text between uppercase and lowercase
- When you want to replace or remove specific characters
- When cleaning data by removing unwanted characters (like extra spaces)
- When converting between different types of line endings (DOS to Unix)
- When creating quick character substitution ciphers
Common Options
| Option | What It Does | When to Use It |
|---|---|---|
-d |
Deletes characters instead of replacing them | When you need to remove specific characters (like removing all vowels) |
-s |
Squeezes repeated characters into a single character | When cleaning text with multiple spaces or other repeated characters |
-c |
Complements the set of characters to work on | When you want to operate on characters NOT in the specified set |
Practical Examples
Let's say you have a file called message.txt with the following content:
hello world!
this is SOME text with MiXeD case.
too many spaces here.To convert the text to all uppercase:
# Make everything UPPERCASE
cat message.txt | tr 'a-z' 'A-Z'Output:
HELLO WORLD!
THIS IS SOME TEXT WITH MIXED CASE.
TOO MANY SPACES HERE.To remove all vowels from the text:
# Remove all vowels
cat message.txt | tr -d 'aeiouAEIOU'Output:
hll wrld!
ths s SM txt wth MXD cs.
t mny spcs hr.To compress multiple spaces into single spaces:
# Clean up extra spaces
cat message.txt | tr -s ' 'Output:
hello world!
this is SOME text with MiXeD case.
too many spaces here.To create a simple substitution cipher (replacing each letter with the next one in the alphabet):
# Create a simple cipher
echo "secret message" | tr 'a-zA-Z' 'b-zA-Za'Output:
tfdsfu nfttbhfThe sed Command
The sed (stream editor) command is a sophisticated text transformation tool that processes text line by line. It allows you to perform search-and-replace operations, delete specific lines, and apply complex text transformations using regular expressions. While tr works only with individual characters, sed can work with patterns, words, and even multi-line content. It's particularly useful for batch editing files, extracting specific content from texts, and automating repetitive text editing tasks. Think of sed as having a text editor's power but with the ability to script your edits.
When to Use
- When you need to find and replace text patterns
- When you want to extract specific lines from a file
- When performing multiple text transformations at once
- When you need to modify text files without opening them in an editor
- When processing text as part of a script or pipeline
Common Options
| Option | What It Does | When to Use It |
|---|---|---|
-e |
Adds multiple editing commands | When you need to apply several transformations in one command |
-f |
Takes commands from a script file | For complex or reusable transformations stored in a separate file |
-i |
Edits files in-place (modifies the original file) | When you want to change the file directly, not just see the output |
-n |
Suppresses automatic printing of patterns | When you want to control exactly what output is shown |
/g |
Global flag - replaces all occurrences on each line | When you want to replace every instance, not just the first one |
/d |
Delete command - removes lines matching the pattern | When you want to remove entire lines that contain specific text |
/p |
Print command - prints lines matching the pattern | When you want to show only lines that contain specific text |
Practical Examples
Let's use a file called email.txt with the following content:
Dear Customer,
Your order #12345 has been shipped.
You should receive your package by Monday.
If you have any questions about your order #12345,
please contact customer support at support@example.com.
Thank you for shopping with us!
To replace the first occurrence of "order" with "purchase" on each line:
# Replace first 'order' with 'purchase' on each line
sed 's/order/purchase/' email.txtOutput:
Dear Customer,
Your purchase #12345 has been shipped.
You should receive your package by Monday.
If you have any questions about your purchase #12345,
please contact customer support at support@example.com.
Thank you for shopping with us!To replace ALL occurrences of "order" with "purchase":
# Replace ALL occurrences of 'order' with 'purchase'
sed 's/order/purchase/g' email.txtTo delete any line containing an email address:
# Remove lines containing email addresses
sed '/[@]/d' email.txtOutput:
Dear Customer,
Your order #12345 has been shipped.
You should receive your package by Monday.
If you have any questions about your order #12345,
Thank you for shopping with us!To replace the order number with a different one and save changes to the file:
# Change order number in the file directly
sed -i 's/12345/67890/g' email.txtTo display only lines containing the word "Customer":
# Show only lines with "Customer"
sed -n '/Customer/p' email.txtOutput:
Dear Customer,The awk Command
The awk command is a powerful text processing language that combines pattern matching (like sed) with column-based processing (like cut), plus adds variables, math, and loops. It reads input one line at a time, splits each line into fields (columns), and runs a small program you write on each line. Unlike tr, which works character by character, and unlike sed, which usually works on whole lines or regex substitutions, awk is built for structured data: CSV files, log files, and command output with columns.
When to Use
- When you need to process data field by field (like CSV files)
- When you want to perform calculations on numeric data in text files
- When generating reports with formatted output
- When you need conditional processing based on field values
- When combining multiple text processing operations in one command
- When you need to aggregate or summarize data from text files
Common Options
| Option | What It Does | When to Use It |
|---|---|---|
-F SEP |
Sets the field separator (default is whitespace) | When working with CSV files or other delimited data |
-v VAR=VAL |
Sets a variable before processing begins | When you need to pass parameters to your awk script |
-f FILE |
Reads awk commands from a file | For complex or reusable awk programs |
Common Built-in Variables
| Variable | What It Contains | When to Use It |
|---|---|---|
NR |
Current record (line) number | When you need to skip header rows or track line numbers |
NF |
Number of fields in current record | When you need to check if a line has enough fields |
$0 |
Entire current record (line) | When you want to work with the whole line |
$1, $2, $3... |
Individual fields (columns) from current record | When you need to access specific columns of data |
FS |
Field separator (default is whitespace) | When you need to change the separator programmatically |
OFS |
Output field separator (default is space) | When you want to control how fields are separated in output |
How awk Programs Work
Every awk command follows a pattern → action model. awk reads a file one line at a time (each line is a record), splits that line into fields, checks whether the pattern matches, and if it does, runs the action.
awk 'pattern { action }' filename- Pattern — decides which lines to process. A pattern in slashes, like
/error/, matches any line that contains that text anywhere on the line. - Action — what to do with matching lines, written in curly braces.
{print $1}prints the first field;{print}prints the whole line. - Default action — if you write a pattern but leave out the action, awk assumes
{print}and prints the entire matching line. That is whyawk '/error/' access.logworks with no curly braces. - Default pattern — if you write an action but leave out the pattern, every line matches.
awk '{print $1}' fileprints the first field from every line.
The -F option sets the field separator — the character awk uses to split each line into columns. By default awk treats spaces and tabs as separators, which works for log files and ls -l output but not for CSV files. When columns are separated by commas, you must use -F ',' so that $1, $2, and $3 refer to the correct columns.
Practical Examples
The setup script creates ~/playground/chapter8/sales.csv with the following content:
Item,Price,Quantity
Widget,25,10
Gadget,75,5
Gizmo,50,20To print the first field from each line using a comma separator:
awk -F ',' '{print $1}' ~/playground/chapter8/sales.csvBreaking down each part of this command:
awk— run the awk program on the file-F ','— split each line on commas, soWidget,25,10becomes three fields:$1=Widget,$2=25,$3=10'{print $1}'— for every line (no pattern means all lines match), print field 1~/playground/chapter8/sales.csv— the input file
Output:
Item
Widget
Gadget
GizmoWithout -F ',', awk would treat the entire line as one field because there are no spaces between the commas. Always set -F when working with comma-separated data.
To skip the header row and print only item names, add a pattern that matches lines after the first:
awk -F ',' 'NR>1 {print $1}' ~/playground/chapter8/sales.csvOutput:
Widget
Gadget
GizmoHere NR>1 is the pattern: it matches only when the record number (line number) is greater than 1, so the header line is skipped.
To calculate the total value for each product (price × quantity):
# Calculate total value for each product (skip header)
awk -F ',' 'NR>1 {print $1 ": $" $2 * $3}' ~/playground/chapter8/sales.csvOutput:
Widget: $250
Gadget: $375
Gizmo: $1000To find products with a price greater than $50:
# Show expensive products
awk -F ',' 'NR>1 && $2 > 50 {print $1 " costs $" $2}' ~/playground/chapter8/sales.csvOutput:
Gadget costs $75To calculate the total revenue from all sales:
# Calculate total revenue
awk -F ',' 'NR>1 {total += $2 * $3} END {print "Total revenue: $" total}' ~/playground/chapter8/sales.csvOutput:
Total revenue: $1625The END block runs once after all lines have been read. It is useful for printing totals and summaries.
When you need to filter lines by text content — similar to grep — use a slash pattern. To print every line in a log file that contains the word error:
awk '/error/' ~/playground/chapter8/access.logBreaking down this command:
/error/— the pattern; matches any line where the letterserrorappear anywhere (case-sensitive)- No
{action}— awk uses the default action{print}, so the whole matching line is printed - No
-Fneeded — you are not splitting into columns, just filtering whole lines
This is equivalent to awk '/error/ {print}' or grep error access.log. Use awk when you also need field processing on the same file; use grep when you only need to find matching lines.
Suppose access.log contains:
192.168.1.1 - - [10/Oct/2025:13:55:36] "GET /page1 HTTP/1.1" 200 1234
192.168.1.2 - - [10/Oct/2025:13:55:37] error: connection refused "GET /page2 HTTP/1.1" 500 0
192.168.1.1 - - [10/Oct/2025:13:55:38] "POST /login HTTP/1.1" 200 890
192.168.1.3 - - [10/Oct/2025:13:55:39] error: disk fullOutput:
192.168.1.2 - - [10/Oct/2025:13:55:37] error: connection refused "GET /page2 HTTP/1.1" 500 0
192.168.1.3 - - [10/Oct/2025:13:55:39] error: disk fullOnly the two lines containing error are printed; the other lines do not match the pattern and are skipped.
Counting and summarizing log data
Using ~/playground/chapter8/access.log from the setup script:
192.168.1.1 - - [10/Oct/2025:13:55:36] "GET /page1 HTTP/1.1" 200 1234
192.168.1.2 - - [10/Oct/2025:13:55:37] "GET /page2 HTTP/1.1" 404 567
192.168.1.1 - - [10/Oct/2025:13:55:38] "POST /login HTTP/1.1" 200 890To count requests by IP address:
# Count requests per IP address
awk '{count[$1]++} END {for (ip in count) print ip ": " count[ip] " requests"}' access.logOutput:
192.168.1.1: 2 requests
192.168.1.2: 1 requestsTo extract month and date from ls -l output:
# Get month and date from ls -l output
ls -l /etc | awk 'NR>1 {print $6 " " $7}'Output:
Apr 3
Apr 5
Apr 19
Apr 19
Apr 27
Apr 29
Apr 30
Aug 6
Aug 10To format dates with hyphens instead of spaces:
# Format dates with hyphens
ls -l /etc | awk 'NR>1 {print $6 "-" $7}'Output:
Apr-3
Apr-5
Apr-19
Apr-19
Apr-27
Apr-29
Apr-30
Aug-6
Aug-10To get a sorted list of unique dates:
# Get unique dates sorted
ls -l /etc | awk 'NR>1 {print $6 " " $7}' | sort | uniqOutput:
Apr 19
Apr 27
Apr 29
Apr 3
Apr 30
Apr 5
Aug 10
Aug 6To count how many files were modified on each date:
# Count files per modification date
ls -l /etc | awk 'NR>1 {count[$6 " " $7]++} END {for (date in count) print date ": " count[date] " files"}'Output:
Apr 19: 2 files
Apr 27: 1 files
Apr 29: 1 files
Apr 3: 1 files
Apr 30: 1 files
Apr 5: 1 files
Aug 10: 1 files
Aug 6: 1 filesThe aspell Command
The aspell command is an interactive spell checking utility designed to find and correct spelling errors in text documents. It offers more accurate results than older spell checkers and supports multiple languages through installable dictionaries. When aspell identifies a potentially misspelled word, it provides a list of suggested replacements ranked by likelihood. This makes it invaluable for proofreading documents, checking email drafts, or ensuring documentation is free from spelling errors before publication. Unlike tr and sed, which transform text, aspell focuses specifically on identifying and correcting spelling mistakes.
When to Use
- When you need to check document spelling
- When preparing documents for publication or submission
- When proofreading text files without a word processor
- When creating scripts that need to verify spelling
- When working with documents in multiple languages
Common Options
| Option | What It Does | When to Use It |
|---|---|---|
-c |
Checks spelling in a file | For interactive spell checking with suggestions |
-a |
Runs in 'pipe mode' for programmatic use | When using aspell in scripts or with other programs |
-l |
Lists misspelled words | When you just want to identify errors without correcting them |
-d [dict] |
Uses a specific dictionary | When checking documents in different languages |
Practical Examples
Let's say you have a file called report.txt with the following content:
This is a sampel report.
It containes some mispeled words.
The speling here is not corect.To check the spelling of the file interactively:
# Interactive spell check
aspell check report.txtThis opens an interactive session where aspell offers suggestions for each misspelled word:
1) sample 6) sampled
2) samples 7) sampans
3) sampler 8) simpler
4) samplers 9) sampler's
5) Sampel 0) sampels
i) Ignore I) Ignore all
r) Replace R) Replace all
a) Add x) Exit
?To just list all misspelled words without correcting them:
# Just list misspelled words
aspell list < report.txtOutput:
sampel
containes
mispeled
speling
corectTo check spelling using a different language dictionary:
# Check spelling with French dictionary
aspell -d fr check french_report.txtTo see which dictionaries are available on your system:
# List available dictionaries
aspell dictsTips for Success
- The
trcommand only works with single characters, not patterns or words - Use
sedwhen you need to work with patterns rather than individual characters - Use
awkwhen you need to process data field by field or perform calculations - Use
awk -F ','for CSV files — without it, comma-separated values stay on one field - A pattern alone like
/error/prints matching lines; add{print $1}when you need a column instead - Make a backup before using
sed -ito edit files in-place - Character classes like
[[:upper:]]intrmake it easier to work with character groups - For complex text transformations, you can chain these commands together with pipes
- Start with simple
awkcommands and gradually build complexity - Use
awk's built-in variables likeNR(record number) andNF(number of fields)
Common Mistakes to Avoid
- Forgetting that
trcan only translate one character to one character - Not escaping special characters in
sedpatterns (like.,*,$) - Using
sed -iwithout a backup on important files - Assuming
aspellwill catch all errors (it might miss contextual mistakes) - Using the wrong dictionary with
aspellfor your document's language - Forgetting to set the field separator with
-F ','inawkwhen working with CSV files - Expecting
$1to mean "first column" in a CSV file without using-F ',' - Not handling the header row properly in
awkwhen processing CSV files (useNR>1to skip it) - Forgetting that a pattern with no action defaults to
{print}—awk '/error/' fileprints whole lines, not just the worderror - Using
awkfor simple character operations thattrcould handle more efficiently
Best Practices
- Test your
trandsedcommands on a sample of the data first - Use
sed -i.bakto create automatic backups before editing - Create a personal dictionary for
aspellif you use specialized terminology - Document complex transformations for future reference
- For advanced text processing, learn regular expressions to unlock the full power of
sed - Use
awkfor data analysis and report generation from structured text files - Combine
awkwith other commands in pipelines for powerful data processing workflows - Learn
awk's pattern-action model: patterns select lines, actions process them
Chapter 9
Disk Usage & Filesystems
When a Linux system feels “broken,” a very common cause is not software—it is storage. If a disk (or partition) fills up, programs cannot save data. This leads to real problems:
- Applications fail to start or crash
- Logs stop recording (so you cannot diagnose issues)
- System updates fail
- Web servers and databases stop working
In other words, a “full disk” can make a healthy system look completely broken.
This lesson teaches you how to answer one key question:
“Where did all my disk space go?”
Disk Usage Commands
In this lesson, we will be using the following commands to find out where the disk space is going:
Quick Reference
| Command | What It Shows |
|---|---|
df |
How full each filesystem is |
lsblk |
Physical disks and partitions |
findmnt |
How paths map to filesystems |
du |
What directories/files are using space |
Note: These tools answer different parts of the same problem.
Find the filesystem that is full (df)
A filesystem is how Linux organizes and stores files on a disk or partition. It is not a single folder—it is the whole storage area, along with the rules for creating files, tracking folders, and keeping track of free space.
When the system starts (or when an administrator attaches storage), each filesystem is connected to a folder in the directory tree called a mount point. For example, one filesystem might be mounted at / (the root of the whole tree), and another might be mounted at /home. You still browse normal paths like /var/log, but different paths can belong to different filesystems, each with its own size limit.
A filesystem type is the specific format used on that storage. Think of a partition as empty space on a drive, and the filesystem type as the filing system installed on it—similar to how one USB drive might be formatted for Windows and another for Mac. Linux commonly uses types such as ext4 and xfs for everyday data. Small boot-related partitions may use vfat. Temporary in-memory filesystems show up as tmpfs. The type tells you how files are stored on disk; it is different from the mount point, which tells you where that storage appears in the directory tree.
The df command reports how full each mounted filesystem is—not how large one individual folder is. That is why /home can have plenty of free space while / is almost full: they may be separate filesystems on separate partitions.
Run df -h on your system. The -h option shows sizes in human-readable units (G for gigabytes, M for megabytes) instead of raw block counts. You will get a table like this:
Each row is one mounted filesystem. Read the table from left to right:
- Filesystem → the storage device or volume name.
- Size → the total capacity of that filesystem
- Used → how much space files are taking now
- Avail → how much free space is left
- Use% → the percentage full; this is usually the first column you check when troubleshooting
- Mounted on → the mount point, the folder where that filesystem appears in the directory tree
Not every row is equally important. Lines named tmpfs or devtmpfs are temporary, in-memory filesystems used by the running system. They are normal and are not the cause of a “disk full” problem on your hard drive. Focus on rows that represent real storage, especially the main system filesystem mounted at / and any separate filesystems such as /home/students or /boot.
In this example, the root filesystem (/) is 38% full and /home/students is 25% full—both are healthy. /boot is at 77%, which is higher but still has 60M free. If you were troubleshooting, you would look for a row with a very high Use%, such as 98% or 100%, and note its Mounted on value. That mount point is where you would run du next to find which folders inside it grew.
df [options] [mountpoint_or_path]Common Options
| Option | What It Does | When to Use It |
|---|---|---|
-h |
Human-readable sizes | Almost always |
-T |
Show filesystem type | For troubleshooting |
-a |
Show all filesystems | For deeper inspection |
-t type |
Filter by type | Focus on specific storage |
-x type |
Exclude type | Ignore temporary filesystems |
--total |
Show totals | Quick overview |
Plain df -h does not show the filesystem type. Add -T to include a Type column so you can see whether a row is real disk storage (for example xfs or ext4) or a temporary tmpfs entry. That is useful when you want to focus on physical storage and ignore in-memory filesystems.
Practical Examples
# Human-readable disk usage by mount point
df -h
# Include filesystem type (ext4, xfs, tmpfs, etc.)
df -hTUnderstand disk/partition layout (lsblk)
lsblk shows how storage is physically organized.
Key terms:
- Disk → the physical device (SSD/HDD)
- Partition → a slice of that disk
- Filesystem → how data is organized on that partition
Analogy:
- Disk = hard drive
- Partition = sections of the drive
- Filesystem = filing system inside each section
lsblk [options]Use -f to connect partitions to filesystems and mount points.
Practical Examples
# View disks/partitions + filesystem info
lsblk -fWhen you run lsblk f, the output shows a “tree” of storage devices:
This is an example of the output:
NAME: the device/partition name (for example,sdais a whole disk, andsda1is a partition on that disk).FSTYPE: the filesystem type that partition uses (for example,xfs,ext4, orvfat). If you seeLVM2_member, that part is part of an LVM setup rather than a normal filesystem.LABEL: a human-friendly name given to the filesystem (sometimes empty).UUID: a unique identifier for the filesystem (useful for reliably finding a filesystem even if it is renamed).MOUNTPOINT: the directory where that filesystem is currently mounted (this is the key connection todf).
In the screenshot, you can use MOUNTPOINT to spot which devices are actually visible in the directory tree (for example, items mounted at /boot, /boot/efi, or /home/students). Once you know the mount point, you can interpret disk-full symptoms with df and find large folders with du.
Why this matters: It helps you connect what df shows (mount points) to actual devices.
Map a path to its mount point (findmnt)
You already know that a directory like / or /boot can be a mount point. But most paths are inside a filesystem, not mount points themselves. For example, /var/log is a folder on whatever filesystem is mounted at / (unless your server uses a separate /var partition).
findmnt answers a practical question: “What filesystem is this path on?” Run it with no arguments to see the full mount tree, or give it a path to look up one location.
findmnt [path]The screenshot below shows the output of plain findmnt (no path). The tree layout shows which mount points sit under other mount points. Read the four columns like this:
- TARGET → the mount point (the directory path in the tree)
- SOURCE → what is mounted there (often a device like
/dev/mapper/rhel-root, or a virtual name likesysfs) - FSTYPE → the filesystem type (for example
xfs,sysfs,tmpfs) - OPTIONS → how the filesystem was mounted (read/write, permissions, and other flags—you can ignore most of these for now)
At the top of the tree, the root filesystem is mounted at / from /dev/mapper/rhel-root with type xfs. That is real disk storage—the same row you would care about when df -h shows / getting full. Below it, many other paths are separate mounts for kernel interfaces, not user data on the hard drive.
If you run findmnt /sys, you are asking about the /sys directory specifically. In this screenshot, that matches the row where TARGET is /sys. It reports SOURCE sysfs, FSTYPE sysfs, and read/write options. That tells you /sys is its own virtual filesystem for kernel information—it is not a separate disk partition and it is not where your files or logs are stored. For a disk-full problem, you would not troubleshoot space usage under /sys.
For disk usage work, the more typical command is findmnt / or findmnt /var. Those tell you which real storage backs the path you plan to run du on, so you do not waste time searching a directory that lives on a different filesystem than the one df flagged as full.
Practical Examples
# Full mount tree (as in the screenshot)
findmnt
# Which filesystem is the root directory on?
findmnt /
# Which filesystem is /sys on? (virtual sysfs, not disk storage)
findmnt /sys
# Which filesystem is /var on? (often the same as / on classroom servers)
findmnt /varWhy this matters: df reports fullness by mount point. Before you drill down with du, use findmnt to confirm that the folder you are investigating is actually on the filesystem that is running out of space.
Find what directories are taking space (du)
du shows how much space directories and files are using.
This is where you actually find the problem.
Strategy:
- Start at a high level
- Find the biggest directory
- Go one level deeper
- Repeat
du [options] pathKey Concepts
--max-depth=1→ only show top-level folders (keeps output readable)2>/dev/null→ hide permission errors| sort -h→ sort from smallest to largest
Think of this pipeline:
du → clean output → sort → find biggest
Practical Examples
# Show top-level directories under /home (skip unreadable parts)
du -h --max-depth=1 /home 2>/dev/null | sort -h
# Show top-level under /var (often contains logs/cache)
du -h --max-depth=1 /var 2>/dev/null | sort -h
# If you find a big folder, go one level deeper
du -h --max-depth=1 /var/log 2>/dev/null | sort -hReal-world tip: /var/log is one of the most common causes of disk filling up.
Disk Full Workflow (Putting It All Together)
When troubleshooting disk space, always follow this order:
- 1. Run
df -h→ find the full filesystem - 2. Run
du→ find the largest directories - 3. Drill down → find the exact cause
Simple mental model:
df= “Where is the problem?”du= “What is causing the problem?”
Logs & Where They Live
Logs explain what the system did and what went wrong. Even if you cannot read every file in /var/log, you can usually still use journalctl (systemd’s journal) to inspect many important events.
Look at example log output (files)
If you need something repeatable (instead of depending on what your machine logged today), use the simulated journal files in ~/playground/chapter9.
Practical Examples
# Go to the practice folder
cd ~/playground/chapter9
# Find only the “ERROR” lines
sed -n '/ERROR/p' journal_after.txt
# See what changed overall (useful for “why now?” questions)
diff -u journal_before.txt journal_after.txtTwo Common Log Sources
- systemd journal accessed via
journalctl(often more accessible) - log files on disk under
/var/log/(permissions vary)
Quick Reference
| Goal | Try This |
|---|---|
| List recent boot sessions | journalctl --list-boots |
| Read logs for the current boot | journalctl -b |
| Look at available log files | ls /var/log |
| Spot check a classic log file (may fail) | less /var/log/messages |
What You Might See (examples)
Depending on permissions, you may see:
Permission deniedwhen opening restricted files (common)- Readable output from
journalctleven when some/var/logfiles are blocked - Relevant errors like missing configs, service crashes, or disk-full warnings
Practical Examples
# List boot sessions
journalctl --list-boots
# Read current boot logs (may be long)
journalctl -b
# View classic log files folder
ls /var/log
# Try one file that might or might not be readable
less /var/log/secure 2>/dev/null || echo "Can't read /var/log/secure"journalctl Workflow (Filters + Time)
journalctl lets you read logs stored in the systemd journal. This is usually the best option for a no-sudo course because you can filter logs without needing to open restricted files directly.
Simulate journal filtering with practice files
In addition to running journalctl on your system, this course includes simulated journal text so you can practice filtering logic with diff and sed.
Practical Examples
# Go to the practice folder
cd ~/playground/chapter9
# See what changed between "before" and "after"
diff -u journal_before.txt journal_after.txt
# Mimic a "show only errors" filter
sed -n '/ERROR/p' journal_after.txt
# Filter by a unit/service keyword (e.g., sshd)
sed -n '/sshd/p' journal_after.txt
# Filter by HTTP service keyword (e.g., httpd)
sed -n '/httpd/p' journal_after.txtQuick Reference
| What You Want | Command |
|---|---|
| Show current boot logs | journalctl -b |
| Show logs since a time | journalctl --since "1 hour ago" |
| Show logs for a specific service | journalctl -u sshd (replace service name) |
| Show only errors (priority filter) | journalctl -p err..alert |
| Make output not require a pager | --no-pager |
1) Start Broad, Then Narrow
Practical Examples
# Current boot (often long)
journalctl -b --no-pager
# Only the last 50 messages
journalctl -n 50 --no-pager
# Since a recent time window
journalctl --since "2 hours ago" --no-pager2) Filter by Service (unit)
Pick a unit that exists on your system. Common examples: sshd, NetworkManager, or a web service like nginx/httpd.
Practical Examples
# Logs for SSH daemon (common on many servers)
journalctl -u sshd --since "today" --no-pager
# Focus on error-level messages for a service
journalctl -u sshd -p err..alert --since "1 hour ago" --no-pager3) Search by text with -g (optional)
If you remember what the message contains, use -g to search the journal efficiently.
Practical Examples
# Search journal for a keyword
journalctl -g "fail" --since "today" --no-pager
# Combine keyword + priority
journalctl -g "error" -p err..alert --since "6 hours ago" --no-pagerInterpreting Output
- Look for the first error in the time window (it’s often the root cause).
- Warnings that appear once may be less important than repeated errors.
- If you see “no space left on device” that matches the disk-full workflow from the previous page.
Log Permissions & Troubleshooting
In a class environment (or on hardened systems), you may not be allowed to read every file under /var/log. That’s normal. The goal is to learn a workflow that still works when some logs are blocked.
When /var/log is blocked, use journal text snapshots
If you cannot read a restricted log file (you may see Permission denied), you can still practice the troubleshooting flow using the provided simulated journal snapshots in ~/playground/chapter9. This is also where sed shines: extract only the important lines.
Practical Examples
# Start in the practice folder
cd ~/playground/chapter9
# Pull out error lines (simulates a "show only errors" view)
sed -n '/ERROR/p' journal_after.txt
# Pull out the specific storage-related message
sed -n '/no space left on device/p' journal_after.txt
# Optional: extract from the pre-built errors file
sed -n '/ERROR/p' journal_after_errors.txt1) Try a Restricted Log File (expect failure)
Practical Examples
# This may work, but often you will see "Permission denied"
less /var/log/secure 2>/dev/null || echo "Can't read /var/log/secure"
# You can also check permissions (readable info)
ls -l /var/log/secure 2>/dev/null2) Use journalctl as a Fallback
If a file under /var/log is blocked, switch to journalctl and filter by service/time.
Practical Examples
# Current boot only (often works for non-admin users)
journalctl -b --since "1 hour ago" --no-pager
# Service-specific (replace sshd with your service/unit)
journalctl -u sshd --since "today" --no-pager
# Only errors for that service
journalctl -u sshd -p err..alert --since "today" --no-pager3) Troubleshooting Flow (small and repeatable)
- Step 1: identify the symptom (what broke: login? web? disk full?)
- Step 2: run a status/read-only check (e.g.
systemctl status <service>if you’re allowed) - Step 3: find the first relevant errors in a narrow time window using
journalctl - Step 4: if the errors mention storage, switch back to the disk workflow:
df -hthendu
What you might see (examples of messages)
“no space left on device”→ disk is full (use the Disk workflow)“failed to start”/“service exited”→ check unit logs withjournalctl -u“permission denied”→ file ACL/SELinux/policy issue (permissions lesson comes later in the course)
Mini Case Study: Service Problem (service + logs)
In the real world you rarely get a “perfect error message.” Instead you get symptoms (service doesn’t respond, log spam, failed login). This case study shows a repeatable approach that stays mostly no-sudo.
Simulated case study (practice files)
This case study can be done either on your live system with systemctl/journalctl, or using the simulated snapshots in ~/playground/chapter9. The simulated version is useful for learning the reasoning, especially when some log files are blocked.
Scenario
“The web server isn’t responding” or “SSH logins fail.” You are allowed to inspect, but not to change system configuration.
Step 1: Check the service status (read-only if allowed)
Practical Examples
# Try a status check (might be readable without sudo)
systemctl status sshd --no-pager
# Or for a web server on Red Hat, common units are httpd or nginx
systemctl status httpd --no-pagerStep 2: Pull the most relevant logs from the last window
Practical Examples
# Live system approach (if journalctl works)
# For SSH (replace sshd with your unit)
journalctl -u sshd --since "30 min ago" --no-pager
# Only errors for that unit in the time window
journalctl -u sshd -p err..alert --since "30 min ago" --no-pager
# If you need to search for a keyword inside recent logs
journalctl -u sshd -g "failed" --since "today" --no-pager
# Simulated approach (no sudo, repeatable)
cd ~/playground/chapter9
# Show all sshd-related log lines from the simulated journal
sed -n '/sshd/p' journal_after.txt
# Show only error lines from the simulated journal
sed -n '/ERROR/p' journal_after.txtStep 3: Connect logs to disk usage (common cause)
If the journal shows storage messages like no space left on device or repeated “write failed,” go back to the disk workflow:
- Run
df -hto see which mount point is full - Use
duto find the largest directories under that filesystem - Then inspect the folder that contains logs (often
/var/log)
Practical Examples (simulated)
# Simulated "why did it start failing?" check:
cd ~/playground/chapter9
# Compare df output (what got fuller?)
diff -u df_before.txt df_after.txt
# Compare how /var changed
diff -u du_var_before.txt du_var_after.txt
# Extract the /var/log line to confirm where the space went
sed -n '/\/var\/log/p' du_var_after.txtChapter 10
A Gentle Guide to VIM
Vim is a text editor that is included with most Linux distributions - it might seem intimidating at first (all those buttons!), but once you learn the basics, you'll edit text faster than ever before. The beauty of Vim is that your fingers never need to leave the keyboard, saving you precious time that adds up over your coding career.
Let's break down this powerful tool into bite-sized, easy-to-understand pieces!
The course setup.sh script creates ~/playground/chapter10 with practice files for this lesson (myfile.txt, file1.txt, file2.txt, file3.txt). Run cd ~/playground/chapter10 before trying the examples, or use the full path when opening files.
Quick Reference: Essential Vim Commands
| Command | Description | Common Use |
|---|---|---|
i, a, o, O |
Enter Insert mode | When you need to add or write text |
Esc |
Return to Command mode | When you're done typing and want to navigate or use commands |
:w |
Save file | When you want to save your work without exiting |
:q |
Quit Vim | When you're done and want to exit |
:wq or ZZ |
Save and quit | When you're finished editing and want to save changes |
:q! |
Force quit without saving | When you want to discard changes |
Understanding Vim's Modes: The Foundation
When to Use Different Modes
- Command Mode - Use when you want to navigate, delete text, or execute commands
- Insert Mode - Use when you want to add or edit text
- Visual Mode - Use when you want to select blocks of text for copying or manipulation
Common Mode Switching Options
| Command | What It Does | When to Use It |
|---|---|---|
i |
Insert before cursor | When you need to add text at current position |
a |
Insert after cursor | When you need to append text after current character |
o |
Open new line below | When you want to start typing on a new line below |
O |
Open new line above | When you want to start typing on a new line above |
Esc |
Exit to Command mode | When you're done typing and want to execute commands |
Practical Examples
# Opening a file (from ~/playground/chapter10 or use full path)
vim myfile.txt # or: vim ~/playground/chapter10/myfile.txt
# Starts in Command mode
# Starting to type in an empty file
i # Press i to enter Insert mode
This is a new line of text # Move the cursor to the end of the last line and press enter to get a new line then type your text
<Esc> # Press Esc to return to Command mode
# Adding text after existing content
a # Moves cursor one position right and enters Insert mode
<Esc> # Return to Command mode when finished
# Adding a new line below current position
o # Creates new line below and enters Insert mode
This is a new line # Type your text
<Esc> # Return to Command mode
# Save the file and exit vim
:wq #this command writes the file and exits vim
Navigating in Vim: Moving Around Like a Pro
When to Use Navigation Commands
- When you need to move to a specific location in your file
- When you want to jump to the beginning or end of a line
- When you need to go to a specific line number
- When you want to navigate through your document without using the mouse
Common Navigation Options
| Command | What It Does | When to Use It |
|---|---|---|
h, j, k, l |
Move left, down, up, right | For basic character-by-character navigation |
w |
Move to start of next word | When moving forward by words |
b |
Move to start of previous word | When moving backward by words |
0 |
Move to beginning of line | When you need to get to the start of a line |
$ |
Move to end of line | When you need to get to the end of a line |
gg |
Go to beginning of file | When you need to jump to the top |
G |
Go to end of file | When you need to jump to the bottom |
10G |
Go to line 10 | When you need to jump to a specific line |
Practical Examples
# Moving to the beginning of a file (try with ~/playground/chapter10/myfile.txt open)
gg # Takes you to the first line
# Moving down 5 lines
5j # Moves cursor down 5 lines
# Jumping to line 42
42G # Takes you directly to line 42
# Moving to the beginning of current line
0 # Positions cursor at first character
# Moving to the end of current line
$ # Positions cursor after last character
Editing Text: The Power of Vim Commands
When to Use Editing Commands
- When you need to delete, change, or copy text
- When you want to manipulate words, lines, or paragraphs efficiently
- When you need to make repetitive edits
- When you want to undo or redo changes
Common Editing Options
| Command | What It Does | When to Use It |
|---|---|---|
x |
Delete character under cursor | When removing a single character |
dd |
Delete current line | When removing an entire line |
3dd |
Delete 3 lines | When removing multiple lines |
dw |
Delete from cursor to end of word | When removing part of a word |
cw |
Change word (delete and enter Insert mode) | When replacing a word |
r |
Replace single character | When changing just one character |
yy |
Yank (copy) current line | When copying a line |
p |
Paste after cursor | When pasting copied or deleted text |
u |
Undo last change | When you make a mistake |
Ctrl+r |
Redo last undone change | When you undo too much |
Practical Examples
# Replacing a word
cw # Delete word and enter Insert mode
better # Type replacement word
<Esc> # Return to Command mode
# Deleting a paragraph
3dd # Delete three lines at once
# Copying and pasting
yy # Copy current line
p # Paste below current line
5yy # Copy 5 lines
p # Paste all 5 lines below current position
# Fixing a mistake
u # Undo last change
Ctrl+r # Redo if you undo too much
Searching and Replacing: Finding What You Need
When to Use Search Commands
- When you need to find specific text in a file
- When you want to jump to occurrences of a pattern
- When you need to replace text throughout a file
- When locating errors or specific sections of code
Common Search Options
| Command | What It Does | When to Use It |
|---|---|---|
/pattern |
Search forward for pattern | When looking for text ahead in the file |
?pattern |
Search backward for pattern | When looking for text earlier in the file |
n |
Repeat search in same direction | When finding next occurrence |
N |
Repeat search in opposite direction | When finding previous occurrence |
:%s/old/new/g |
Replace all occurrences in file | When doing global find and replace |
Practical Examples
# Finding all instances of "error"
/error # Search forward for "error"
n # Go to next occurrence
N # Go to previous occurrence
# Replacing "bug" with "issue" throughout file
:%s/bug/issue/g # Replace globally
:%s/bug/issue/gc # Replace globally with confirmation
# Clearing search highlighting
:noh # Turns off highlighting until next search
Working with Multiple Files: Buffers and Split Screens
When to Use Multiple File Features
- When working on related files at the same time
- When comparing different files
- When copying content between files
- When managing a complex project with multiple components
Common Multiple File Options
| Command | What It Does | When to Use It |
|---|---|---|
:e filename |
Edit a new file | When opening another file |
:ls |
List all open buffers | When checking which files are open |
:buffer n |
Switch to buffer n | When moving between open files |
:bn |
Go to next buffer | When cycling through open files |
:bp |
Go to previous buffer | When cycling through open files |
:bd |
Delete (close) current buffer | When done with a file |
:split filename |
Open file in horizontal split | When viewing two files one above the other |
:vsplit filename |
Open file in vertical split | When viewing two files side by side |
Ctrl+w, arrow key |
Move between splits | When navigating between split windows |
:only |
Close all splits except current one | When focusing on just one file again |
Practical Examples
# Opening multiple files at once (from ~/playground/chapter10)
vim file1.txt file2.txt # Opens both files in buffers
# Checking open buffers and switching between them
:ls # Lists all open buffers with numbers
:buffer 2 # Switches to buffer number 2
:bn # Goes to next buffer
:bp # Goes to previous buffer
# Working with split screens
:split file2.txt # Opens file2.txt in horizontal split
:vsplit file3.txt # Opens file3.txt in vertical split
Ctrl+w, ↓ # Move to split below
Ctrl+w, → # Move to split on right
:only # Close all splits except current one
Customizing Vim: Making It Your Own
When to Use Customization Commands
- When you want to make Vim more comfortable to use
- When you need to see line numbers
- When you want to change the visual appearance
- When running scripts from within Vim
Common Customization Options
| Command | What It Does | When to Use It |
|---|---|---|
:set nu |
Show line numbers | When you need to reference specific lines |
:set nonu |
Hide line numbers | When you want a cleaner display |
:colorscheme [name] |
Change color scheme | When you want a different look |
:!bash % |
Run current bash script | When testing a script you're editing |
Practical Examples
# Turning on line numbers
:set nu # Shows line numbers along left side
# Changing color schemes
:colorscheme <Ctrl+d> # List available colorschemes
:colorscheme desert # Change to the desert colorscheme
# Running an external command (e.g. list chapter10 files)
:!ls -la ~/playground/chapter10
Learning Aids
Tips for Success
- Practice mode switching - Getting comfortable moving between Command and Insert modes is the foundation of Vim proficiency
- Use cheat sheets - Keep a Vim command reference nearby until muscle memory kicks in
- Start small - Master 5-10 commands thoroughly before adding more to your arsenal
- Use
vimtutor- Type this command in your terminal for an interactive tutorial - Combine commands - Learn how numbers and commands work together (e.g.,
5ddto delete 5 lines) - Remember
Esc- When in doubt, hit Escape to get back to Command mode
Common Mistakes to Avoid
- Forgetting which mode you're in - The most common Vim error is typing commands in Insert mode or text in Command mode
- Not saving often enough - Use
:wfrequently to save your work - Forgetting to exit Insert mode - Many users hit arrow keys while still in Insert mode, causing unexpected text insertion
- Quitting without saving - Using
:q!discards all changes since your last save - Getting stuck - If you're confused, press
Escmultiple times, then type:qto exit safely - Overriding files - Be careful when using
:w!as it forces overwriting without confirmation
Best Practices
- Use relative line numbers -
:set relativenumbermakes it easier to make line-relative movements - Create a .vimrc file - Store your preferred settings for automatic loading
- Learn one new command per day - Gradual improvement leads to mastery over time
- Use visual mode for complex selections - When selecting text is complex,
v(visual mode) often helps - Embrace repetition - Use the dot command (
.) to repeat the last change - Compose commands - Vim commands are like a language; learn to combine them (e.g.,
d3wto delete 3 words)
Complete Vim Command Reference
| Command | Description |
|---|---|
vim myfile.txt |
Open a file (use ~/playground/chapter10/myfile.txt after setup) |
i |
Insert text before the cursor (Insert mode) |
a |
Insert text after the cursor (Insert mode) |
o |
Open a new line below the current line (Insert mode) |
O |
Open a new line above the current line (Insert mode) |
<Esc> |
Switch back to Command mode |
h, j, k, l |
Move cursor left, down, up, right (also arrow keys) |
4j |
Move cursor down four lines |
x |
Delete character under the cursor |
3dd |
Delete three lines starting from the current line |
3yy |
Yank (copy) three lines |
p |
Paste copied lines below the cursor |
u |
Undo the last change |
:w |
Save the file |
:wq |
Save and quit vim |
ZZ |
Save and quit vim (alternative) |
:q! |
Quit without saving |
gg |
Go to the beginning of the file |
G |
Go to the end of the file |
10G |
Go to line 10 |
0 |
Move to the beginning of the current line |
$ |
Move to the end of the current line |
rj |
Replace the character under the cursor with 'j' |
cw world |
Change the word under the cursor to 'world' |
dw |
Delete from the cursor to the end of the word |
v |
Start visual mode to select text |
d$ |
Delete from the cursor to the end of the line |
y2w |
Yank (copy) two words |
/hello |
Search forward for 'hello' |
?hello |
Search backward for 'hello' |
n |
Repeat the search in the same direction |
N |
Repeat the search in the opposite direction |
:set nu |
Set line numbers |
:set nonu |
Remove line numbers |
:colorscheme ctrl-d |
List available colorschemes |
:colorscheme color |
Change to specified color scheme |
:!bash % |
Run the current bash script in vim |
:noh |
Clear highlighting |
Creating a Bash Script, Comments, Variables and Read
Bash scripts are like mini-programs that can save you hours of work. Think of them as a way to teach your computer to follow instructions - whether it's organizing files, processing data, or performing system maintenance. Once you write a script, you can run it anytime with a single command, and your computer faithfully executes all the steps you've defined.
The course setup.sh script creates ~/playground/chapter10 with a foo.txt file (for variable/command-substitution examples) and a scripting subdirectory (for the file-system navigation example). Run the examples from ~/playground/chapter10 or use that path in your scripts.
Quick Reference: Essential Bash Scripting Elements
| Element | Description | Common Use |
|---|---|---|
#!/bin/bash |
Shebang line | First line of every script to specify Bash interpreter |
# Comment |
Comments | Adding notes and explanations in your script |
variable="value" |
Variable assignment | Storing data for later use in the script |
echo $variable |
Output text/variables | Displaying information to the user |
read variable |
User input | Getting information from the user |
chmod 700 script.sh |
Change permissions | Making a script executable |
./script.sh |
Run script | Executing a script from its directory |
Practical Example
In this example, we are creating a simple bash script. The script starts with the shebang line #!/bin/bash which tells the system to use bash to interpret the script. We then add a comment explaining what it is, and finally use echo to display a message. If you use Vim you would start by typing vim ~/playground/chapter10/simplescript.sh and then typing the script below into the file.
The line that starts with # is a comment. Comments are ignored by the interpreter and are used to explain the script. Comments are useful for documenting what the script does and how it works.
#!/bin/bash
#this is a comment it is ignored by the interpreter
echo "This is a simple script"
To run this script, you would first make it executable with chmod 700 simplescript.sh and then run it with ./simplescript.sh or bash simplescript.sh. Run these commands from ~/playground/chapter10 so the script is in your current directory. The reason I want you to use chmod 700 is because it gives the owner read, write, and execute permissions. This is important because if the script is not executable, it will not run. Also other users will not be able to run or see the script.
Working with Variables
Variables in Bash scripts are containers that store data which can be used and manipulated throughout your script. They make scripts more flexible and reusable by allowing you to store values that might change, rather than hardcoding them into the script. A variable name can consist of letters, numbers, and underscores, but cannot start with a number and must never have a space in them. To assign a value to a variable, use the format variable_name=value (with no spaces around the equals sign), and to access a variable's value, prefix the variable name with a dollar sign $variable_name. NOTE: If you try to access a variable that has not been assigned a value, it will return an empty string.
Common Variable Operations
| Operation | What It Does | When to Use It |
|---|---|---|
name="value" |
Assigns a value to a variable | When storing data for later use |
echo $name |
Accesses the variable's value | When using the stored data |
${name} |
Explicitly defines variable boundaries | When variable is used in a string and needs to be clearly defined |
result=$(command) |
Captures command output | When you need to use command results |
Practical Examples
Basic variable assignment and usage
In this example, we are demonstrating basic variable assignment and usage. We assign a string value to var1, a numeric value to var2, and capture the output of a command into var3. We then echo each variable to display its value. Notice how we use ${var3} when concatenating to make sure the variable name is clearly defined. The course setup creates ~/playground/chapter10/foo.txt; run this script from ~/playground/chapter10 or use the full path to foo.txt.
#!/bin/bash
var1="this is a variable"
var2=5
var3=$(cat ~/playground/chapter10/foo.txt)
echo $var1
echo $var2
echo $var3
echo "I am concatenating this to the contents of varible 3 (var 3) ${var3}"
Arithmetic operations with variables
In this example, we are demonstrating arithmetic operations with variables. We start with num1 set to 5. We then use ((num1++)) to increment num1 by 1. We can also use $((expression)) to perform arithmetic. When we write num1=$((num1+5)), we are assigning the result back to num1 (like x = x + y). When we write echo $((num1+5)), we are just calculating and displaying the result without changing num1 (like x + y).
#!/bin/bash
num1=5
((num1++)) #this increments by 1
echo $num1
num1=$((num1+5)) #this is like doing x = x + y
echo $num1
echo $((num1+5)) #this is like doing x + y
echo $num1
Advanced variable usage with heredoc
In this example, we are demonstrating more advanced variable usage using a heredoc (using <<TEST and TEST) which allows us to output multiple lines of text where quotes are treated literally but variables are still expanded. We can store the heredoc output in a variable using command substitution, then echo the variable to display it. You can reference ~/playground/chapter10/foo.txt in the heredoc if you want to include file contents (e.g. with $(cat ~/playground/chapter10/foo.txt)).
#!/bin/bash
d=$(cat ~/playground/chapter10/foo.txt)
variable=$(cat <<TEST
This is some "text"
where 'single' and "double" quotes are just printed
This is the contents of the foo.txt file ${d}
TEST
)
echo "$variable"
Getting User Input with 'read'
The read command is Bash's way of accepting input from the user during script execution. When the script encounters a read statement, it pauses and waits for the user to type something and press Enter. This input is then stored in a variable that you specify, allowing your script to use that information for later processing. The read command makes your scripts interactive, enabling them to respond differently based on user input rather than following a fixed path.
Common read Command Options
| Option | What It Does | When to Use It |
|---|---|---|
read variable |
Basic input collection | When you need a single value from the user |
read -p "Prompt: " variable |
Shows a prompt before input | When indicating what input is needed |
read -s variable |
Silent input (no display) | When collecting sensitive information like passwords |
read var1 var2 var3 |
Reads multiple values | When collecting related pieces of information |
Practical Examples
Basic read command
In this example, we are demonstrating the basic use of the read command. We first echo a question to the user, then use read to wait for their input. The input is stored in the variable name, which we then use in an echo statement to greet the user.
#!/bin/bash
echo "What is your name?"
read name
echo "Hello, $name!"
Reading multiple values
In this example, we are demonstrating how to read multiple values at once. When you use read first last, the read command will split the input by spaces and assign the first word to the first variable and the second word to the second variable. Any additional words will be assigned to the last variable.
#!/bin/bash
echo "Enter your first and last name:"
read first last
echo "Hello, $first $last!"
Using read with prompts and silent input
In this example, we are demonstrating the -p and -s options for the read command. The -p option allows you to include a prompt on the same line as the read command, which is useful for one-line requests. The -s option makes the input silent, meaning what the user types will not be displayed on the screen. This is useful for passwords and other sensitive information. Notice that we use -sp together to combine both options.
#!/bin/bash
#the -p is for prompt it will wait for a user response. This is needed on one line requests.
read -p "Enter your username: " username
#the -s is so whe the user types does not show.
read -sp "Enter your password: " password
echo "Username: $username, Password: [hidden]"
File System Navigation in Scripts
Bash scripts can navigate the file system and perform operations on files and directories just like you would manually. You can use commands like cd to change directories, ls to list files, mkdir to create directories, and rm to remove files and directories. Scripts can combine these commands to automate complex file system operations.
Practical Example
In this example, we are demonstrating file system navigation and operations in a bash script. The script navigates to the chapter10 playground, then into the scripting subdirectory (created by setup.sh). It creates a new directory scott and a file inside it, lists the contents, and then removes the directory. Run this script from anywhere; it uses full paths so it does not depend on your current directory.
#!/bin/bash
echo
echo "*** START SCRIPT ***"
cd ~
echo "* List home directory"
ls -l
echo "* Go to playground/chapter10/scripting directory"
cd ~/playground/chapter10/scripting/
echo "* Create scott directory and file.txt"
mkdir scott
echo "This is text" > scott/file.txt
echo "* List playground/chapter10/scripting"
ls -l
echo "* List scott directory"
ls -l scott
echo "* Delete scott directory"
rm -r scott
echo "* Show that directory scott was deleted"
ls -l
echo "*** SCRIPT COMPLETE ***"
echo
Running and Managing Scripts
Common Script Execution Methods
| Method | What It Does | When to Use It |
|---|---|---|
chmod 700 script.sh |
Makes script executable | Before running a script for the first time |
./script.sh |
Runs script from current directory | When the script is in your current location |
bash script.sh |
Explicitly uses bash to run script | When testing or the script isn't executable |
/path/to/script.sh |
Runs script using full path | When the script is in another location |
Practical Example
In this example, we are demonstrating how to make a script executable and run it. First, we use chmod 700 to give the owner read, write, and execute permissions. Then we can run the script using ./myscript.sh if it's in the current directory (e.g. after cd ~/playground/chapter10), or bash myscript.sh to explicitly use bash to run it.
# Making a script executable (e.g. in ~/playground/chapter10)
chmod 700 myscript.sh # Owner can read, write, execute
# Different ways to run a script
./myscript.sh # Run from current directory (e.g. from ~/playground/chapter10)
bash myscript.sh # Run with bash explicitly
Learning Aids
Tips for Success
- Start small - Begin with simple scripts that do one thing well, then build up complexity
- Test frequently - Run your script after adding each new feature to catch errors early
- Use meaningful variable names - Choose descriptive names that explain what the variable contains
- Add comments liberally - Your future self will thank you when revisiting old scripts
- Use consistent indentation - Proper spacing makes scripts much easier to read
- Create a scripts directory - Keep all your scripts organized in one place like ~/bin
- Learn from examples - Study other scripts to learn new techniques and best practices
- Use version control - Store your scripts in a Git repository for tracking changes
Common Mistakes to Avoid
- Forgetting spaces around operators - In Bash,
var=5assigns a value, butvar = 5tries to run a command called "var" - Misusing quotes - Double quotes allow variable expansion but single quotes don't
- Forgetting the shebang line - Without
#!/bin/bash, the system might use a different shell to run your script - Not making scripts executable - Forgetting
chmod 700means you'll get "permission denied" errors - Using spaces in variable names - Variables like
first namewon't work; usefirst_nameorfirstNameinstead - Forgetting the $ when using variables - Writing
echo nameprints "name", not the variable's value - Incorrect file paths - Using relative paths can break when running scripts from different locations
- Destructive commands without confirmation - Commands like
rmshould ask for confirmation in scripts
Best Practices
- Use functions for repeated code - Define functions for operations you perform multiple times
- Handle errors gracefully - Check for errors and provide helpful error messages
- Make scripts configurable - Use variables at the top of scripts for easy customization
- Document usage instructions - Include a comment section explaining how to use the script
- Check command success - Verify that commands succeed before proceeding with
if [ $? -eq 0 ] - Use consistent naming conventions - Adopt a standard naming pattern for all your scripts
- Include script headers - Add author, date, purpose, and usage information at the top
- Validate user input - Never trust user input without checking it first
Chapter 11
Functions
Functions allow you to organize your code like building blocks, making it easier to understand, maintain, and debug. Just as you might break down a complex math problem into smaller steps, functions let you divide your script into logical, focused pieces that each perform a specific task. This not only saves you from writing the same code multiple times but also makes your scripts cleaner and more professional.
When naming functions, follow the same rules as naming variables: use lowercase letters, numbers, and underscores. Avoid using uppercase letters or special characters unless absolutely necessary. Don't start with a number and don't have a space in the function name.
Common Function Syntax Options
| Syntax Style | What It Does | When to Use It |
|---|---|---|
function_name() { commands; } |
Standard POSIX-compliant function definition | For maximum portability across different shells |
function function_name { commands; } |
Bash-specific function definition with keyword. The keyword is the word "function" and it is before the function name. | When working exclusively in Bash environments |
function_name { commands; } |
Simplified Bash function definition | Less common; not recommended for clarity reasons |
Practical Example
When writing functions in bash you need write the function first before you can call it. You do this by writing the function name followed by parentheses and then the commands to be executed. You then call the function by writing the function name followed by parentheses.
In this example, we are defining three functions: test1, add, and comm. We are then calling each function and echoing the result.
# Standard function definition (recommended)
test1(){
echo "Hello Class"
echo "more here"
}
# Call the function
test1 # Outputs: Hello Class
# Function that performs a calculation
add(){
echo "The numbers added together are $((5 + 3 + 7))"
}
add # Outputs: The numbers added together are 15
# Function that uses external commands
comm(){
echo "The contents of the foo file is $(cat foo.txt)"
}
comm # Outputs: The contents of the foo file is this is the foo.txt file text
Passing Arguments to Functions
When passing arguments to a function, you need to pass them in the order they are defined in the function. You can pass them in the order you want to, but you need to pass them in the order they are defined in the function.
How Arguments Work in Functions
| Parameter | What It Represents | When to Use It |
|---|---|---|
$1 |
First argument passed to the function | To access the first value provided when calling the function |
$2, $3, ... |
Second, third, etc. arguments | When your function accepts multiple inputs |
Practical Examples
In this example, we are defining two functions: add and concat. We are passing three numbers to the add function and two strings to the concat function as arguments.
# Function that takes multiple arguments and performs addition
add(){
echo "we are adding the numbers $1, $2 and $3 the sum is "$(($1+$2+$3))
}
# Call with three numbers
add 10 25 45 # Outputs: we are adding the numbers 10, 25 and 45 the sum is 80
# Function that concatenates two words
concat(){
echo "this is a contactenation of two words $1 $2"
}
# Call with two string arguments
concat "Hello" "World" # Outputs: this is a contactenation of two words Hello World
Returning Values from Functions
When returning values from a function, you need to use the return statement. The return statement will return the value to the calling function. The return statement will also exit the function (meaning the function will stop executing and return the value to the calling function). The return statement can only return integers between 0 and 255. If you return a value greater than 255, it will be truncated to 255. You can also write a return statement without a value, this will return 0. You can capture the return value of a function in a variable by using the $? special variable.
Return Methods in Bash Functions
| Method | What It Does | When to Use It |
|---|---|---|
return [0-255] |
Returns an exit status code | For indicating success (0) or failure (non-zero) |
Practical Examples
Return statement stops execution
In this example, we are demonstrating that the return statement stops execution of the function. The function ret1 echoes "ret1 got called", then returns, and the echo statement after the return will not execute because the function has already exited.
#!/bin/bash
ret1(){
echo "ret1 got called"
return
echo "this is ret1 after a return statement" # This will not run because it is after the return statement
}
ret1 # Outputs: ret1 got called
Returning an integer value
In this example, we are demonstrating how to return an integer value from a function. The function ret2 returns the value 5. We capture this return value using the $? special variable, which contains the exit status of the last command executed. After calling ret2, we store the return value in varRet2 and then echo it to display the value.
#!/bin/bash
ret2(){
echo "this is ret2, returns can only return integers between 0 and 255"
return 5
}
ret2
varRet2=$? # Captures the return value (5) into a variable using the $? special variable
echo $varRet2 # Outputs: 5
Returning a different integer value
In this example, we are demonstrating another function that returns a different integer value. The function ret3 returns the value 3. We capture this return value using $? and store it in varRet3, then echo it to display the value.
#!/bin/bash
ret3(){
echo "this is ret3 returning the integer of 3"
return 3
}
ret3
varRet3=$? # Captures the return value (3)
echo $varRet3 # Outputs: 3
Return value wrapping
In this example, we are demonstrating how return values greater than 255 get wrapped around using modulus 256. The function ret4 attempts to return 500, but since return values can only be between 0 and 255, it gets wrapped to 500 % 256 = 244. We capture this wrapped value using $? and display it. Note that when we echo $? again after the first echo, it shows 0 because $? now contains the exit status of the echo command, not the function's return value.
#!/bin/bash
ret4(){
echo "this is ret4 it returns 244 because it gets wrapped around modulus 256"
echo "500 % 256 = 244"
return 500
}
ret4
varRet4=$? # Captures the return value (244, because 500 wraps to 500 % 256)
echo $varRet4 # Outputs: 244
echo $? # Outputs: 0 (because echo was the last command)
Variable Scope in Functions
Variable scope in functions is the scope of a variable within a function. The scope of a variable is the range of the script that the variable is visible to. The scope of a variable can be local to the function, global to the script, or local to the script. The scope of a variable is determined by the keyword used to declare the variable. The keyword used to declare a variable can be local, global, or local to the script. The keyword used to declare a variable can be local to the function by using the local keyword. The keyword used to declare a variable can be global to the script by using the global keyword. The keyword used to declare a variable can be local to the script by using the local keyword.
| Scope Type | What It Does | When to Use It |
|---|---|---|
local variable_name |
Creates a variable only visible within the function by using the local keyword | To prevent the function from affecting variables in the main script |
| Global variables (default) | Variables accessible throughout the entire script | When the variable needs to be accessed by multiple functions |
Practical Example
In this example, we are demonstrating the scope of a variable in a function. The variable name is declared outside the function and is global to the script. The function changeName modifies the global variable name to "sam". If we uncomment the local name="sam" line and comment out the name="sam" line, the global variable "name" will not be changed. The function echo $name will echo the global variable name which is "sam".
Let's take a look at an example of each first example the "name" variable is global to the script and the function changeName modifies the global variable name to "sam". The second example the "name" variable is local to the function and the function changeName modifies the local variable name to "sam".
# Global variable defined outside function
name="scott"
# Function that modifies the global variable
changeName(){
name="sam"
echo $name
}
changeName # Outputs: sam
echo $name # Outputs: sam (the global variable was changed)
In this example, we are demonstrating the scope of a variable in a function. The variable "name" is declared outside the function and is global to the script. The function changeName modifies the local variable "name" to "sam". The function echo $name will echo the local variable "name" which is "sam". However, the global variable "name" will not be changed because the local variable "name" is not global to the script.
# Local variable defined inside function
name="scott"
changeName(){
local name="sam"
echo $name
}
changeName # Outputs: sam
echo $name # Outputs: scott (the global variable was not changed)
Re-using functions
This example shows how to re-use a function. For example, if you have a menu item that has to be called multiple times, you can create a function for that menu item and then call it multiple times.
#!/bin/bash
# Function to display a menu
displayMenu(){
echo "1. Add item"
echo "2. Remove item"
echo "3. View list"
echo "4. Exit"
read -p "Enter your choice: " choice
if [ "$choice" -eq 1 ]; then
addItem
elif [ "$choice" -eq 2 ]; then
removeItem
elif [ "$choice" -eq 3 ]; then
viewList
elif [ "$choice" -eq 4 ]; then
exit 0
fi
}
addItem(){
echo "Adding item"
displayMenu
}
removeItem(){
echo "Removing item"
displayMenu
}
viewList(){
echo "Viewing list"
displayMenu
}
displayMenu # Outputs: 1. Add item 2. Remove item 3. View list 4. Exit
As you can see from the above example, the displayMenu function is called multiple times.
Learning Aids
Tips for Success
- Use meaningful function names - Names should clearly indicate what the function does
- Keep functions focused - Each function should do one thing well
- Document your functions - Add comments explaining the purpose, parameters, and return values
- Validate input parameters - Check that required arguments are provided and valid
- Use local variables by default - Minimize the use of global variables to avoid side effects
- Group related functions together - Organize functions logically in your script
- Test functions individually - Ensure each function works correctly on its own
- Avoid deeply nested functions - Keep the function call hierarchy relatively flat
Common Mistakes to Avoid
- Forgetting to make variables local - Unintentionally modifying global variables can cause bugs
- Relying on undeclared variables - Always initialize variables before using them
- Using incorrect return values - Remember that
returnonly works with values 0-255. If you use a value greater than 255, it will be truncated using modulus 256 to fit within the valid range - Forgetting that functions have their own argument list -
$1inside a function is not the same as$1in the main script - Creating functions with the same name as commands - This can lead to unexpected behavior
- Defining multiple functions with the same name - The second function will override the first one; only the most recent definition will be used when called
- Not checking the number of arguments - Missing arguments can cause your function to fail
- Writing overly complex functions - If a function is too complex, break it into smaller functions
- Using echo for both output and return values - This can make it difficult to capture return values
Best Practices
- Place all functions at the beginning of your script - Define functions before you use them
- Use the POSIX-compliant syntax -
function_name() { commands; }for better portability - Return meaningful exit codes - Use 0 for success and different non-zero values for specific errors
- Include usage examples in comments - Show how the function should be called
- Use clear parameter naming in comments - Document what each parameter represents
- Create a standard error handling approach - Be consistent in how functions report errors
- Modularize complex scripts into separate files - Use
sourceto include function libraries - Write functions that do one thing well - Follow the Unix philosophy of simplicity
Conditional Statements
Computers make decisions based on true or false conditions. This is called a conditional statement. Conditional statements can only evaluate true or false they cannot do maybe there is not grey area. Conditional statements use if statements to evaluate conditions. If something is true then do this. They also use else statements like if this is true do this else (otherwise) do that. They can also use elif statements like if this is true do this elif this is true do this else (otherwise) do that.
The course setup.sh script creates ~/playground/chapter11 with a data.txt file used in the file-test example below. Run scripts that check for data.txt from ~/playground/chapter11 or use the full path to the file.
The table below is a quick reference for the conditional statements. It is a list of the conditional statements and what they do.
| Structure | What It Does | When to Use It |
|---|---|---|
| Basic if statement | Executes commands only if a condition is true | When you have a single condition to check |
| if-else statement | Executes one set of commands if condition is true, another if false | When you need to handle both true and false cases |
| if-elif-else statement | Checks multiple conditions in sequence | When you have multiple possible scenarios |
| Nested if statements | Places if statements inside other if statements | When conditions depend on other conditions |
Practical Examples
Simple if statement
In this example, we are checking if the name is scott. If it is, we echo the message "The name is ${name}". If it is not, we do anything.
#!/bin/bash
#IMPORTANT: make sure to have a space after the if
#notice both of these work the double and single equalis
#the second one (though works somewhat) is not correct because we are assigning $name to scott which
#evaluates to true but does not actually assign it. When doing a condition make sure you use ==
name="scott"
#this is the correct way to compare a string
if [[ $name == "scott" ]]; then
echo "The name is ${name}"
fi
#this is the incorrect way to compare a string, it will work because it evaluates to true but does not actually assign it or compare it.
#if [[ $name = "scott" ]]; then
# echo "The name is ${name}"
#fi
Simple if-else statement
In this example, we are checking if the name is scott. If it is, we echo the message "The name is ${name}". If it is not, we echo the message "The name is not scott".
#!/bin/bash
name="scott"
if [[ $name == "scott" ]]; then
echo "The name is ${name}"
else
echo "The name is not scott"
fi
Simple if-elif-else statement
In this example, we are checking if the name is scott. If it is, we echo the message "The name is ${name}". If it is not, we check if the name is karen. If it is, we echo the message "The name is karen". If it is not, we echo the message "The name is not scott or karen".
#!/bin/bash
name="scott"
if [[ $name == "scott" ]]; then
echo "The name is ${name}"
elif [[ $name == "karen" ]]; then
echo "The name is karen"
else
echo "The name is not scott or karen"
fi
Nested if elif statements
This is a nested if elif statement. It is a nested if statement inside another if statement. It is used to check multiple conditions in sequence.
In this example, we are checking if the first name is Scott and if the last name is Shaper. If both are true, we echo the name. If the first name is not Scott, we check if the first name is Karen and if the last name is Shaper. If both are true, we echo the name. If neither are true, we echo "Neither first name is Scott or Karen".
#!/bin/bash
fname="Scott"
lname="Shaper"
if [[ $fname == "Scott" ]]; then
if [[ $lname == "Shaper" ]]; then
echo "The name is ${fname} ${lname}"
else
echo "The first name is ${fname} but the last is not Shaper"
fi
elif [[ $fname == "Karen" ]]; then
if [[ $lname == "Shaper" ]]; then
echo "The name is ${fname} ${lname}"
else
echo "The first name is ${fname} but the last is not Shaper"
fi
else
echo "Neither first name is Scott or Karen"
fi
Comparison Operators
Comparison operators are used to compare values and create conditions based on relationships between data.
Common Comparison Operators
| Comparison Type | Operator | Description |
|---|---|---|
| String Comparison | == |
Equal to |
!= |
Not equal to | |
| Numeric Comparison | -eq |
Equal to |
-ne |
Not equal to | |
-gt |
Greater than | |
-lt |
Less than | |
-ge |
Greater than or equal to | |
-le |
Less than or equal to | |
| Logical Operators | && |
Logical AND |
|| |
Logical OR | |
| File Test Operators | -f |
Checks if a file exists and is a regular file |
Practical Examples
String comparison
In this example, we are checking if the name is scott. If it is, we echo the message "The name is ${name}". If it is not, we do nothing.
#!/bin/bash
name="scott"
if [[ $name == "scott" ]]; then
echo "The name is ${name}"
fi
Numeric comparison
In this example, we are checking if the number is 3 using the -eq operator. If it is, we echo the message "The number is three". If it is not, we do nothing.
#!/bin/bash
num=3
if [[ $num -eq 3 ]]; then
echo "The number is three"
fi
Combining conditions with logical OR operator
In this example, we are checking if the first name is Scott, Karen, or Mark using the logical OR operator (||). If the first name matches any of these, we then check if the last name is Shaper. If both conditions are true, we echo the full name. If the first name matches but the last name doesn't, we echo a message indicating the last name doesn't match. If the first name doesn't match any of the options, we echo a message indicating the first name doesn't match.
#!/bin/bash
fname="Scott"
lname="Shaper"
if [[ $fname == "Scott" || $fname == "Karen" || $fname == "Mark" ]]; then
if [[ $lname == "Shaper" ]]; then
echo "The name is ${fname} ${lname}"
else
echo "The first name is ${fname} but the last is not Shaper"
fi
else
echo "Neither first name is Scott, Karen or Mark"
fi
Logical AND operator
This is an example of a logical AND operator to check if two conditions are true, like a username and password. Both username and password must evaluate to true to echo the message "The username and password are correct". If either condition is false, it will echo "The username or password is incorrect".
#!/bin/bash
username="sshaper"
password="123456"
if [[ $username == "sshaper" && $password == "123456" ]]; then
echo "The username and password are correct"
else
echo "The username or password is incorrect"
fi
File test operator (-f)
This is an example of using the -f file test operator to check if a file exists and is a regular file. The -f operator returns true if the file exists and is a regular file (not a directory or special file). The course setup.sh creates ~/playground/chapter11/data.txt. Run this script from ~/playground/chapter11 so data.txt is found, or set filename to the full path.
#!/bin/bash
# Run from ~/playground/chapter11 so data.txt (created by setup.sh) is in the current directory
filename="data.txt"
if [[ -f "$filename" ]]; then
echo "The file exists"
else
echo "The file does not exist"
fi
Using with read
This is an example of using read to get input, then checking with logical operators. It will prompt the user to enter a first name and an age. It will then check if the first name is Scott, Karen, Mark, or John and if the age is 20, 30, 40, or 50. If both conditions are true, it will echo the message "The name is ${fname} and the age is ${age}". If either condition is false, it will echo the message "The first name is ${fname} but the age is not 20 or 30 or 40 or 50". If the first name is not Scott, Karen, Mark, or John, it will echo the message "The first names are not Scott or Karen or Mark or John".
#!/bin/bash
# Using read to get input, then checking with logical operators
echo "Please enter a first name"
read fname
echo "Please enter an age"
read age
if [[ $fname == "Scott" || $fname == "Karen" || $fname == "Mark" || $fname == "John" ]]; then
if [[ $age -eq 20 || $age -eq 30 || $age -eq 40 || $age -eq 50 ]]; then
echo "The name is ${fname} and the age is ${age}"
else
echo "The first name is ${fname} but the age is not 20 or 30 or 40 or 50"
fi
else
echo "The first names are not Scott or Karen or Mark or John"
fi
Learning Aids
Tips for Success
- Always quote variables - Even with
[[ ]], quoting variables is a good habit that prevents issues with spaces and special characters - Use
[[ ]]when possible - Double brackets provide more features and safer behavior in most cases - Indent your code - Proper indentation makes conditional blocks much easier to read and debug
- Test your conditions - Use
echoto print the result of complex conditions to verify they work as expected - Use descriptive variable names - Names like
is_validorfile_countmake your conditionals self-documenting - Break complex conditions into parts - Assign parts of complex conditions to variables with meaningful names
- Use functions for repeated tests - If you use the same condition in multiple places, create a function for it
- Add comments - Explain the purpose of complex conditionals, especially for edge cases
Common Mistakes to Avoid
- Forgetting spaces inside brackets -
[[$var == "value"]]is incorrect; use[[ $var == "value" ]] - Using
=instead of==the=is for assignment,==is for comparison. While=may work it is a better practice to use==so it is clear to what is intended. - Mixing string and numeric comparisons -
==is for strings,-eqis for numbers. Using-eqwith strings doesn't work correctly - Omitting then/fi keywords - Every
ifneeds a matchingthenandfi - Not escaping special characters in
[ ]- Characters like<need escaping in single brackets - Using
[[without]]- Always ensure your brackets are balanced - Assuming all variables exist - Check if a variable exists before using it in conditions
Best Practices
- Use meaningful exit codes - Return 0 for success and specific non-zero values for different errors
- Check user input thoroughly - Validate all user input before using it in your scripts
- Handle edge cases - Consider what happens if files don't exist or inputs are unexpected
- Provide helpful error messages - When conditions fail, give users clear information about what went wrong
- Use early returns - Exit from scripts early when prerequisites aren't met
- Be consistent with your style - Choose either
[[ ]]or[ ]and stick with it throughout your script - Test conditions separately - For complex conditions, test each part individually first
- Default to safe behavior - When in doubt, make your script fail safely rather than proceed with uncertainties
Chapter 12
Loops
Loops solve one of programming's most common challenges: performing repetitive tasks efficiently. Instead of copying and pasting the same commands dozens or hundreds of times, you can wrap those commands in a loop and let the computer handle the repetition for you. This not only makes your scripts shorter and cleaner but also makes them easier to maintain and modify.
The course setup.sh script creates ~/playground/chapter12 with a sometext.txt file used in the "processing a file character by character" example below. Run that script from ~/playground/chapter12 or use the full path to the file.
Whether you need to process a list of files, count from 1 to 100, or keep trying something until it succeeds, loops provide the perfect tool for the job.
Quick Reference: Loop Types
| Loop Type | Description | Common Use |
|---|---|---|
while [[ condition ]] |
Repeats while condition is true | Running until a specific condition changes |
until [[ condition ]] |
Repeats while a condition is false | Running until a specific condition is met |
The While Loop
The while loop repeats a block of code as long as a condition is true. It checks the condition before each iteration, and if the condition is true, it executes the loop body. If the condition becomes false, the loop stops and execution continues after the loop.
When to Use While Loops
- When you need to repeat until a condition changes
- When the number of iterations isn't known in advance
- When implementing counters or timers
- When processing data with conditions
- When you need to check conditions during each iteration
Common While Loop Options
| Syntax | What It Does | When to Use It |
|---|---|---|
while [[ condition ]] |
Repeats while condition is true | When looping based on a Boolean condition |
while (( condition )) |
Repeats while numeric condition is true | When using arithmetic expressions in the condition |
Practical Examples
Basic while loop with counter
In this example, we are demonstrating a basic while loop that counts from 1 to 5. We initialize a counter variable to 1, then use a while loop that continues as long as the counter is less than or equal to 5. Inside the loop, we echo the current count and then increment the counter by 1. It's important to increment the counter inside the loop, otherwise the loop would run forever.
#!/bin/bash
count=1
while [[ $count -le 5 ]]; do
echo "Count: $count"
#or you can use $((count++))
count=$((count + 1))
done
echo "Finished the count is ${count}"
While loop with condition checking
In this example, we are demonstrating a while loop that finds even numbers. We ask the user for a number, then loop from 1 to that number. Inside the loop, we use the modulo operator (%) to check if a number is even (when count % 2 equals 0). If it's even, we add it to a string. We use string concatenation with += to build a list of even numbers separated by commas.
#!/bin/bash
echo "Please enter a number"
read num
count=1
number=""
mod=0
while [[ $count -le $num ]]; do
mod=$((count%2))
if [[ $mod -eq 0 ]]; then
number+="${count},"
fi
count=$((count + 1))
done
number="${number:0:-1}"
echo "The even numbers are ${number}"
While loop with modulo operation - including numbers
In this example, we are demonstrating a while loop that finds numbers divisible by a given number. We ask the user for two numbers: a maximum number and a number to divide by. We then loop from 1 to the maximum number, and for each number, we check if it's evenly divisible by the second number using the modulo operator. If the modulo result is 0, the number is evenly divisible, so we add it to our list.
#!/bin/bash
echo "Please enter a number"
read num
echo "Please enter a number to whole number divide on"
read omit
count=1
number=""
mod=0
while [[ $count -le $num ]]; do
mod=$((count%$omit))
if [[ $mod -eq 0 ]]; then
number+="${count},"
fi
count=$((count + 1))
done
#I did the following to omit the last comma
number="${number:0:-1}"
echo "This is the list of numbers less then or equal to $num inwhich every number is evenly divisable by ${omit} ----- ${number}"
While loop with modulo operation - omitting numbers
In this example, we are demonstrating a while loop that finds numbers NOT divisible by a given number. This is similar to the previous example, but we use -ne (not equal) instead of -eq (equal) in the condition. This means we add numbers to our list when the modulo result is NOT 0, which means the number is NOT evenly divisible by the given number.
#!/bin/bash
echo "Please enter a number"
read num
echo "Please enter a number to omit on"
read omit
count=1
number=""
mod=0
while [[ $count -le $num ]]; do
mod=$((count%$omit))
if [[ $mod -ne 0 ]]; then
number+="${count},"
fi
count=$((count + 1))
done
#I did the following to omit the last comma
number="${number:0:-1}"
echo "This is the list of numbers less than or equal to $num with every number NOT evenly divisable by ${omit} ----- ${number}"
While loop processing a file character by character
In this example, we are demonstrating a while loop that processes a file character by character. We first read the entire file into a variable, then use a while loop with an arithmetic expression (( i++ < ${#file} )) to iterate through each character position. Inside the loop, we use expr substr to extract each character, then check if it equals "a". If it does, we echo the position and increment a counter. This demonstrates how to process strings character by character in a loop. The course setup.sh creates ~/playground/chapter12/sometext.txt; run this script from ~/playground/chapter12 or set the path to sometext.txt explicitly.
#!/bin/bash
# Run from ~/playground/chapter12 so sometext.txt (created by setup.sh) is in the current directory
file=$(cat ~/playground/chapter12/sometext.txt)
i=0
count=0
while (( i++ < ${#file} ))
do
char=$(expr substr "$file" $i 1)
if [[ $char == "a" ]]; then
echo "The position number for a is $i and it is $char"
count=$((count + 1))
fi
#echo $count
done
echo $count
The Until Loop
The until loop is similar to the while loop, but it repeats as long as a condition is false. It continues looping until the condition becomes true. This is useful when the exit condition is more naturally expressed than the continuation condition.
When to Use Until Loops
- When you want to repeat until a condition becomes true
- When the exit condition is more naturally expressed than the continuation condition
- When implementing counters that need to reach a specific value
Common Until Loop Options
| Syntax | What It Does | When to Use It |
|---|---|---|
until [[ condition ]] |
Repeats until condition becomes true | When the exit condition is clearer than the continuation condition |
Practical Examples
Basic until loop with counter
In this example, we are demonstrating a basic until loop that continues until the counter is greater than 10. The until loop works opposite to the while loop - it continues as long as the condition is false. So until [[ $count -gt 10 ]] means "continue looping until count is greater than 10", which is the same as while [[ $count -le 10 ]].
#!/bin/bash
count=1
while [[ $count -le 10 ]]; do
echo "Count: $count"
count=$((count + 1))
done
echo "Finished the count is ${count}"
count=1 #reset the counter for the until loop
until [[ $count -gt 10 ]]; do
echo "Count: $count"
count=$((count + 1))
done
echo "Finished the count is ${count}"
Learning Aids
Tips for Success
- Always increment counters inside loops - A while or until loop without changing the condition variable will run forever
- Initialize variables before loops - Set counter variables like
count,number, andmodto their starting values before the loop begins - Use meaningful variable names - Names like
count,num,mod, andnumberare clearer than single letters - Understand modulo operations - The modulo operator (%) is useful for checking divisibility and finding even/odd numbers
- Use string concatenation with += - When building strings in loops, use
variable+="value"to append to the string - Remove trailing characters when needed - Use
${variable:0:-1}to remove the last character from a string (like removing a trailing comma) - Include comments for complex logic - Explain what the loop is doing, especially for loops with modulo operations or string manipulation
- Choose the right comparison operator - Use
-lefor less than or equal,-gtfor greater than,-eqfor equal, and-nefor not equal
Common Mistakes to Avoid
- Forgetting to increment counters - A while loop without changing the condition variable will run forever
- Using the wrong comparison operator - Remember
-leis less than or equal,-gtis greater than - Forgetting to quote variables - Without quotes, variables with spaces can break your loop conditions
- Infinite loops - Always ensure your loop has a valid exit condition that will eventually be met
- Off-by-one errors - Make sure your loop conditions include or exclude the correct boundary values
- Not initializing variables - Always set counter and accumulator variables to their starting values before the loop
- Missing done keywords - Each do needs a matching done to close the loop block
Best Practices
- Keep loops focused - Each loop should have a single, clear purpose
- Break complex tasks into multiple loops - Use separate loops for separate tasks rather than one complex loop
- Handle edge cases - Test what happens with empty input or unexpected values
- Set default values - Initialize variables before using them in loops
- Use comments to explain complex logic - Especially for loops with modulo operations or string manipulation
- Test with small numbers first - Verify functionality with small input values before testing with large numbers
- Increment counters at the end - Place counter increments at the end of the loop body for clarity
Arrays
Arrays help solve the problem of having to create separate variables for related data. Instead of creating variables like fruit1="apple", fruit2="banana", and so on, you can simply use one array to keep everything organized and accessible. This makes your scripts cleaner, more efficient, and easier to maintain.
The course setup.sh script creates ~/playground/chapter12. The examples below do not require any practice files; you can save and run your scripts in ~/playground/chapter12 to keep them with the other chapter 12 materials.
Whether you're managing a list of files to process, storing command results, or working with user inputs, arrays provide a powerful way to keep your data structured and your code elegant. Let's explore how these digital containers can transform the way you handle data in your scripts!
Quick Reference: Array Operations
| Operation | Description | Common Use |
|---|---|---|
array=("item1" "item2" "item3") |
Array declaration and initialization | Creating a new array with predefined values |
${array[index]} |
Access array element by index | Retrieving a specific element from the array |
array[index]="value" |
Assign value to array element | Updating or adding elements at a specific position |
When to Use Arrays
- When you need to store multiple related values
- When you want to iterate through a collection of items
- When order of data matters
- When you need to group command outputs or results
- When processing lists of files, users, or any collection of items
Practical Examples
Creating and initializing an array
In this example, we are creating an array called fruits and initializing it with four values: "apple", "banana", "cherry", and "date". Arrays in bash are created by assigning values in parentheses, with each value separated by spaces and optionally enclosed in quotes. The @ symbol is used to access all elements in the array.
#!/bin/bash
# Initialize the array
fruits=("apple" "banana" "cherry" "date")
echo "Initial fruits array: ${fruits[@]}"
Accessing a specific array element
In this example, we are accessing a specific element from the array using its index. Arrays in bash are zero-indexed, meaning the first element is at index 0, the second at index 1, and so on. We use ${fruits[1]} to access the second element (banana).
#!/bin/bash
fruits=("apple" "banana" "cherry" "date")
# Print the second fruit
echo "The second fruit is: ${fruits[1]}"
Modifying an array element
In this example, we are modifying an existing element in the array by assigning a new value to a specific index. We replace the fourth fruit (at index 3) with "dragonfruit" using fruits[3]="dragonfruit".
#!/bin/bash
fruits=("apple" "banana" "cherry" "date")
# Replace the fourth fruit with 'dragonfruit'
fruits[3]="dragonfruit"
echo "After replacing the fourth fruit with dragonfruit: ${fruits[@]}"
Getting the array length
In this example, we are getting the number of elements in the array using ${#fruits[@]}. The # symbol before the array name gives us the length of the array, which tells us how many elements are stored in it.
#!/bin/bash
fruits=("apple" "banana" "cherry" "date")
# Print the number of fruits
echo "Number of fruits: ${#fruits[@]}"
Adding elements to an array
In this example, we are adding new elements to the end of the array using the += operator. This operator appends one or more elements to the existing array. We can add multiple elements at once by listing them in parentheses.
#!/bin/bash
fruits=("apple" "banana" "cherry" "date")
# Try to add two more fruits
fruits+=("grape" "elderberry")
echo "After attempting to add 'grape' and 'elderberry': ${fruits[@]}"
echo "Number of fruits now: ${#fruits[@]}"
Iterating through array elements
In this example, we are looping through all elements in the array using a for loop. We use "${fruits[@]}" to access all elements, and the loop iterates through each element one at a time. The quotes around ${fruits[@]} are important to preserve spaces in array elements.
#!/bin/bash
fruits=("apple" "banana" "cherry" "date")
# Loop through the array and print a message
echo "Looping through fruits:"
for fruit in "${fruits[@]}"
do
echo "I love $fruit"
done
Learning Aids
Tips for Success
- Always quote array variables - Use
"${array[@]}"instead of${array[@]}to preserve spaces in elements - Remember zero-based indexing - The first element is at index 0, the second at index 1, and so on
- Use meaningful array names - Name arrays to reflect their contents, like
fruitsorvegetables - Iterate arrays carefully - Use
"${array[@]}"in for loops to handle elements with spaces correctly - Use quotes when accessing all elements -
"${array[@]}"properly separates elements even if they contain spaces
Common Mistakes to Avoid
- Forgetting to quote array references - This can cause issues with spaces in array elements
- Using the wrong index - Remember arrays are zero-indexed, so the first element is at index 0, not 1
- Accessing non-existent indexes - Bash silently returns empty strings for non-existent indexes
- Forgetting the $ when accessing elements - Use
${array[index]}notarray[index]to get the value - Not using quotes in loops - Without quotes, elements with spaces will be split incorrectly
Best Practices
- Use arrays instead of multiple variables - Simplifies code and improves maintainability
- Document array contents - Add comments explaining what each array contains
- Initialize arrays with meaningful values - Start with data that makes sense for your script
- Use the += operator to add elements - This is the cleanest way to append to an array
- Always quote array references in loops - Use
"${array[@]}"to preserve element integrity
Chapter 13
String and Numbers
Imagine you're organizing a massive library of books. You need tools to count them, label them, sort them by title, and even rename some. That's exactly what string and number manipulation does in the shell - it helps you organize and process your digital library!
The course setup.sh script creates ~/playground/chapter13 with a file.txt file used in the "Performance Improvement" and "Finding the Longest Word" examples below. Run those scripts from ~/playground/chapter13 or pass the full path to file.txt.
In this chapter, we'll explore how the bash shell gives you powerful tools to work with text (strings) and values (numbers) - skills that make everyday tasks faster and more efficient. Whether you're renaming files, extracting information, or performing calculations, these techniques are your command-line superpowers.
Quick Reference: String and Number Operations
| Operation Type | Description | Common Use |
|---|---|---|
| Parameter Expansion | Manipulate variable contents | Working with variables, setting defaults |
| String Operations | Extract, measure and modify text | Filename manipulation, text processing |
| Case Conversion | Change text between uppercase/lowercase | Normalizing user input, formatting output |
| Arithmetic Expansion | Perform math operations | Counters, calculations, logic checks |
| Bit Operations | Manipulate individual bits in numbers | Setting flags, low-level data manipulation |
Parameter Expansion
Parameter expansion is like having a Swiss Army knife for your variables. It lets you retrieve, modify, and test variable values in many useful ways.
When to Use Parameter Expansion
- When you need to use variable values in your scripts
- When you want to provide default values for missing parameters
- When you need to handle potentially empty variables safely
- When working with filenames that might contain spaces or special characters
Basic Parameters
The simplest form of parameter expansion happens when you use variables with the $ sign:
# Basic variable usage
name="Alice"
echo "Hello, $name" # Outputs "Hello, Alice"
# Using braces to clarify variable boundaries
fruit="apple"
echo "$fruit_pie" # Tries to find variable "fruit_pie" (nothing outputs)
echo "${fruit}_pie" # Outputs "apple_pie"
Always wrap your variables in double quotes ("$variable") to prevent problems with spaces and special characters.
Handling Empty Variables
| Syntax | What It Does | When to Use It |
|---|---|---|
${var:-word} |
Use word if var is empty/unset |
Providing fallback values |
${var:=word} |
Use word if var is empty/unset AND set var to word |
Setting default values |
${var:?word} |
Exit with error if var is empty/unset |
Ensuring required variables exist |
${var:+word} |
Use word only if var is NOT empty |
Conditional text substitution |
# Provide a default value without changing the variable
username=""
echo "Hello, ${username:-"Guest"}" # Outputs "Hello, Guest"
# Set a default value and update the variable
config_file=""
echo "Using config: ${config_file:="default.conf"}" # Sets and outputs "Using config: default.conf"
echo $config_file # Now contains "default.conf"
# Error if a required variable is missing
function send_email() {
${recipient:?"Email recipient not specified"}
# Rest of function...
}
# Add text only when variable exists
title="Professor"
name="Smith"
echo "Hello, ${title:+"$title "}$name" # Outputs "Hello, Professor Smith"
String Operations
String operations are like having text editing tools built right into your command line - they help you measure, extract, and modify text with precision.
When to Use String Operations
- When working with filenames (extracting extensions, directories)
- When processing user input (validation, formatting)
- When generating formatted output
- When you need to modify text without external commands
Common String Operations
| Operation | What It Does | When to Use It |
|---|---|---|
${#var} |
Get string length | Validating input, formatted output |
${var:offset}${var:offset:length} |
Extract substring | Getting parts of text, truncating |
${var#pattern}${var##pattern} |
Remove from beginning (shortest/longest match) | Removing file directories, prefixes |
${var%pattern}${var%%pattern} |
Remove from end (shortest/longest match) | Removing file extensions, suffixes |
${var/pattern/replacement}${var//pattern/replacement} |
Replace text (first occurrence/all) | Text substitution, formatting |
# String length - Validating a password
password="abc123"
if [ ${#password} -lt 8 ]; then
echo "Password too short - needs at least 8 characters"
fi
# Substring extraction - Getting username from email
email="student@university.edu"
username=${email%%@*}
echo "Username: $username" # Outputs "Username: student"
# Filename manipulation - real-world examples
full_path="/home/student/documents/essay.final.docx"
# Get just the filename (remove directories)
filename=${full_path##*/}
echo "Filename: $filename" # Outputs "Filename: essay.final.docx"
# Get just the extension
extension=${filename##*.}
echo "Extension: $extension" # Outputs "Extension: docx"
# Remove the extension
basename=${filename%.*}
echo "Base name: $basename" # Outputs "Base name: essay.final"
# Replace text
text="Hello world"
echo "${text/world/friends}" # Outputs "Hello friends"
Case Conversion
Case conversion is like having an automatic text formatter that can make your text SHOUT or whisper with a simple command.
When to Use Case Conversion
- When normalizing user input for consistent database entries
- When formatting output for display
- When making case-insensitive comparisons
- When enforcing formatting standards
| Syntax | What It Does | Example |
|---|---|---|
${var,,} |
Convert all to lowercase | "ABCdef" → "abcdef" |
${var,} |
Convert first character to lowercase | "ABCdef" → "aBCdef" |
${var^^} |
Convert all to uppercase | "ABCdef" → "ABCDEF" |
${var^} |
Convert first character to uppercase | "aBCdef" → "ABCdef" |
# Normalize user input for consistent data entry
read -p "Enter your state code: " state_code
state_code=${state_code^^} # Convert to uppercase
echo "Normalized state code: $state_code"
# Proper capitalization for names
name="john smith"
first=${name%% *} # Get first name
last=${name##* } # Get last name
# Capitalize first letter of each name
proper_name="${first^} ${last^}"
echo "Formatted name: $proper_name" # Outputs "Formatted name: John Smith"
Arithmetic Operations
Think of arithmetic expansion as having a calculator built right into your command line. No need to open a separate app - just do math directly in your scripts!
When to Use Arithmetic Operations
- When calculating values in scripts
- When using counters in loops
- When performing comparisons
- When working with file sizes, dates, or other numeric data
Common Arithmetic Operations
| Operation | Syntax | Example |
|---|---|---|
| Basic math | $((expression)) |
echo $((2 + 3)) → 5 |
| Increment | $((var++)) or $((++var)) |
Adds 1 to variable |
| Decrement | $((var--)) or $((--var)) |
Subtracts 1 from variable |
| Assignment | $((var = expression)) |
Sets variable to result |
| Compound assignment | $((var += expression)) |
Shorthand for var = var + expression |
# Simple calculator
read -p "Enter first number: " num1
read -p "Enter second number: " num2
sum=$((num1 + num2))
echo "Sum: $sum"
# Loop with counter
echo "Countdown:"
for ((i=10; i>=0; i--)); do
echo "$i..."
# In real script, you might add: sleep 1
done
echo "Blast off!"
# Converting units - KB to MB
size_kb=2584
size_mb=$((size_kb / 1024))
echo "Size: $size_mb MB"
# Using shortcuts for counters
count=0
echo "Initial count: $count"
echo "Post-increment: $((count++))" # Uses current value, then increments
echo "New count: $count" # Now shows 1
echo "Pre-increment: $((++count))" # Increments first, then uses value
echo "Final count: $count" # Now shows 2
Bit Operations
Bit operations are like having microscopic switches you can flip on and off within a number. They're especially useful in system programming and when working with flags or binary data.
When to Use Bit Operations
- When working with binary flags
- When performing low-level system operations
- When optimizing for speed or space
| Operation | Symbol | What It Does |
|---|---|---|
| Bitwise AND | & |
Sets bits that are on in both numbers |
| Bitwise OR | | |
Sets bits that are on in either number |
| Bitwise XOR | ^ |
Sets bits that are on in one number but not both |
| Left Shift | << |
Shifts bits left (multiplies by 2^n) |
| Right Shift | >> |
Shifts bits right (divides by 2^n) |
# Using bit shifts for quick multiplication/division by powers of 2
echo $((1 << 3)) # 1 × 2³ = 8
echo $((16 >> 2)) # 16 ÷ 2² = 4
# Setting and checking flags
# Example: Permissions flags (read=4, write=2, execute=1)
permissions=0 # No permissions
permissions=$((permissions | 4)) # Add read permission
permissions=$((permissions | 1)) # Add execute permission
echo "Permissions value: $permissions" # Shows 5
# Check if read permission is set (using bitwise AND)
if (( (permissions & 4) != 0 )); then
echo "Read permission is set"
fi
Logic and Comparison Operations
Logic operations let you make decisions based on conditions, like a digital fork in the road for your script.
# Age verification with ternary operator
age=20
status=$(( age >= 21 ? "allowed" : "underage" ))
echo "Drinking status: $status"
# Checking multiple conditions
temperature=72
humidity=65
comfort_level=$(( (temperature > 65 && temperature < 75) &&
(humidity > 40 && humidity < 70) ?
"comfortable" : "uncomfortable" ))
echo "Current conditions are $comfort_level"
# Using (( )) for conditions in if statements
count=5
if (( count > 0 && count < 10 )); then
echo "Count is between 1 and 9"
fi
Tips for Success
- Always quote your variables (
"$var") to prevent word splitting issues with spaces - Use parameter expansion instead of external commands like
cutorsedwhen possible - it's much faster - Use
declare -ifor variables you only use for integers to help catch errors - Test your string operations on edge cases (empty strings, special characters)
- Remember that bash arithmetic only works with integers (no floating point)
Common Mistakes to Avoid
- Forgetting to quote variables, especially when they might contain spaces
- Trying to use floating-point math in bash arithmetic (use
bccommand instead) - Forgetting that
${var#pattern}and${var##pattern}match from the beginning - Forgetting that
${var%pattern}and${var%%pattern}match from the end - Using backticks (`` `command` ``) instead of
$(command)for command substitution
Best Practices
- Use parameter expansion over external commands when possible for better performance
- Handle empty variables safely using default values (
${var:-default}) - Use meaningful variable names that describe their purpose
- Comment your complex parameter expansions to explain what they do
- Test for edge cases (empty strings, special characters, numeric limits)
Example: Performance Improvement
Look at how parameter expansion can dramatically improve performance in real scripts:
# Original slow version - took 3.618 seconds
# (using external commands)
# Run from ~/playground/chapter13 where setup.sh created file.txt
for word in $(cat ~/playground/chapter13/file.txt); do
len=$(echo -n $word | wc -c)
# ... rest of script
done
# Improved fast version - took only 0.06 seconds
# (using parameter expansion)
for word in $(cat ~/playground/chapter13/file.txt); do
len=${#word}
# ... rest of script
done
That's a 60x performance improvement by using parameter expansion!
Example: Finding the Longest Word
#!/bin/bash
# longest-word: find longest string in a file
# Usage: ./longest-word ~/playground/chapter13/file.txt
# Setup.sh creates file.txt in ~/playground/chapter13
# Explain what we're doing
echo "Finding the longest word in your files..."
for filename; do
if [[ -r "$filename" ]]; then
max_word=
max_len=0
# Process each word in the file
for word in $(cat "$filename"); do
# Use parameter expansion to get length (much faster)
len="${#word}"
# Check if this word is longer than current max
if (( len > max_len )); then
max_len="$len"
max_word="$word"
fi
done
echo "$filename: '$max_word' ($max_len characters)"
else
echo "Error: Cannot read '$filename'" >&2
fi
done
Example: Counting Letters in a String
This example shows how to count occurrences of a specific letter in a string using a while loop and parameter expansion.
#!/bin/bash
# count-letters: counts occurrences of a specific letter in a string
# Define a string with both uppercase and lowercase 'A'
myString="Alice was Amazed At the Apple and Ate it All. Amazing!"
echo "Original string: $myString"
# Convert to lowercase using parameter expansion
myString=${myString,,} # Convert to lowercase
echo "Lowercase string: $myString"
# Initialize counter and index
count=0
i=0
# Loop through each character of the string
while (( i++ < ${#myString} )); do
# Extract the current character
char=$(expr substr "$myString" $i 1)
# Check if character is 'a' and increment counter
if [[ "$char" == "a" ]]; then
((count++))
fi
done
# Display the result
echo "The letter 'a' appears $count times in the string."
This example demonstrates:
- Using case conversion with
${string,,}to normalize input - Getting string length with
${#string} - Using a while loop with counters
- Extracting individual characters from a string
Example: Validating Numeric Input
This example shows how to validate that user input contains only numbers, which is useful when creating scripts that perform calculations.
#!/bin/bash
# validate-numbers: ensures input values are numeric
# Function to check if input is a number
check_num() {
# Check if parameter contains at least one digit
num=`echo $1 | grep '[0-9]'`
# Check if parameter contains any non-digit characters
non_digit=`echo $1 | grep '[^0-9]'`
if [ "$num" = '' ] || [ "$non_digit" != '' ]; then
echo "Error: '$1' is not a valid number"
return 1
fi
return 0
}
# Get two numbers from user
read -p "Enter first number: " num1
read -p "Enter second number: " num2
# Validate both inputs
if check_num "$num1" && check_num "$num2"; then
# If both are valid, perform a calculation
sum=$((num1 + num2))
echo "The sum of $num1 and $num2 is $sum"
else
echo "Please try again with valid whole numbers"
exit 1
fi
This example demonstrates:
- Creating and using shell functions
- Using grep to validate input patterns
- Checking for both the presence of digits and absence of non-digits
- Using return values to communicate success/failure
- Performing conditional arithmetic operations
With these examples and the techniques covered in this chapter, you now have powerful tools to manipulate strings and numbers in your shell scripts!
Troubleshooting Bash Scripts
Programmers are problem solvers at heart. When you code, you're constantly breaking down complex tasks into logical steps. Troubleshooting is simply an extension of this problem-solving mindset - identifying issues, diagnosing their causes, and implementing solutions.
The course setup.sh script creates ~/playground/chapter13 with notes.txt (42 lines) and report.txt (157 lines) for the "Step-by-Step Analysis" trace example below. Run that script from ~/playground/chapter13 to see it process those files.
Everyone's code breaks sometimes - even experienced programmers. This chapter will equip you with the problem-solving tools to diagnose issues, understand error messages, and fix your scripts. Think of troubleshooting as a puzzle to solve, where each error message is a clue that leads you closer to a working solution.
Quick Reference: Troubleshooting Techniques
| Technique | Description | Common Use |
|---|---|---|
| Syntax Checking | Identify missing quotes, brackets, etc. | When script won't run at all |
| Tracing | Watch script execution step-by-step | When script runs but behaves unexpectedly |
| Echo Debugging | Display variable values during execution | When you need to see data at specific points |
| Defensive Programming | Add safeguards to prevent errors | When building robust, reliable scripts |
| Commenting Out | Disable sections of code temporarily | When isolating problem areas |
Finding Syntax Errors
Syntax errors are like pieces that don't fit in your puzzle. The shell can't understand what you're asking it to do, so it refuses to run your script.
When to Look for Syntax Errors
- When you see error messages about "unexpected tokens"
- When your script refuses to run at all
- After making changes to a previously working script
- When learning new bash features
Common Syntax Errors
| Error Type | What Happens | How to Prevent |
|---|---|---|
| Missing Quotes | Shell keeps looking for closing quote | Use syntax highlighting; count your quotes |
| Missing Tokens | Commands like if/then are incomplete |
Use templates or snippets for complex structures |
| Empty Variables | Commands receive incorrect arguments | Quote your variables: "$variable" |
Example: The Missing Quote Problem
Spot the error in this script:
# Buggy script
#!/bin/bash
echo "Hello, welcome to my script!
echo "Let's get started."The error message might look like:
/home/student/script.sh: line 5: unexpected EOF while looking for matching `"'
/home/student/script.sh: line 6: syntax error: unexpected end of fileThe problem solving:
- The error mentions a missing quote (
") - Notice the first echo doesn't have a closing quote
- The error appears at the end of the file (lines 5-6), not where the actual error is (line 3)
The fix:
# Fixed script
#!/bin/bash
echo "Hello, welcome to my script!" # Added closing quote
echo "Let's get started."Example: The Missing Semicolon Problem
# Buggy script
#!/bin/bash
number=1
if [ $number = 1 ] then
echo "Number equals 1"
else
echo "Number doesn't equal 1"
fiThe error message:
/home/student/script.sh: line 6: syntax error near unexpected token `else'
/home/student/script.sh: line 6: `else'The problem solving:
- The error points to the
elsestatement - However, the actual problem is in the
ifstatement - The
ifcondition needs either a semicolon (;) or a newline beforethen
The fix:
# Fixed script
#!/bin/bash
number=1
if [ $number = 1 ]; then # Added semicolon
echo "Number equals 1"
else
echo "Number doesn't equal 1"
fiSolving Logical Errors
Logical errors are trickier - your script runs without errors, but doesn't do what you expect. It's like having all the puzzle pieces connected, but forming the wrong picture.
When to Look for Logical Errors
- When your script runs but produces incorrect results
- When a script works with some inputs but fails with others
- When loops don't iterate the expected number of times
- When conditions don't evaluate as expected
Common Logical Errors
| Error Type | What Happens | How to Find It |
|---|---|---|
| Off-by-one errors | Loops run one time too many or too few | Print counter values; check bounds |
| Incorrect conditions | If/then logic fails or always takes one path | Echo condition results before decisions |
| Unexpected data formats | Script assumes data it receives has specific format | Validate input; print received values |
Example: The Always-True Condition Problem
# Buggy script - supposed to check if user input is valid
#!/bin/bash
read -p "Enter a number between 1 and 10: " user_input
# This condition has a logical error
if [ $user_input -ge 1 -o $user_input -le 10 ]; then
echo "Valid input!"
else
echo "Invalid input!"
fiThe problem:
This condition is always true! If user_input is 20, it's not >= 1 but it is <= 10. The condition uses OR (-o) when it should use AND (-a).
The fix:
# Fixed script
#!/bin/bash
read -p "Enter a number between 1 and 10: " user_input
# Fixed condition
if [ $user_input -ge 1 -a $user_input -le 10 ]; then
echo "Valid input!"
else
echo "Invalid input!"
fiThis example demonstrates how logical operators can be confused, leading to unexpected behavior without any syntax errors.
Defensive Programming
Defensive programming is like wearing a seatbelt when driving - it's not about preventing accidents, but surviving them when they happen. Good scripts anticipate problems before they occur.
When to Use Defensive Programming
- When your script could receive unexpected input
- When your script performs potentially dangerous operations (like deleting files)
- When writing scripts that others will use
- When your script depends on external resources (files, network, etc.)
Common Defensive Techniques
| Technique | What It Does | Example |
|---|---|---|
| Check if files/directories exist | Prevents operations on non-existent resources | [[ -f "$filename" ]] |
| Validate command success | Only continues if previous commands worked | command1 && command2 |
| Quote variables | Prevents word splitting and globbing issues | "$variable" |
| Validate input | Ensures data meets expected format | [[ $input =~ ^[0-9]+$ ]] |
Example: The Case of the Dangerous Delete
This script is dangerous - it might delete files you didn't intend to delete:
# Dangerous script
#!/bin/bash
# Script to clean a directory
directory=$1
cd $directory
rm * # DANGER! What if cd failed?The problems:
- If
$directorydoesn't exist,cdwill fail silently - The script will then delete files in the current directory!
- No confirmation or validation occurs before deletion
The safer version:
# Safe script
#!/bin/bash
# Script to clean a directory
directory="$1" # Quotes prevent word splitting
# Check if directory parameter was provided
if [[ -z "$directory" ]]; then
echo "Error: No directory specified" >&2
echo "Usage: $0 directory_name" >&2
exit 1
fi
# Check if directory exists
if [[ ! -d "$directory" ]]; then
echo "Error: Directory '$directory' does not exist" >&2
exit 1
fi
# Try to change to the directory
if ! cd "$directory"; then
echo "Error: Cannot change to directory '$directory'" >&2
exit 1
fi
# Ask for confirmation before deleting
echo "About to delete all files in $(pwd)"
read -p "Are you sure? (y/n): " confirm
if [[ "$confirm" == "y" || "$confirm" == "Y" ]]; then
echo "Deleting files..."
rm *
echo "Done."
else
echo "Operation cancelled."
fiThis safer version:
- Quotes the directory parameter to handle spaces
- Checks if the directory parameter was provided
- Verifies the directory exists before trying to use it
- Confirms the directory change was successful
- Asks for confirmation before deleting
- Shows where error messages come from by using the script name ($0)
Debugging Techniques
When your script isn't working correctly, you need tools to analyze the problem. These techniques help you observe what's happening inside your script to diagnose the issue.
When to Use Debugging
- When you're not sure what part of your script is failing
- When you need to see the values of variables during execution
- When you want to follow the exact path your script is taking
- When commands are producing unexpected results
Common Debugging Techniques
| Technique | What It Does | When to Use It |
|---|---|---|
| Echo debugging | Displays variable values at key points | When specific variables have unexpected values |
Tracing (set -x) |
Shows each command as it executes | When you need to see the execution flow |
| Commenting out | Temporarily disables code sections | When isolating which section causes a problem |
| Test stubs | Replace real commands with echo/test versions | When testing potentially destructive operations |
Example: The Mysterious Variable Problem
Let's debug a script with echo statements:
# Script with echo debugging
#!/bin/bash
# Calculate a discount
price=$1
discount_rate=$2
echo "DEBUG: price = $price, discount_rate = $discount_rate" # Debug line
discount=$(echo "$price * $discount_rate" | bc -l)
final_price=$(echo "$price - $discount" | bc -l)
echo "DEBUG: discount = $discount, final_price = $final_price" # Debug line
echo "Original price: $price"
echo "Discount: $discount"
echo "Final price: $final_price"By adding the DEBUG echo statements, you can see exactly what values your variables have at each stage of calculation, helping identify where problems might occur.
Example: The Step-by-Step Analysis
Using trace mode to see every command as it executes. Run this script from ~/playground/chapter13 so it finds notes.txt and report.txt (created by setup.sh); the output will match the example below.
# Script with tracing
#!/bin/bash
# Process a list of files
# Run from ~/playground/chapter13 (contains notes.txt and report.txt from setup.sh)
echo "Starting file processing..."
# Turn on tracing just for this section
set -x
for file in *.txt; do
if [[ -f "$file" ]]; then
lines=$(wc -l < "$file")
echo "$file has $lines lines"
fi
done
set +x # Turn off tracing
echo "Processing complete!"When run from ~/playground/chapter13, this will show each command in the loop as it executes. The output might look like:
Starting file processing...
+ for file in '*.txt'
+ [[ -f notes.txt ]]
+ wc -l
+ lines=42
+ echo 'notes.txt has 42 lines'
notes.txt has 42 lines
+ for file in '*.txt'
+ [[ -f report.txt ]]
+ wc -l
+ lines=157
+ echo 'report.txt has 157 lines'
report.txt has 157 lines
+ set +x
Processing complete!This helps you see exactly which files are being processed, which conditions are being met, and what values are being assigned.
Testing Your Scripts
Testing is like a fire drill - it's better to find problems during practice than during a real emergency. Testing scripts helps catch problems before they cause real damage.
When to Test Scripts
- After writing a new script
- After making changes to an existing script
- Before running a script that performs critical operations
- When moving a script to a new environment
Testing Techniques
| Technique | What It Does | Best For |
|---|---|---|
| Safe mode testing | Replace destructive commands with echo | Scripts that delete/modify files |
| Edge case testing | Test extreme or unusual inputs | Scripts that process user input |
| Test data | Create sample files/data for testing | Scripts that process files |
| Early exit | Add exit commands to stop at specific points |
Testing specific sections of longer scripts |
Example: Safe Testing Mode
# Script with safe testing mode
#!/bin/bash
# Script to archive old logs
log_dir="/var/log"
archive_dir="/backup/logs"
days_old=30
# Set to "true" for testing, "false" for real operation
TESTING="true"
find_old_logs() {
find "$log_dir" -name "*.log" -type f -mtime +$days_old
}
if [[ "$TESTING" == "true" ]]; then
echo "TEST MODE: Would process these files:"
find_old_logs
echo "TEST MODE: Would move files to $archive_dir"
echo "TEST MODE: Would compress files after moving"
exit 0 #This prevents the script from going to the end.
fi
# Real operations (only run if TESTING is false)
if [[ ! -d "$archive_dir" ]]; then
mkdir -p "$archive_dir"
fi
for log_file in $(find_old_logs); do
base_name=$(basename "$log_file")
mv "$log_file" "$archive_dir/$base_name"
gzip "$archive_dir/$base_name"
echo "Archived: $base_name"
doneThis script includes a testing mode that shows what would happen without actually moving or compressing files. By setting TESTING="true", you can safely see which files would be affected before running it for real.
How the test flag works:
- When
TESTING="true", the script enters the first if-block, shows what it would do, thenexit 0terminates the script before reaching the real operations - When
TESTING="false", the if-condition evaluates to false, the script skips that block and continues to the actual file operations - This pattern (early exit) is common in bash for creating "dry run" modes that show what would happen without making actual changes
Tips for Success
- Always test scripts with sample data before using real data
- Start with small, working scripts and build up complexity gradually
- Keep a backup of any files your script might modify
- Use meaningful variable names that indicate what data they contain
- Add comments explaining what complex sections of code do
- Test your error handling by deliberately causing errors
- Check exit status after critical commands with
echo $?
Common Mistakes to Avoid
- Forgetting to quote variables that might contain spaces
- Assuming directories or files exist without checking
- Using
rm -rfwithout verifying what you're deleting - Confusing test operators like
-eq(numeric) vs=(string) - Ignoring error messages and return codes
- Writing complex one-liners that are hard to debug
- Using hardcoded paths that might not exist on other systems
Best Practices
- Add a descriptive comment header to every script explaining its purpose
- Include usage information that prints when incorrect parameters are provided
- Redirect error messages to stderr with
>&2 - Use meaningful exit codes (0 for success, non-zero for specific errors)
- Handle unexpected input gracefully instead of crashing
- Develop incrementally - write, test, then add more features
- Use functions to organize code and avoid duplication